Featured Articles
If you have accidentally deleted Sticky Notes, now you get four ways to recover Sticky Notes and regain the contents written on them. You can look for the Sticky Notes .snt files directly by your search, check the Outlook folder, show hidden Sticky Notes, or leave the mess to professional data recovery software.
| Workable Solutions | Step-by-step Troubleshooting |
|---|---|
| Fix 1. Use Data Recovery Software | Use EaseUS Data Recovery Wizard to recover deleted .snt file. Scan your C drive for deleted files...Full steps |
| Fix 2. Recover from .snt Files | Navigate to C:\Users\AppData\Roaming\Microsoft\Sticky Notes director...Full steps |
| Fix 3. Restore notes from Outlook | Sticky Notes syncs files to the cloud, you can recover deleted notes from Microsoft Outlook account...Full steps |
| Fix 4. Restore from previous version | Windows file backup tool can automatically back up certain files. Restore deleted Sticky Notes from...Full steps |
Overview of Accidentally Deleted Sticky Notes Issue
"Does anyone have any idea on how to recover accidentally deleted Sticky Notes contents? I am a big fan of the Sticky Notes program and get used to writing down everything by creating Sticky Notes on Windows desktop. That's it, 1, 2, 3...then more and more Sticky Notes there. However, today, 12 pieces of notes were accidentally deleted, and they didn't go to the recycling bin! How to perform sticky notes recovery?"

Sticky Notes doesn't have the archive feature, which means clicking on the delete button will directly delete it. Fortunately, there are four practical ways to recover Sticky Notes.
Method 1. How to Recover Sticky Notes with Data Recovery Software
When using the Sticky Notes program to create notes on the desktop, you can't save the notes locally. You can minimize the notes, but if you delete notes accidentally or intentionally, you lose all data. The only way to recover Sticky Notes is by using the way demonstrated above.
EaseUS Sticky Notes Recovery Software Free Download
If you delete the .snt file mistakenly or if the .snt file is lost due to hard drive formatting, partition loss, or RAW partition, is that the end of the recovery attempt? Not exactly, if you can't find the .snt file to recover Sticky Notes, you can turn to EaseUS EaseUS Data Recovery Wizard for help, which enables you to easily recover the file and restore Sticky Notes easily in Windows 10/8/7/XP/Vista.
In fact, besides restoring Sticky Notes .snt files, the program can recover many other types of files, including Word, Excel, PPT documents, photos, audios, videos, and more. It offers an easy solution to recover deleted files, even recover files from emptied Recycle Bin. Now, learn how to recover accidentally deleted Sticky Notes on Windows with EaseUS data recovery software.
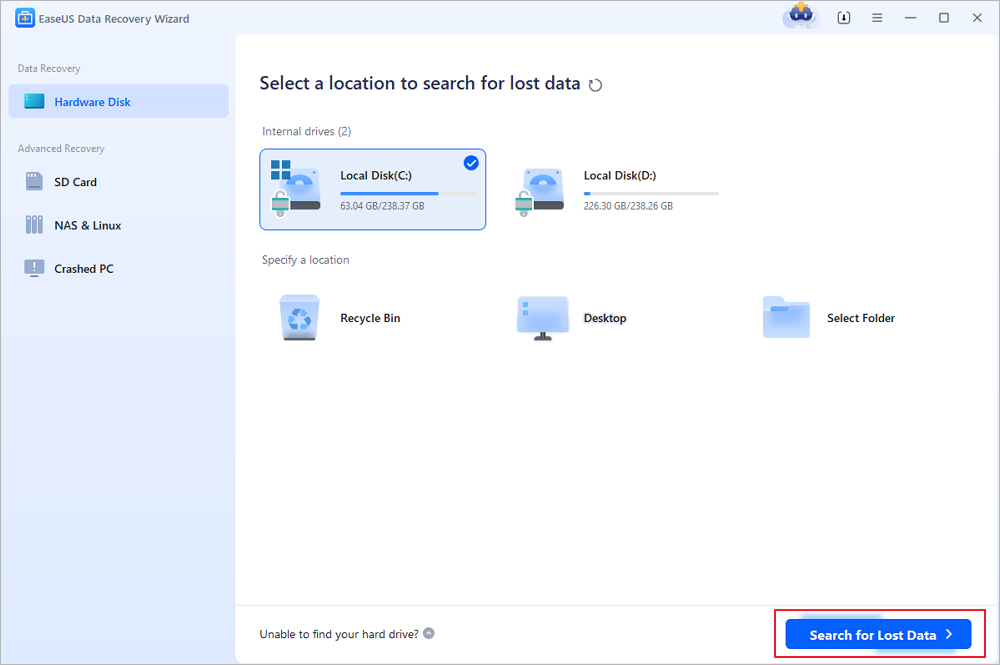
Step 1. Select a location and start scanning
Launch EaseUS Data Recovery Wizard, hover on the partition/drive where the deleted files were stored. Click "Scan" to find lost files.
Step 2. Select the files you want to recover
When the scanning has finished, select the deleted files you want to recover. You can click on the filter to display only the file types you want. If you remember the file name, you can also search in the "Search files or folders" box, which is the fastest way to find the target file.

Step 3. Preview and recover deleted files
Preview the recoverable files. Then, select files you want to restore and click "Recover" to store the files at a new storage locations instead of the disk where the data was previously lost.

After the .snt file has been recovered, you can manually filter the needed data, as explained in the following method.
Method 2. How to Recover Sticky Notes from .snt Files
If you close the Sticky Note by right-clicking it on the taskbar, it closes the Sticky Note application. Next time you open Sticky Notes, your data will return. The same also applies if you leave the Sticky Notes up when rebooting your computer. If you delete the Sticky Notes by hitting "Delete Note" accidentally, your best chance to recover deleted Sticky Notes is as shown below.
Step 1. Navigate to where the Sticky Notes are stored: C:\Users\AppData\Roaming\Microsoft\Sticky Notes director.
Step 2. Find the .snt file. You can't open the file the usual way. Therefore, you need to right-click the file and open it with a text editor like MS Word, WordPad, Notepad, etc.
The editor (like MS Word) will ask you to decode the file. Choose the default actions and proceed. Then, use the search feature (Ctrl+F) to find the content of your deleted notes.

Method 3. How to Recover Sticky Notes from Outlook Deleted Folder
Every time you delete a note, a copy of the same is stored in the Trash folder of Outlook. All you need to do is open the web version of Outlook and follow the steps below:
Step 1. Open Outlook with a browser and sign in with your Microsoft account.
Step 2. Select "Deleted" in the left sidebar. You will see all the notes you to be recovered.
Step 3. Find the deleted Sticky Notes that you need to restore.

Method 4. Recover Deleted Sticky Notes from Previous Versions
Another way to restore deleted Sticky Notes is to apply the Restore Previous Versions feature on Windows. Once you've enabled file backup on your Windows 10, it will automatically save specific files/folders frequently. Then, you can restore from the backup once the data is lost.
Step 1. Find the Sticky Notes .snt file, right-click on it and select "Properties".
Step 2. Under the Previous Versions tab, you will see the previous versions of Sticky Notes. If there is a previous version, select it, and click on "Restore", "Apply", and "OK".

Extra Tips - Enable Delete Confirmation for Sticky Notes
You may delete a note easily by mistake. The latest Windows 10 version provides delete confirmation to avoid deleting Sticky Notes by mistake. You can go to "Settings" and enable the "Confirm before deleting" option. When you click the trash icon, a pop-up window will ask "Do you want to delete this note", you can choose Delete or Keep. Besides, don't choose the "Don't ask me again" option.

How to Create a Backup of Sticky Notes to Avoid Data Loss
You can only recover deleted Sticky Notes from .snt file if you have enabled the File History or system backup feature on a Windows computer. Except for automatic backup, you also can back up your sticky notes manually. To backup your Sticky Notes on Windows 10, do the following:
Step 1. Navigate to the path:
C:\Users\AppData\Local\Packages\Microsoft.MicrosoftStickyNotes_8wekyb3d8bbwe\LocalState
Step 2. Right-click the plum.sqlite file, and select Copy. You can store your Sticky Notes anywhere you like. Once you complete these steps, next time, you can restore your notes when the loss happens.

If you want to restore the backup of your Sticky Notes, you need to put the plum.sqlite file in the same place where it saves. Then, open Sticky Notes, and all your notes should now appear on your desktop exactly in the same location where you left them.
Important: You can replace an existing plum.sqlite, but if you do, you'll delete any previous notes already stored on the device.
Conclusion
That's all about how to recover deleted sticky notes. Besides sticky notes recovery, EaseUS Data Recovery Wizard can restore deleted Word documents, videos, photos, and repair corrupted MP4 or MOV files. Download this hard drive recovery software and retrieve your data.
Was This Page Helpful?
Cedric Grantham is a senior editor and data recovery specialist of EaseUS. He mainly writes articles and how-to tips about data recovery on PC and Mac. He has handled 10,000+ data recovery cases and is good at data recovery of NTFS, FAT (FAT32 and ExFAT) file systems, and RAID structure reorganization.
Jean is recognized as one of the most professional writers in EaseUS. She has kept improving her writing skills over the past 10 years and helped millions of her readers solve their tech problems on PC, Mac, and iOS devices.
Related Articles
-
Best 8 Microsoft Office File Recovery Software [2024]
![author icon]() Dany/Jan 09, 2024
Dany/Jan 09, 2024 -
How to Recover Unsaved or Deleted PSD (Photoshop) Files in 2024
![author icon]() Tracy King/Jan 30, 2024
Tracy King/Jan 30, 2024 -
How to Recover Deleted Windows.old Folder in Windows 11/10
![author icon]() Jean/Oct 25, 2023
Jean/Oct 25, 2023 -
How to Fix Cannot Start Microsoft Office Outlook Error on Windows 11/10/8/7
![author icon]() Jaden/Feb 04, 2024
Jaden/Feb 04, 2024