Table of Contents
![]() About the Author
About the Author
![]() Reviews and Awards
Reviews and Awards
- Video Recovery
- SD Card Recovery
- Recycle Bin Recovery
- Recover Data from USB
- Recover Deleted Emails
- Hard Drive Not Showing Up in Windows
- Recover Unsaved Word Documents
- Recover Deleted Files
- Recover Files from Virus Infected Hard Drive
- Best Free Photo Recovery Software
- Recover Files from Formatted Hard Drive
Here in this article, you will learn how to mount the ISO images in windows 10/11 and the significant problems faced by people mounting ISO images in Windows 10 and 11. Here, you will also get to know how to restore your deleted iso files safely.
So without further ado, dive into the details described below and benefit yourself.
ISO Image Overview
First of all, before proceeding with the methods of mounting ISO images, you should know what an ISO image is.
An ISO image is a disc image that serves as that of an archive file for all sector data included on an optical disc, along with the file system. The ISO file extension is obtained from the ISO 9660 file system, used in CD-ROM medium. Despite these, the ISO image also consists of the Universal Disk Format (UDF) system of files which you can comfortably use on the Blu-Ray disks and DVDs.
Here are the various methods to help you mount ISO images in Windows 10/11 without any problems.
How to Mount ISO Windows 10 to USB with File Explorer
The first method to mount an iso file is through File Explorer. Here using file explorer, there come out three distinct ways. So we have described all these three methods in detail, so we look forward and letting the ISO image be mounted successfully.
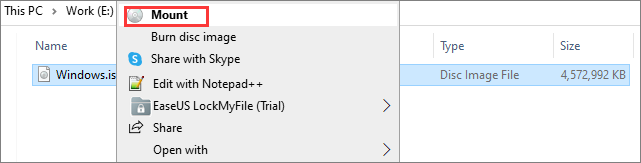
1. Use the Context Menu to Mount a Picture
The easiest way to mount the iso file with File Explorer is through the context menu. Its steps are given below.
Step 1. Go to File Explorer. Search for the folder containing the ISO image file.
Step 2. Once you find the folder, click right on the ISO file.
Step 3. Now click the "Mount" option from the context menu.
Step 4. Select a virtual drive from the panel on the left side.
2. Double Click to Mount the Image
The second easiest way to mount an iso file with File Explorer has been explained underneath in easy steps.
Step 1. Press the Win + E keys to open File Explorer.
Step 2. Now, search for the folder which contains the ISO image file.
Step 3. Once you find the folder, and then double-click the iso file.
Step 4. After double-clicking, the File will open in the form of a separate folder. Then there, you can extract and access the content as per your requirement.
3. Mount ISO File by Using the Mount Option Located in the Ribbon Menu
Apart from the above two steps, if you want to mount an ISO image or File from the ribbon menu, follow the steps below.
Step 1. Go to File Explorer.
Step 2. Now, search for the folder which contains the ISO image file. Then, choose the ISO file.
Step 3. At the top of the screen, there is an option "Disc image tools." Just click on it.
Step 5. Select the "Mount" option, which can be found in the top left corner of the screen.
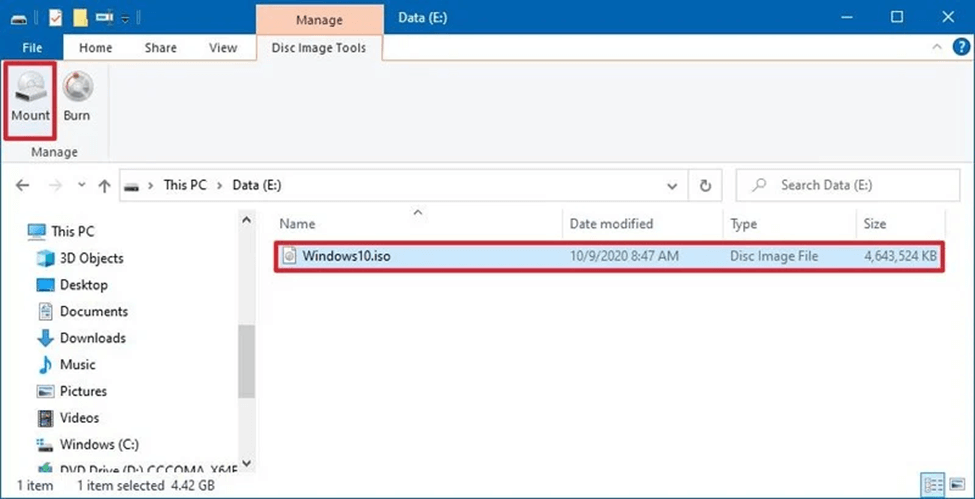
Users mostly do not see the "Mount" option on the menu bar due to having third-party tools employed to open and run the compressed files. These tools are set to default for opening iso images in such cases. Hence if you do not see the mount option in the ribbon menu, follow up on the other two ways to mount the iso image with File Explorer.
How to Mount ISO Image Using Windows PowerShell
Some users want to use a pre-installed application in Windows 10 and 11 called Command Line Interface. In this situation, you can mount iso with Powershell. Accordingly, see the following steps to mount the iso file with the PowerShell command.
Step 1. Click the "Start" option on your computer/laptop. Search for Powershell.
Step 2. Now click right on it to run it as an administrator.
Step 3. Paste the following command and hit Enter: Mount-DiskImage -ImagePath "CompletePathToISO.iso".
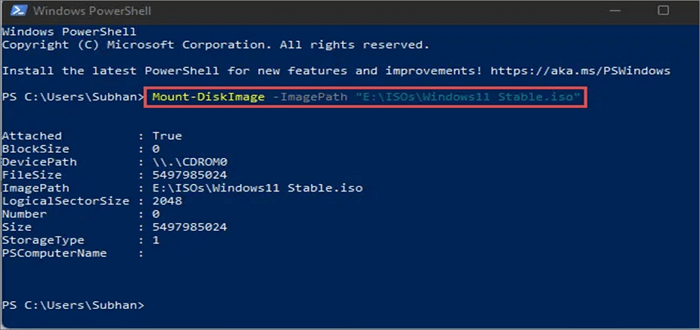
In this command, make sure to write the actual path to the iso file that you wish to mount in the place of CompletePathToISO. After that, you are all done mounting iso files in Windows 10 and 11. You can look at the example given below for your better understanding.
How to Recover Deleted or Lost ISO Image File Quickly
ISO is generally large and can be used repeatedly by users. Users who accidentally deleted their ISO files can use EaseUS data recovery program for help. This file recovery tool enables users to restore deleted files in any file type from any device like HDD, SSD, USB flash drive, external hard drive, etc.
This tool benefits you with one data recovery (from damaged, corrupted, formatted, or RAW hard drives). You can quickly get back 1000+ file types through this data recovery software in just three simple steps without using any hard and fast rules and techniques.
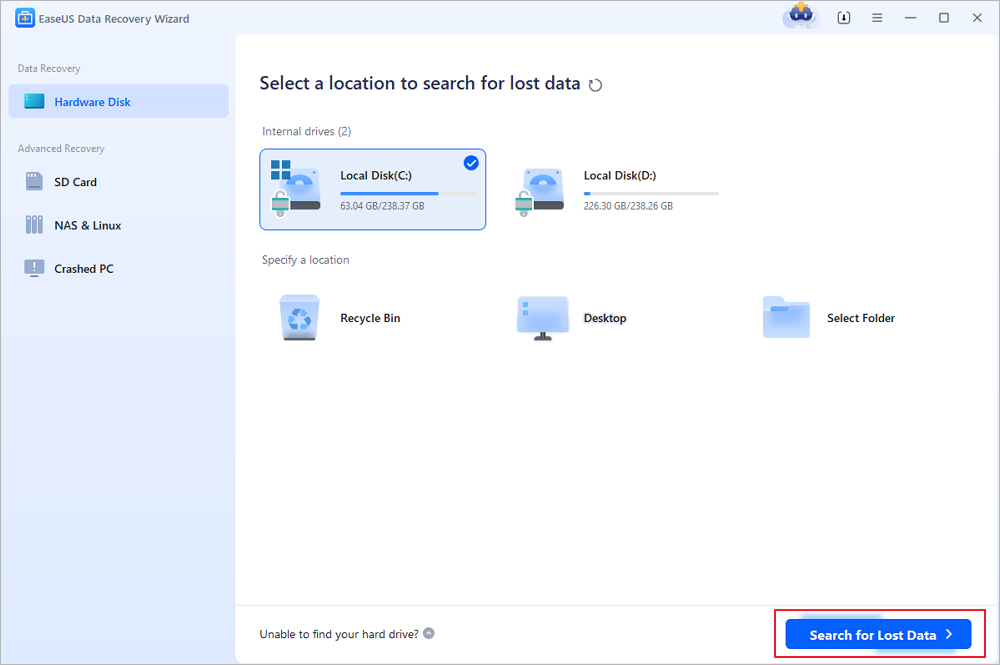
Step 1. Select the location to scan
Choose the specific device and drive where you have permanently deleted files using Shift delete or emptying recycle bin. Then, click the "Scan" button to find lost files.
Step 2. Check the results
The software will automatically start scanning all over the selected drive. When the scan completes, select the "Deleted Files" and "Other Lost Files" folders in the left panel. Then, apply the "Filter" feature or click the "Search files or folders" button to quickly find the deleted files.

Step 3. Recover deleted files
Select the deleted files and click "Preview". Next, click "Recover" to save them to another secure location or device.

Windows 10 Mount ISO Option Missing, How to Fix
Some users reported that when they right-clicked on. ISO files, the "Mount" option disappeared from the context menu. If this ever happens to you, follow up on the below-mentioned methods for restoring or adding the Mount option to the context menu.
Fix 1. Add Missing Mount Option Using Properties
If you want to quickly restore the mount option without spending too much time on the process, you should see the steps given below by using the Properties option.
Step 1. Go to the File Explorer. Navigate to the folder that contains the ISO file
Step 2. Simply right-click on the ISO file. Then, select the "Properties" > "Change".

Step 3. Choose the "File Explorer" from the list. Click OK and Apply.

After following these steps, you will see the mount option whenever you right-click on the iso file.
Fix 2. Restore the Missing Mount Option Using Settings
The mount option will directly appear in the context menu by choosing the file explorer from the settings app.
Step 1. Search and select the "Settings" app on your device.
Step 2. Click the "Apps" and then Default apps
Step 3. Click "Set Defaults by Apps."
Step 4. Select the "Windows Disc Image Burner" and click the "Manage" option.

Step 5. Select the "File Explorer" as the default app for iso files.
Step 6. Now the mount option will be visible to you in the context menu.
Fix 3. Add Mount ISO Option Using Control Panel
You can also use the control panel for restoring the mount option by carrying out the below steps.
Step 1. Go to "Control Panel > Programs > Default Programs".
Step 2. Click "Set your default programs".

Step 3. Click "Choose defaults for this program".
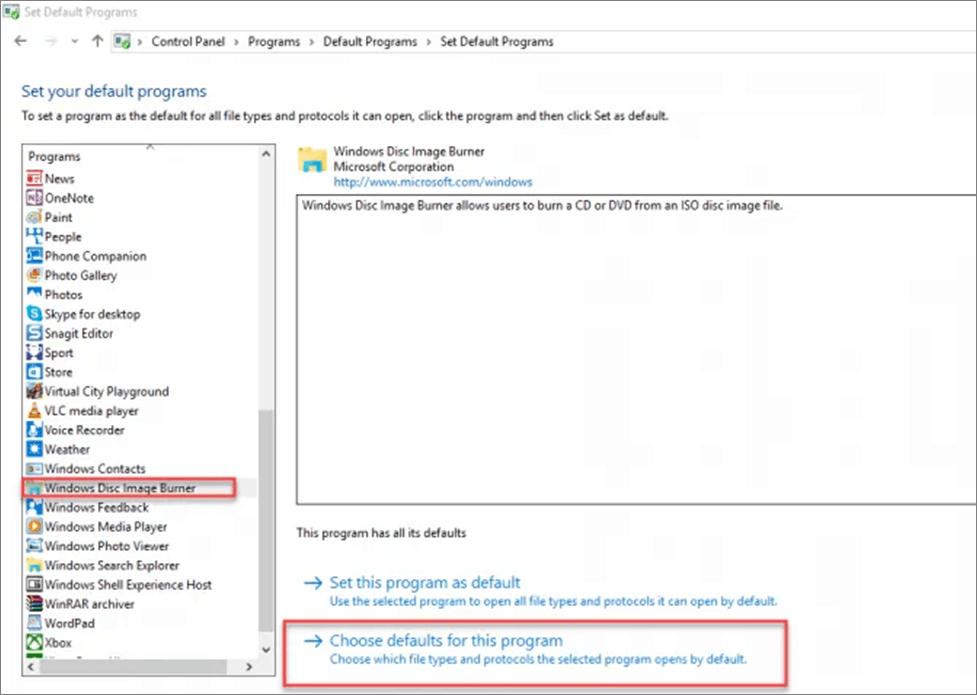
Step 4. Click on the "Check all" and "Save" in the list which appears.
The mount option will have been added to the context menu, which you can assure by right-clicking on the iso file.
The Bottom Line
Consequently, that was the simplest and easy-to-understand guide about mounting an iso file to Windows 10/11, which was divided into two main methods of either doing it through File Explorer or the PowerShell Command. You can also find this article helpful for solving the problems that come your way when you mount an iso file in Windows 10/11.
The most important aspect of this article was to help you retrieve your deleted iso files by using an affordable and easy-to-use tool called EaseUS data recovery software. So this single article contains a solid solution for your multiple iso issues.
Was This Page Helpful?
Cedric Grantham is a senior editor and data recovery specialist of EaseUS. He mainly writes articles and how-to tips about data recovery on PC and Mac. He has handled 10,000+ data recovery cases and is good at data recovery of NTFS, FAT (FAT32 and ExFAT) file systems, and RAID structure reorganization.
-
EaseUS Data Recovery Wizard is a powerful system recovery software, designed to enable you to recover files you’ve deleted accidentally, potentially lost to malware or an entire hard drive partition.
Read More -
EaseUS Data Recovery Wizard is the best we have seen. It's far from perfect, partly because today's advanced disk technology makes data-recovery more difficult than it was with the simpler technology of the past.
Read More -
EaseUS Data Recovery Wizard Pro has a reputation as one of the best data recovery software programs on the market. It comes with a selection of advanced features, including partition recovery, formatted drive restoration, and corrupted file repair.
Read More
Related Articles
-
How to Fix Runtime Error 1004 in Excel
![author icon]() Cedric/2024/02/19
Cedric/2024/02/19 -
ISO Recovery: Recover Deleted ISO Files with ISO Recovery Software
![author icon]() Tracy King/2023/07/20
Tracy King/2023/07/20 -
How to Recover Unsaved Excel Files from Excel Temporary Files in Windows 10/11
![author icon]() Jean/2023/10/08
Jean/2023/10/08 -
Can't Find AppData Folder on Windows? Causes and Solutions
![author icon]() Jaden/2024/01/06
Jaden/2024/01/06