Page Table of Contents
Updated on Mar 19, 2024
After a while, our PC requirements increased, and we needed more power and efficiency to cater to them. We get software updates over time, but the real deal to improve the performance and optimize the computer depends on the hardware. If you are on HDD or SSD and want the ROG Ally SSD upgrade to a new one, you need a guide to go through it and reinstall the Windows. EaseUS will go through 2 ways of replacing the SSD: without reinstalling Windows and with reinstalling.
What You'll Need to Upgrade ASUS ROG Ally SSD
The ASUS ROG Ally, like Steam Deck, is a powerful handheld gaming PC. It is preinstalled with Windows 11 operating system and offers 512GB SSD to store your games. If you are unsatisfied with all the limited Asus ROG Ally storage, you can try upgrading the ROG Ally SSD to a larger one.
Here's how I upgraded the SSD of the ASUS ROG Ally
byu/looney2388 inROGAlly
First, we must have all the equipment ready to start the process. Check out the necessary items list and get them ready:
- Any compatible ASUS ROG Ally SSD [ such as Teamgroup MP44S 1TB, WD – BLACK SN770M 2TB Internal SSD, Corsair MP600 Mini, SABRENT Rocket 2230 NVMe 4.0 1TB SSD, or others].
- Reliable SSD Cloning software.
- A size 0 Phillips head screwdriver.
- A guitar pick or any thin piece of plastic to separate the back panel.
- Latest BIOS software.
If you prefer the cloning process (no reinstallation), you may need an SSD enclosure while cloning the old drive's contents to the new drive.
Does this article solve your problem? If you find it useful, share it on your social media!
Upgrade SSD on ROG Ally Without Reinstalling Windows
Reinstalling Windows will wipe out all your data, including the game progress on ROG Ally. If you wish to keep all your games and save the game progress without losing any game date, you can clone the old SSD onto the new one using a bit-by-bit clone to transfer all your data to the new SSD before installing the ROG Ally. But you need reliable and safe software to achieve this complex task perfectly.
EaseUS Disk Copy is reliable cloning software that clones your SSD bit-by-bit to transfer all the data onto the new SSD. It removes bad sectors, migrates all your data, and acts as an instant recovery tool in emergencies. With the tool, you can safely clone your SSDs, hard drives, and systems or create a boot disk.
- Make a sector-by-sector clone of your SSDs
- Transfer data from the old hard drive to a new PC
- Resize SSD partitions when cloning a hard drive
- Copy your Windows installation drive to an SSD
- Upgrade a smaller hard disk to a larger one
With advanced and efficient programs and a simple guide, EaseUS disk clone software can clone your SSD in 3 steps. Download the Disk Copy and transfer all your game data onto the new SSD to upgrade the ASUS ROG Ally without reinstalling Windows.
Prior Notice:
- The "Sector by sector copy" asks the size of your destination disk to be at least equal to or larger than that of the source disk. Leave this feature unchecked if you wish to clone a larger hard disk to a smaller hard disk.
- All data on the destination disk will be completely erased, so take care.
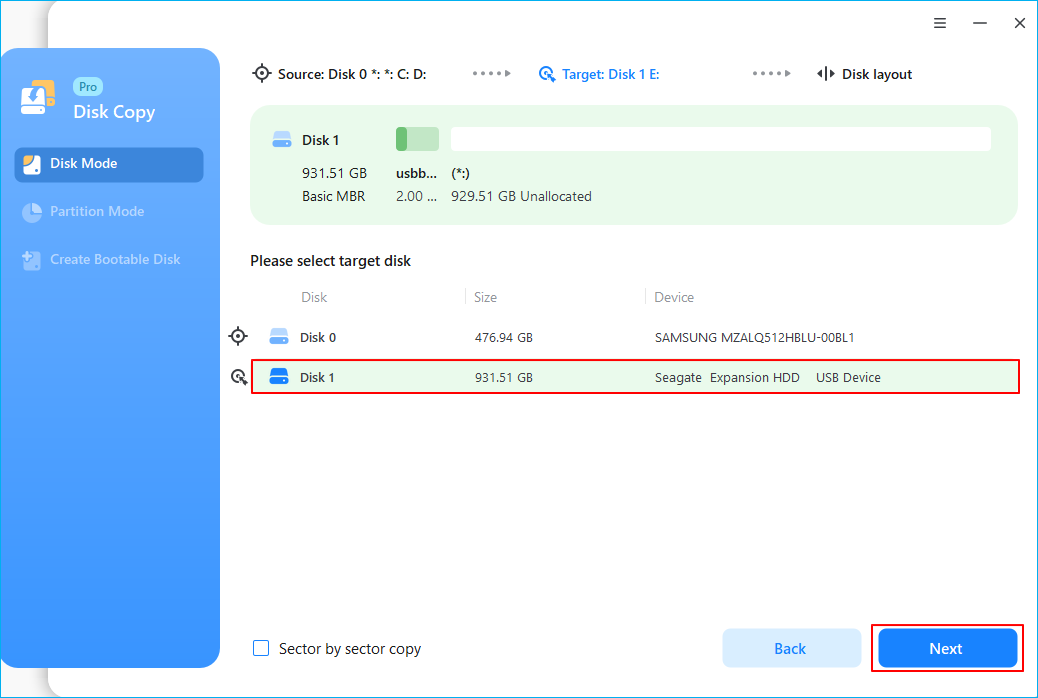
Step 1. To start copying/cloning an entire disk to another, choose this disk as the source disk under "Disk Mode" and click "Next".

Step 2. Choose the other disk as the destination disk.
Step 3. Check the disk layout of the two disks. You can manage the disk layout of the destination disk by selecting "Autofit the disk", "Copy as the source" or "Edit disk layout".
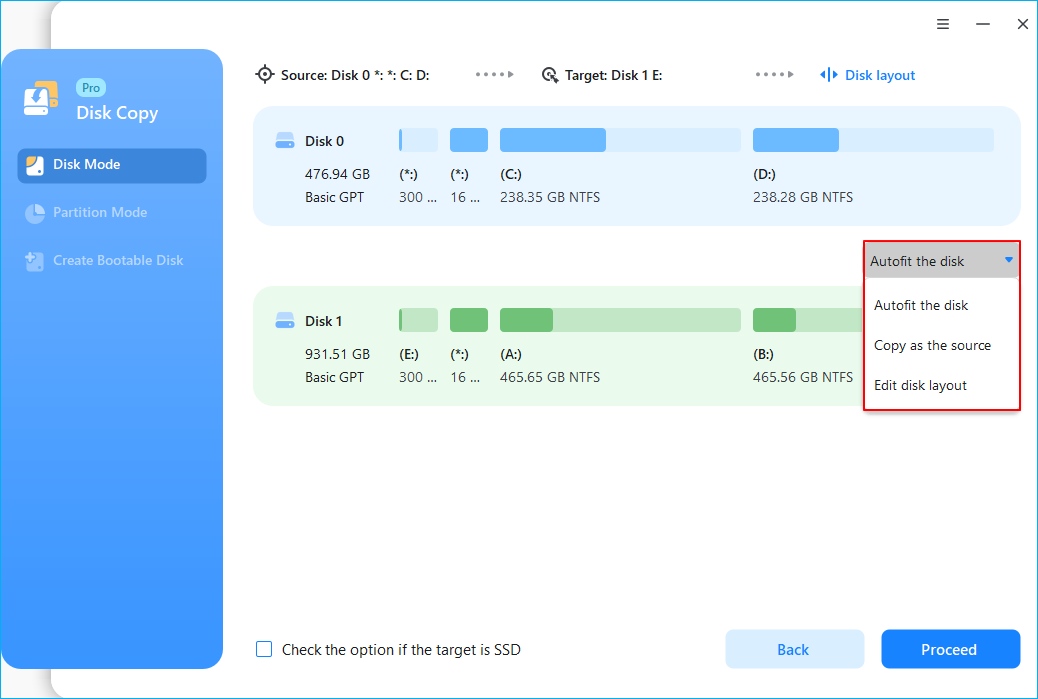
- "Autofit the disk" makes some changes by default on the destination disk layout so that it can work at its best status.
- "Copy as the source"does not change anything on destination disk and the layout is the same as source disk.
- "Edit disk layout" allows you to manually resize/move partition layout on this destination disk.
Tick the "Check the option if the target is SSD" option to put your SSD in its best performance.
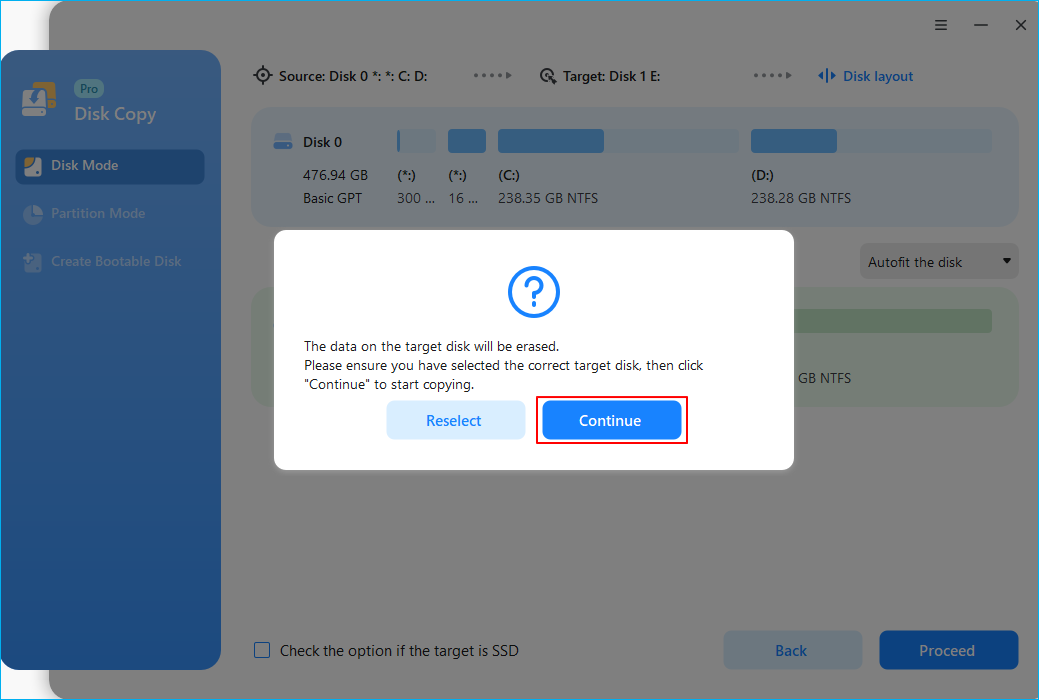
A message now appears, warning you that data will be lost. Please confirm this message by clicking "OK" and then click "Next".
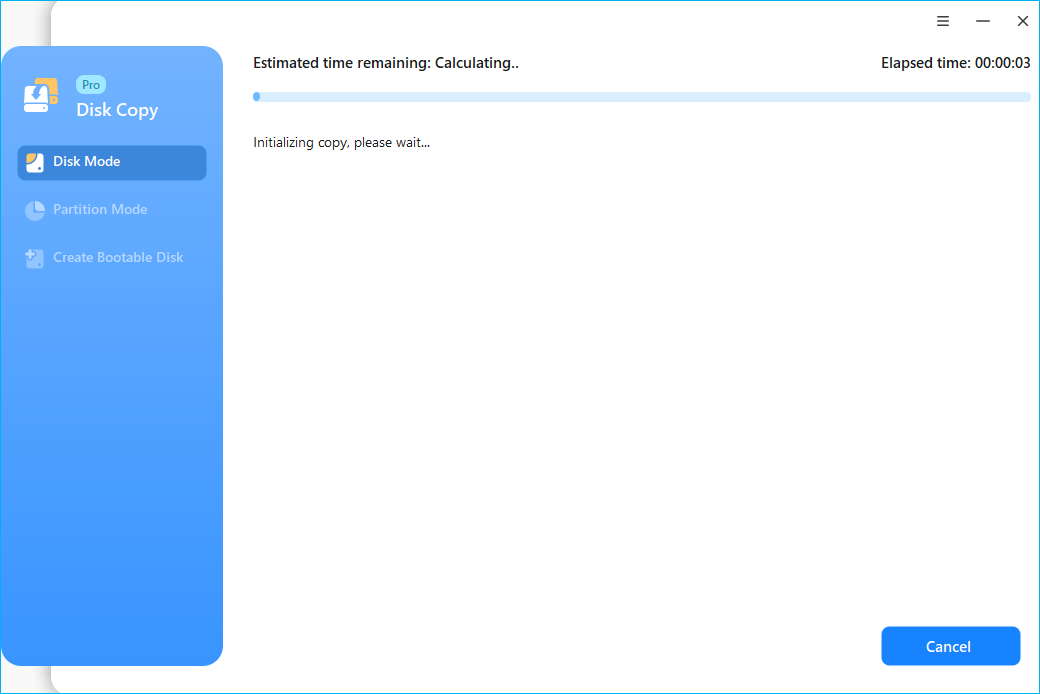
Step 4. Click "Proceed" to officially execute the task.
Does this article solve your problem? If you find it useful, share it on your social media!
Upgrade ASUS ROG Ally SSD and Reinstall Windows
We will use the latest BIOS software to install Windows on this part. But this part removes all your data, and you must start downloading the games and apps from scratch. Let us see the guide to replace the old SSD with a new one and reinstall the Windows.
Step 1. Install the latest BIOS
To ensure the latest BIOS is installed on your ASUS ROG Ally, turn on the Ally, complete the initial Windows setup, and head to the desktop. Find the MyASUS app, check for updates, and get the latest version of BIOS before shutting down the device.

Step 2. Remove the Ally back panel
Before removing the screws on the back panel, discharge the battery to 25% or lower, and remove microSD cards, if you have installed any.
Turn the ROG Ally upside down and place it on a surface. Grab the screen driver, and unscrew all the sic screws on the back. The middle screw at the bottom won't come out all the way; you have to use it to lift the bottom cover off the case. Now, try to separate the back panel from the console.

If the bottom panel doesn't come off, use a guitar pick to undo the screw holding the case and panel.
Step 3: Replace the old SSD with the new SSD
First, disconnect the battery from the handheld for safety. Find the black flap between the fans and slide the metal retaining clip back using a guitar pick.

Pull out the battery connector upward to get it out of the socket.

Below the black flap between the fans, you can see the SSD. Remove the screw holding the drive, take out the SSD, and slide the new SSD in. After completing, secure the SSD using the screw, and wind up all the connections, including the battery and back panel.

Step 4. Reinstalling Windows with ASUS Cloud Recovery
Once you have your device back, plug the Ally into the wall using a 65W charger. Press and hold the Volume down and Power button to switch on the device. The device boots into the BIOS menu.
1. Press the Y button to exit the EZ mode.
2. Open the Advanced tab, select ASUS Cloud Recovery, and press A to start the download.

3. Connect to your Wi-Fi and let the ROG Ally download and reinstall the Windows.
Here is a video about how to upgrade ROG Ally SSD.
If you want to learn how to clean install Windows 10 on your new SSD, you can refer to the following article.
How to Choose the Best ROG Ally SSD for Replacement
There are multiple ways to increase the storage on the ROG Ally, but the best one is to replace the SSD (512 GB) with a new one (bigger one). The Asus ROG Ally has a 512GB PCIe 4.0 NVMe M.2 SSD (2230) and supports all compact 2230 M.2 NVMe drives.
Before moving to the best SSDs for ROG Ally, you must know how to select one. The major chunk of discussions around an SSD comes in two departments: performance and storage. The performance includes the reading and writing speeds to run the games with high FPS and storage to stack all your games on your console. ROG Ally has a 512 SSD by default, and you can switch to 1TB or 2TB drives.
Let us see a list of the best SSDs for ROG Ally SSD upgrade:
- Teamgroup MP44S 1TB: Teamgroup MP44S is an ideal SSD for handheld devices if you are on a budget. It is a 2230-sized NVMe SSD that comes in 1TB and 2TB.
- Corsair MP600 Mini: The Corsair MP600 is another great SSD for use with ASUS ROG. It is a 1TB variant with good writing and reading speeds.
- SABRENT Rocket 2230 NVMe 4.0 1TB SSD: SABRENT Rocket SSDs are becoming popular. It offers reliability and performance with a storage of 1TB and read and write speeds of 4,750MB/s and 4,300MB/s.
- WD - BLACK SN770M 2TB Internal SSD: Western Digital SSDs are top-notch in performance and storage. The WD - BLACK SN770M 2TB has a reading and writing speed of 5,150MB/s and 4,850MB/s. The SSD is packed in a 2230 form factor and is efficient and fast. WD SSDs are expensive, but they offer excellent storage and speed.
To Wrap Things Up
The ASUS ROG Ally SSD upgrade makes your device faster and more efficient. You can store more games, and with the fast reading and writing speeds, you can play high-end games without lag. With the help of the guide, you can upgrade ROG Ally SSD with and without installing Windows. If you do not want to lose data and your game progress, the best option is to choose a reliable cloning tool like EaseUS Disk Copy to get your data onto the new SSD and upgrade your device.
FAQs on Upgrading ROG Ally SSD
Here are some frequently asked questions on duplicate video finder on Mac. If you have similar queries, this will help you.
1. Can you upgrade the ROG Ally SSD?
Yes, you can upgrade the ROG Ally SSD in three ways. The Ally lets you use a microSD, an external drive, and an internal SSD to upgrade the storage and performance.
2. Can I perform an ROG Ally SSD upgrade without losing data?
You can perform an ROG Ally SSD upgrade without losing any data. With a professional cloning tool like EaseUS Disk Copy, all the contents of the old SSD are cloned onto the new one, and the ROG Ally is updated.
3. Is ROG Ally more powerful than Steam Deck?
Yes, ROG Ally is more powerful than Steam Deck. ROG Ally is expensive and has high-end hardware, whereas the Steam Deck is a budget option.
Was this page helpful? Your support is truly important to us!
EaseUS Disk Copy
EaseUS Disk Copy is a well designed and very easy-to-use HDD/SSD cloning and migration tool, a tool which should be ideal for anyone wanting to quickly and easily migrate an existing system disk to a new disk (or newly installed SSD drive) with the minimal of configuration required.
-
Updated by
![]()
Jerry
"I hope my articles can help solve your technical problems. If you are interested in other articles, you can check the articles at the bottom of this page, and you can also check my Facebook to get additional help."…Read full bio
Related Articles
![]() Install Windows 10 on New Hard Drive from USB on Laptop & PC🔥
Install Windows 10 on New Hard Drive from USB on Laptop & PC🔥![]() Beginner's Guide - How to Replace HDD with SSD on Windows 11
Beginner's Guide - How to Replace HDD with SSD on Windows 11![]() Clone UEFI Disk to SSD without Boot Issue (Full Guide)
Clone UEFI Disk to SSD without Boot Issue (Full Guide)![]() Top 9 Best SSD Cloning Software of 2024
Top 9 Best SSD Cloning Software of 2024![]() Top 3 Best WD Disk Cloning Software (2024 Edition)
Top 3 Best WD Disk Cloning Software (2024 Edition)![]() Disk Clone | Samsung Clone SSD to Larger SSD
Disk Clone | Samsung Clone SSD to Larger SSD


EaseUS Disk Copy

Dedicated cloning tool to meet all your system, disk, and partition clone needs.
Popular Posts


Interesting Topics