Featured Articles
- 01 Accidentally Closed Word Without Saving
- 02 I Saved a Word Document and Can't Find It
- 03 How to Recover Unsaved Google Docs
- 04 How to Find Hidden Images in Word Document
- 05 Word Document Is Blank When Opened
- 06 Word Cannot Open the Document: User Does Not Have Access Privileges
- 07 Open ASD File
- 08 Run Time Error 53
- 09 Word Experienced an Error Trying to Open the File 2022

Microsoft Word documents can disappear in certain situations. For example, it may be gone after a forced quit, power interruption or close without saving changes. Here are some of the other reasons:
- Windows 10 automatically upgraded and removed the file.
- Personal files were erased or hidden by the infection.
- You created a new user account.
This page introduces several possible ways to recover lost word files. You can try any one of them to delete word documents, and recover formatted ones in different data loss cases.
Method 1. Recover from the Recycle Bin
If you happen to delete Word files on the desktop and moved it into the recycle bin, you'll have a great chance to bring it back from the recycle bin.
1. Launch the Recycle Bin. Click View > Arrange Icons, then you can filter this list according to file type, name, delete date, etc.
2. When you find your target document, right-click on it, and click Restore to get it back.
Method 2. Recover from searching the original document
If you still cannot find your file, you can search for it on the computer.
In Windows, click Start > Search > For Files or Folders.
Then type the file name and click "Search".
If the Search Results box does not show the file, you can try to search for Word backup files or use EaseUS office file recovery software to help.
Method 3. Recover from the backup location
Here we take Word 2013 as an example. And this method works in all versions including 2007/2011/2013/2015/2016 etc.
1. Start Word 2013.
2. Click the File menu, click Open, click Computer, and then click Browse.
3. Locate the folder in which you last saved the missing file.
4. In the Files of type list (All Word documents), click All Files. The backup file usually has the name "Backup of" followed by the name of the missing file.
5. Click the backup file, and then click Open.
Method 4. Creating a new Word document with an identical name
This method may work when you cannot find any tracks on your computer by following the above 3 methods. You can create an exact same Word document to see whether you can find the previous version.
1. Create a new Word document with the same name and format of the lost one.
2. Right-click on the file > Choose Properties and select Previous Versions.
If you see several versions of the Word document, choose the former one and click Recover.
Method 5. Recover lost Word files with EaseUS office recovery software
When you permanently deleted Word files or other data on your computer or storage devices, all the methods above will not work. Then you'll need professional file recovery software to help yourself with ease.
EaseUS Data Recovery Wizard is a popular online data recovery tool for Windows and Mac users. With it, you can easily get back all types of files lost due to accidental deletion, disk formatting, virus attack or some other reasons. All Windows systems such as Windows 10/8/7 etc are all supported. And it can be also used to recover other versions of Word document such as Word 2013/2015/2016 etc, recover lost Excel files. Now you can download the software and follow the below guide to retrieve lost Word files with simple steps.
This video will give you more detail info about how to make it simple and easy for you to recover lost word files with EaseUS data recovery software. If you wanna be your own data rescuer, do not hesitate anymore and download this tool.
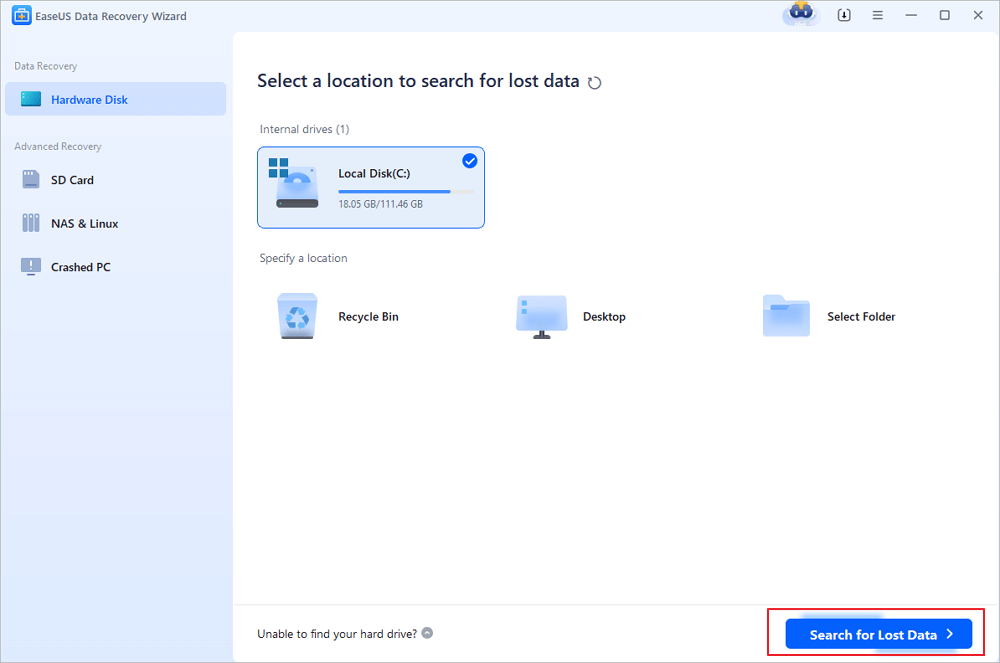
Step 1. Choose the Word file location
Choose the drive or a specific folder where you lost Word documents and click the "Search for Lost Data" button.
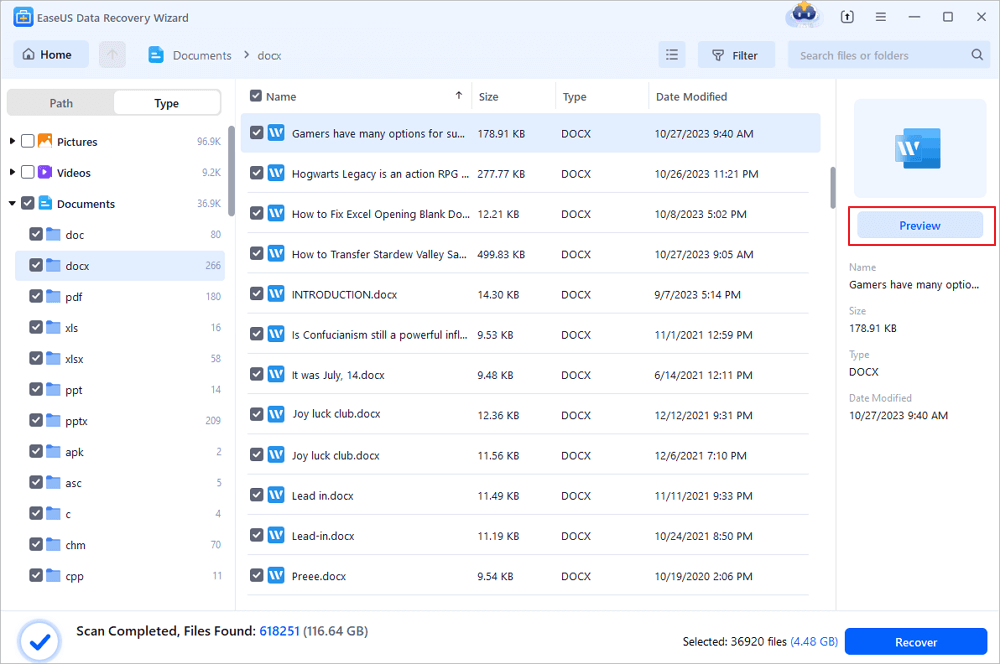
Step 2. Locate your Word documents
The software will start immediately scanning all lost data on the selected drive. After the scan, click the "Documents" option in the left panel. Choose the target Word file from the scan results. Then, click "Preview".
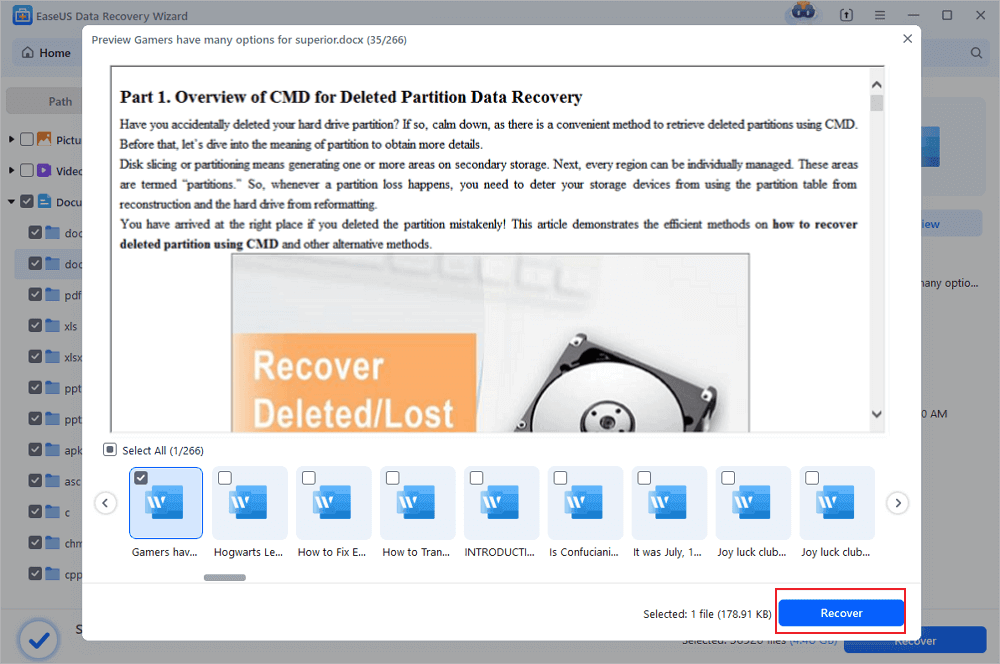
Step 3. Recover the deleted Word documents
After previewing, select the desired Word files and click "Recover". Remember, save the recovered documents in another location rather than original place. It is a great choice saving the recovered documents to cloud storage like OneDrive or Dropbox.
Was This Page Helpful?
Jaden is one of the editors of EaseUS, who focuses on topics concerning PCs and Mac data recovery. Jaden is committed to enhancing professional IT knowledge and writing abilities. She is always keen on new and intelligent products.
Jean is recognized as one of the most professional writers in EaseUS. She has kept improving her writing skills over the past 10 years and helped millions of her readers solve their tech problems on PC, Mac, and iOS devices.
Related Articles
-
2026 Best Free Linux Data Recovery Software for EXT2/EXT3
![author icon]() Tracy King/Jul 02, 2026
Tracy King/Jul 02, 2026 -
How to Remove Recycle Bin from Desktop Windows 10/11 in 3 Ways
![author icon]() Cedric/Jul 02, 2026
Cedric/Jul 02, 2026 -
Fix the Volume You Have Selected to Shrink May Be Corrupted [with Tips]
![author icon]() Jaden/Jun 16, 2026
Jaden/Jun 16, 2026 -
Fix Invalid Access to Memory Location [Top 4 Ways]
![author icon]() Finley/Jun 16, 2026
Finley/Jun 16, 2026