Have you recently encountered the Mac error code 8072? Though Macs are highly reliable, you can still face the Mac error 8072, which is not dependent on your Mac version.
The error code 8072 on Mac occurs when you try to delete a Time Machine backup or a corrupted file. It can even happen when you are trying to get rid of Trash. Users generally see this message - "The operation t be completed because an unexpected error occurred (error code -8072)."
Determining the exact cause is challenging, which is why troubleshooting these problems can be tedious. But there are multiple solutions you can adopt and see which one resolves the error code 8072 in Mac Finder.
| Workable Solutions | Step-by-step Troubleshooting |
|---|---|
| Fix 1. Force Reboot Your Mac | The simplest solution is to force reboot the macOS and reset...Full steps |
| Fix 2. Check the Permissions on Mac | Sometimes, the error occurs because you don't have permission to delete it...Full steps |
| Fix 3. Force Empty Trash Can | go to the Trash and empty it. You should click the Empty button...Full steps |
| Fix 4. Run Disk Utility First Aid | You can also run Disk Utility First Aid to see if it fixes the error code...Full steps |
| More Fixes | The other 2 fixes are available here for you to follow and fix Mac error code 8072...Full steps |
How to Handle the Error Code 8072 on Mac
The appearance of the Mac error code 8072 can quickly become frustrating. However, there are various solutions you can explore to resolve the problem. Before we move ahead with the fixes, it is critical to understand data security. Keep in mind that data loss might happen, and as such, safeguarding it is vital.
Fix 1. Force Reboot Your Mac
The simplest solution is to force restart MacBook. You need to press the power button and hold it to do that. Make sure not to release the key until the system shuts down. After a few seconds, press the power button to turn it on. Check and see if the issue is resolved.
Fix 2. Check the Permissions on Mac
Sometimes, the error occurs because you don't have permission to delete it. You need to check to see if you have the required permission.
Here are the steps to follow -
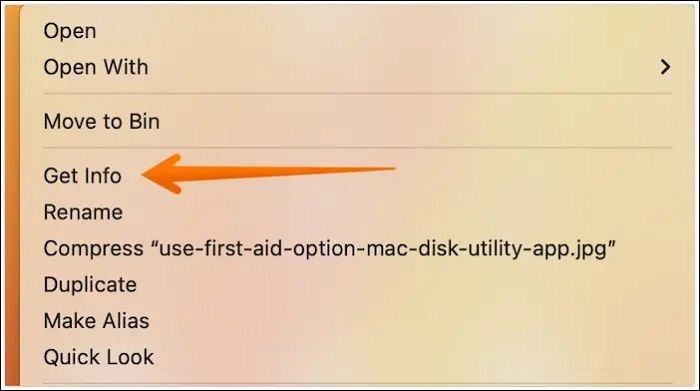
Step 1. Go to the file you want to delete and control-click on it.
Step 2. Select "Get Info".
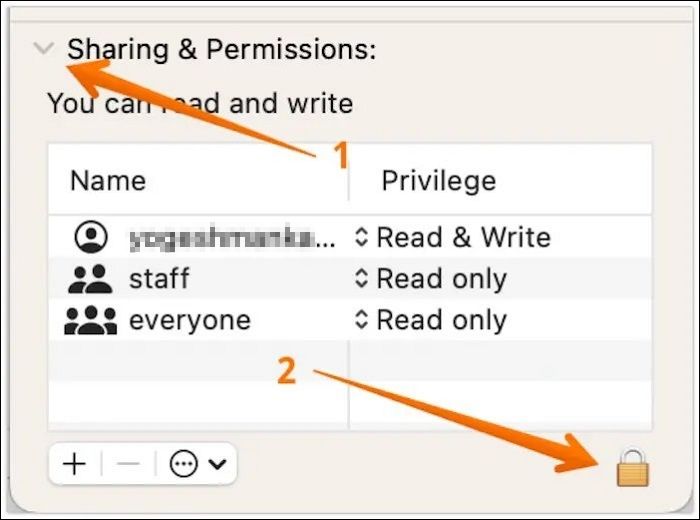
Step 3. Scroll down to click on "Sharing & Permissions" from the Get Info window. Expand the option.
Step 5. Check the list of accounts and the type of permission granted.
Step 6. If you see a lock icon at the bottom, click on it.
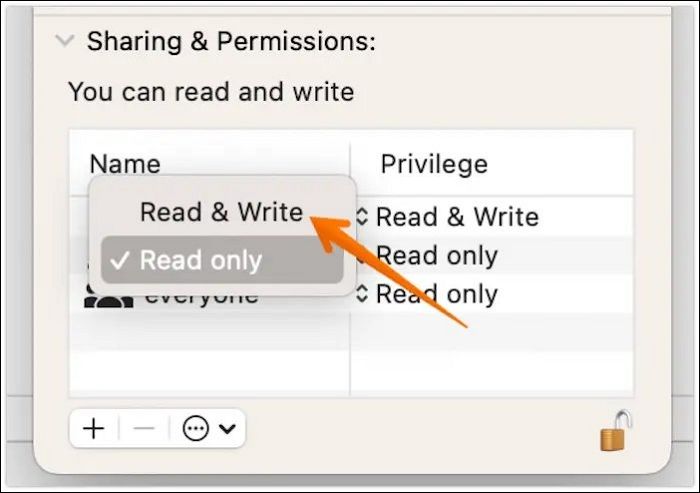
Step 7. Enter your admin password.
Step 8. Now, choose the account you want to delete. Select "Read & Write".
Fix 3. Force Empty Trash Can
Are you facing a problem in emptying the Trash on your system? Well, you can use Mac Safe Mode for this task.
Check out the steps here –
Step 1. Go to the "Apple icon".
Step 2. Select "Restart" from the drop-down menu.
Step 3. As the system reboots, press and hold the shift key.
Step 4. Release the key when you see the Apple logo displayed on the screen.
Step 5. The system will enter safe Mode.
Step 6. Now, go to empty the Trash. You must click the "Empty" button on the upper right-hand side.
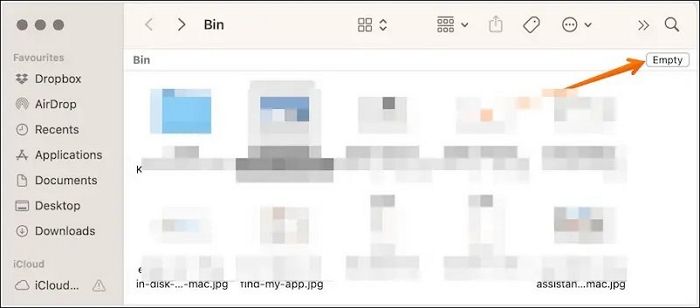
Step 7. After that, click "Restart". Allow Mac to reboot normally.
Fix 4. Run Disk Utility First Aid
You can also run Disk Utility First Aid to see if it fixes the error code. Take a look at the steps to follow –
Step 1. Boot the system into the Mac Recovery Mode. Wait for the macOS Utilities window to appear.
Step 2. Now, select "Disk Utility". Select "Continue". Go to "View".
Step 3. Select "Show All Devices".
Step 4. Choose the Mac hard drive from the left sidebar.
Step 5. On the top, you will see First Aid. Click on it.
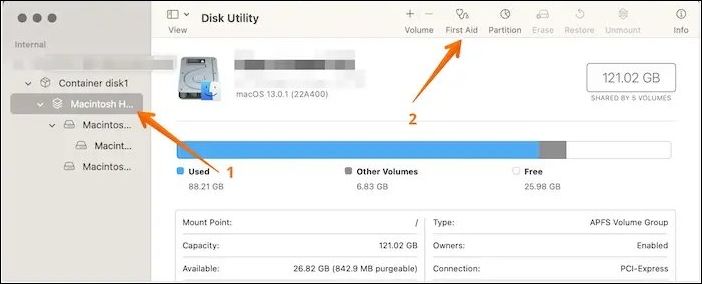
Step 6. When the pop-up appears, click "Run".
Step 7. Choose "Continue".
Step 8. You will see a pop-up box saying – Running First Aid on "SVN."
Step 9. Select "Done".
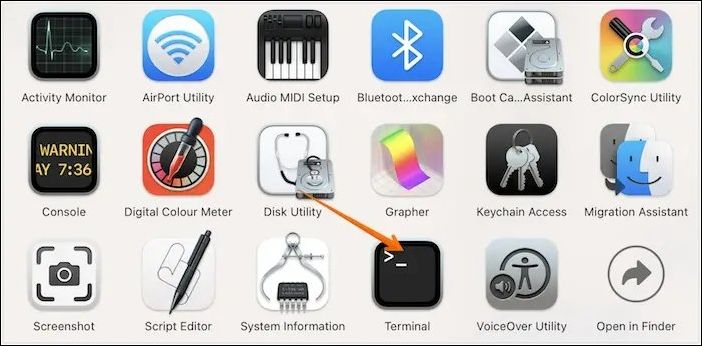
Fix 5. Force Delete Files with Terminal
Another excellent way to resolve the Mac error code 8072 is to use Terminal on Mac. Check out the steps that you need to follow –
Step 1. Open Terminal. For that, click on "Applications" > "Utilities" > "Terminal".
Step 2. Type - sudo rm -R. It will ask for the password. Enter your admin password to continue.
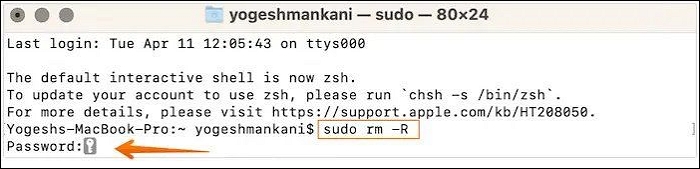
Step 3. Go to the Trash folder.
Step 4. Select the files you wish to remove.
Step 5. Drag these files to the Terminal window.
Step 6. Now, hit the Enter key.
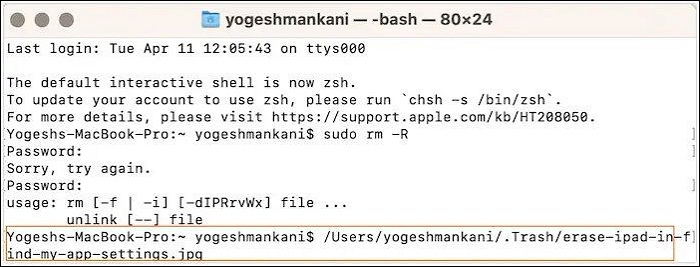
Step 7. When asked, type the admin password.
Step 8. Now, Mac will remove the files from Trash.
Fix 6. Fix from Time Machine
Has Time Machine created the file you want to delete? In that case, there are some steps you can follow to fix the error code 8072. These are -
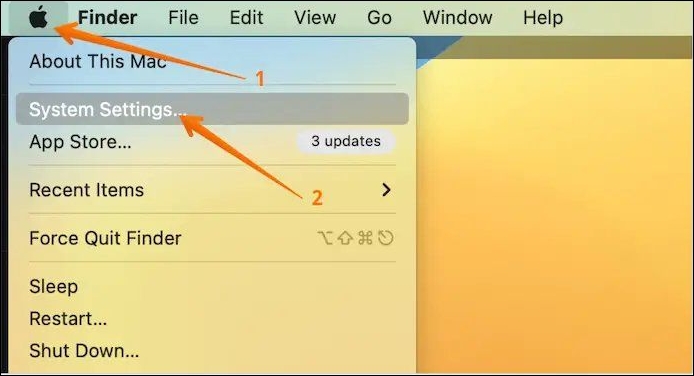
Step 1. Go to the Apple menu. A drop-down menu will appear. Select System Settings from there.
Step 2. Type Time Machine from the search bar on the left-hand side. Once you find it, click on it.
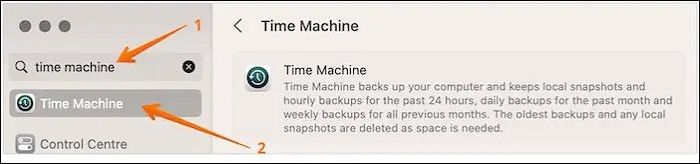
Step 3. Drag the slider to the OFF part on the right-hand side.
Step 4. This turns off the Time Machine.
Step 5. Now, try to delete the files.
Note: Turn on Time Machine after the files are deleted; forgetting to do so will lead to no backup of files.
If one of the methods is helpful in resolving the Mac error code 8072, share it on Facebook, Twitter, Instagram, and other social media platforms!
How to Recover Deleted Data on Mac
Are you anxious about data loss due to the Mac Error Code 8072? Well, that sometimes happens, so you must take data security seriously. If data loss occurs, it is vital to take professional data recovery software assistance. In that scenario, you can try EaseUS Data Recovery Wizard for Mac.
The EaseUS Data Recovery Wizard for Mac is a powerful data recovery program. With this tool, you can retrieve various data types without much hassle and recover permanently deleted files Mac from different Mac-based devices. Besides, exciting features such as file filters, recovery to the cloud, etc., are also present.
- Restore data irrespective of the reason, such as accidental deletion, malware attack, etc.
- Retrieve various data types such as videos, documents, music files, photos, etc.
- Recover data from Mac-based devices such as SSD, HDD, fusion drive, etc.
- Deep and quick scan to help recover trash Mac and without much hassle.
What's more, this softwsoftware's exciting part is it is user-friendly. The simple user interface enables even novice users to use the software easily. You can opt for the trial version and see if it suits your needs.
Step 1. Select the drive to be scanned
In the main EaseUS Data Recovery Wizard window, there will be a list of the drives connected to your Mac. Select the drive you need to recover lost/deleted files from, and click the "Search for lost files" button.
Note: Before data recovery, you'd better click "Disk Backup" from the left sidebar to create a backup of your Mac to avoid further data loss. After backing up, the software can recover data from the Mac backup, and your computer can wirte new data again.

Step 2. Select your lost data/files
EaseUS Data Recovery Wizard for Mac will immediately scan your selected disk volume and display the scanning results on the left pane. You can sort the results to find the wanted files if you are looking for certain files.

Step 3. Recover lost/deleted data
Once you have found the desired files, preview the files and then click "Recover" to begin the recovery of your deleted/lost Mac files.

Why Can I Delete the Corrupted File or Time Machine Backup
Multiple causes can lead to the error code 8072. Multiple causes can help to know the reasons so that you can learn more about the solutions. Let's take a look -
😦Reason 1. Unintentional format
Have you ever accidentally formatted your system? While we try to refrain from tweaking our system without any reason, such things can still happen.
🦠Reason 2. Viruses or malware
Sometimes, your system encounters a vicious virus or malware attack, leading to the corruption of files. As a result, you will face difficulty removing them, and the error code 8072 will occur.
📃Reason 3. Corrupted system files
The primary cause of the error code 8072 is the presence of corrupted files. It can be due to various reasons, such as system crashes, power outages, mismatched versions, etc.
🟦Reason 4. Modification of BIOS settings
A lack of complete knowledge is a terrible thing. Users often change the BIOS settings without knowing much about it, which could lead to the 8072 error code on Mac.
💻Reason 5. Sharing of data in the unsupported format
It is vital to always share data in supported formats. That way, they won't be any issues between the system and the media. Otherwise, you could come across the error code 8072.
Final Thoughts
Are you irritated with the Mac Error Code 8072? Even though Mac is a robust system, such issues might crop up. Understanding the reasons leading to the error code is significant, and the grounds include unintentional formatting, malware attack, corrupt system files, etc.
There are multiple solutions users can try to resolve the error code 8072. For starters, you can force reboot the system and run Disk Utility First Aid or Time Machine. In case, data loss occurs, you can take help from professional data recovery software.
For that, you can choose EaseUS Data Recovery Wizard for Mac. It is efficient and easy-to-use data recovery software that aids users in restoring data, irrespective of the reasons. Check out EaseUS Data Recovery Wizard for Mac today!
Mac Error Code 8072 FAQs
Knowing more about Mac Error Code 8072 will help you deal efficiently. For that, scroll through the questions and answers listed below -
1. How to fix Mac error code 8076?
There are several ways to fix Mac error code 8076. These include using Disk Utility, disabling "ignore permissions on this device", logging out and restarting, etc.
2. Whcan't't I create a new folder on my Mac?
One of the reasons for not being able to create a new folder on your Mac is that you don't have writing privileges, and you must ensure you have the permissions needed to make the folder.
3. How to clear the cache on Mac?
To clear the cache on Mac, here are the steps –
- Go to Finder.
- Select Go and then Go to Folder.
- Type ~//Library//Caches
- Press Go.
- After reaching the Caches folder, delete what you want.
4. How to recover data after forcing empty Mac Trash?
You must opt for reliable data recovery software to recover data after forcing empty Mac Trash. In that case, you can choose EaseUS Data Recovery Wizard for Mac. The tool is easy to use and aids in hassle-free data retrieval.
Was This Page Helpful?
Jaden is one of the editors of EaseUS who lives and works in Chengdu, China. She focuses on topics concerning PCs and Mac data recovery. Jaden is committed to enhancing professional IT knowledge and writing abilities. She is always keen on new and intelligent products.
Related Articles
-
4 Ways to Fix Windows System Backup Failed in Preparing the Backup Image
![author icon]() Jean/2024-03-15
Jean/2024-03-15 -
Tutorial on Windows 10: Move Partition to End of Disk [Step-by-Step Guide]
![author icon]() Sherly/2024-02-07
Sherly/2024-02-07 -
Disk Utility First Aid Process Has Failed [with 5 Proven Ways to Fix It]
![author icon]() Brithny/2024-01-11
Brithny/2024-01-11 -
Portal/Portal 2 Save File Location - Everything You Need to Know
![author icon]() Larissa/2024-03-15
Larissa/2024-03-15

EaseUS Data Recovery Services
EaseUS data recovery experts have uneaqualed expertise to repair disks/systems and salvage data from all devices like RAID, HDD, SSD, USB, etc.