The flashing folder with a question mark on a Mac may signal starting disk difficulties. Despite the difficulty, there are solutions without a CD. This article will discuss ways to fix flashing folder with question mark on a Mac without CD. We'll guide you through troubleshooting from initial drive settings to macOS Recovery Mode data recovery.
| Workable Solutions | Step-by-step Troubleshooting |
|---|---|
| Fix 1. Check the Startup Disk System Settings | Go to the Apple menu, click System Settings > General, and select the Startup Disk tab...Full steps |
| Fix 2. Reselect Startup Disk in macOS Recovery Mode | Restart your Mac, then immediately hold Command + R to boot into Recovery Mode...Full steps |
| Fix 3. Repair Tour Startup Disk via the First Aid Button | Hold the power button until your Mac turns off entirely. Then, boot your Mac into Recovery Mode...Full steps |
| Fix 4. Reinstall macOS after Formatting Startup Disk | To enter Recovery Mode on your Mac, choose the proper procedure based on its processor...Full steps |
Whether you're losing data or having trouble booting up your Mac, this thorough tutorial will equip you with the tools and strategies you need to address the flashing folder problem effectively. Let's find out how to fix the flashing folder with a question mark on a Mac no-CD!
Recover Data When Flashing Folder Shows Question Mark on a Mac
If you are already confronted with the scenario of a flashing folder with a question mark on a Mac, you might utilize multiple solutions and end up formatting the hard drive. Fortunately, EaseUS Data Recovery Wizard for Mac provides a strong solution.
This strong program specializes in performing Mac data recovery in macOS Recovery Mode with its simple UI and excellent scanning algorithms. The EaseUS software allows customers to restore access to their essential data and overcome the hurdles offered by the flashing folder problem on their Mac.
You Can Trust EaseUS Data Recovery Software
EaseUS Data Recovery Wizard has acquired an extensive technical base in data recovery and trusted by billions of users since 2005. Check out reviews on Trustpilot.
Download this professional data recovery software and recover stored data before fixing the flashing folder with question marks issue.
Fix 1. Check the Startup Disk System Settings on Your Mac
To resolve the problem of a flashing question mark folder on your Mac at startup, you might first need to check if the right starting disk is selected or not. Follow the steps below to check the Startup Disk System Settings.
Step 1. Go to the "Apple menu > System Settings > General > Startup Disk" and check whether the right start-up disk is selected.
Step 2. Ensure that external hard drives are turned on and properly linked via functional USB ports and connections.
Step 3. Click the lock icon at the bottom to unlock and make changes to the startup disk. Select an appropriate startup drive from the options and then set the lock.
Step 4. After choosing the starting disk, see whether the blinking question mark folder remains.
If you can't find your Mac startup disk, don't worry! Read this guide to learn effective solutions to fix this error.

Fix No Startup Disk on Mac Without Losing Data
This article discusses startup disk errors in different situations and recovers MacBook data with EaseUS. Read more >>
Share this article on social media to help others learn how to fix the flashing folder with question marks on a Mac without CD.
Fix 2. Reselect Startup Disk in macOS Recovery Mode
Reselecting the right start-up disk in macOS Recovery Mode may help address the flashing folder with a question mark on your Mac. Here are the steps to reselect the starting disk:
Step 1. Unplug any external drives and devices attached to your Mac.
Step 2. If your Mac is stuck on the flashing folder icon, hit and hold the power button for several seconds to forcibly shut it down.
Step 3. Restart your Mac, then immediately hit and hold the key combination (Command + R) to boot into macOS Recovery Mode. When you see the Apple logo or recovery choices, release the keys.

Step 4. Once in macOS Recovery Mode, select your user account, type your password, and hit "Enter".
Step 5. Click on "Disk Utility" and then "View > Show All Volumes".
Step 6. From the list of available alternatives, select the appropriate starting disk (e.g., Macintosh HD) containing macOS.
Step 7. To reboot your Mac, click the "Restart" button. If you were successful, your Mac should boot up without the flashing folder symbol.
Fix 3. Repair Tour Startup Disk via the First Aid Button
If you can't find any starting options in the starting Disk window, your built-in startup disk or Macintosh HD may be damaged, resulting in the flashing folder with a question mark on your Mac. Follow the instructions listed below.
Step 1. Press and hold the power button until your Mac turns off entirely.
Step 2. Restart your Mac and enter macOS Recovery mode.
Step 3. Once in macOS Recovery mode, choose "Disk Utility" from the macOS Utilities box and click "Continue".

Step 4. From the Disk Utility window's left side, select your starting disk, which is usually branded Macintosh HD.
Step 5. To begin the repair procedure, choose "First Aid" at the top and then press the "Run" button.
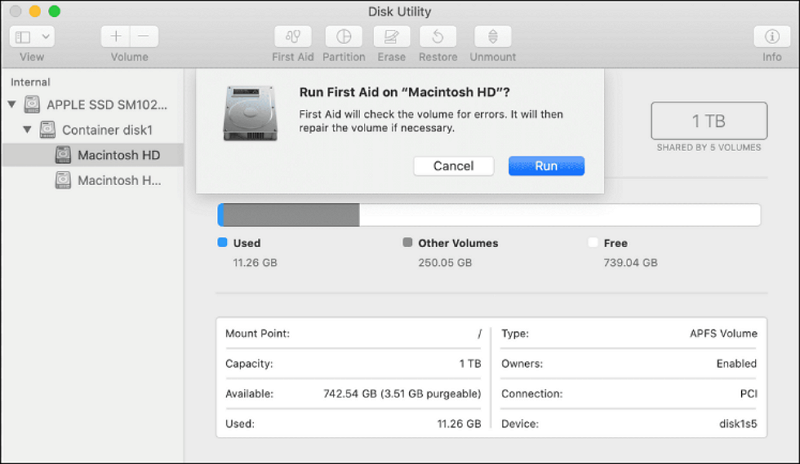
Allow Disk Utility enough time to check and restore your starting disk. Once done, exit Disk Utility and restart your Mac using the Apple menu.
Fix 4. Reinstall macOS after Formatting Your Startup Disk
Reinstalling macOS in Recovery Mode is a simple step that will successfully address the flashing folder with a question mark problem on your Mac. Follow the instructions below to reinstall macOS without losing any data:
Step 1. To enter Recovery Mode on your Mac, choose the proper procedure based on its processor.
• For Apple silicon Macs, hold down the power button until the starting options box displays, then click the gear icon labeled Options.
• On Intel-based Macs, press and release the power button, then hold down the Command (⌘) and R keys until the Apple logo displays.
Step 2. Once in Recovery Mode, select "Reinstall macOS" from the menu.

Step 3. Accept the installation conditions and pick the hard disk to reinstall macOS. Click "Continue" to start the installation procedure.
Allow the installation to finish while keeping your Mac connected to power.
Conclusion
The flashing folder with a question mark on a Mac might be scary, but it can be fixed with the appropriate actions. Users may fix this problem and restore Mac functioning by reviewing the starting disk settings, fixing it using First Aid, and reinstalling macOS. Use trustworthy data recovery software like EaseUS Data Recovery Wizard for Mac to restore lost data while troubleshooting. Don't hesitate to contact Apple Support.
How to Fix Flashing Folder with Question Mark on Mac Without CD FAQs
Following are some common questions that users ask about how to fix flashing folders with question marks on Mac without CD:
1. How do I get rid of the question mark on my MacBook?
Utilize these troubleshooting methods to get rid of this problem: review the startup disk settings, repair the startup disk using First Aid, or reinstall macOS after formatting the startup disk. You may need to contact Apple Support for more help if the problem persists.
2. How do I fix the blinking question mark folder on my Mac?
To resolve the flashing question mark folder on your Mac, you may examine the startup disk settings, reselect the startup disk in macOS Recovery Mode, repair the startup disk using First Aid, or reinstall macOS after formatting the startup disk.
3. How do I boot my Mac into recovery mode?
To boot your Mac into recovery mode, follow the instructions below:
Step 1. For recent Macs using Apple silicon, press and hold the power button until the startup options box displays, then choose Options > Continue to enter Recovery Mode.
Step 2. To enter Recovery Mode on earlier Macs with Intel processors, press and release the power button and then hold the Command (⌘) + R keys until the Apple logo displays.
Was This Page Helpful?
Brithny is a technology enthusiast, aiming to make readers' tech lives easy and enjoyable. She loves exploring new technologies and writing technical how-to tips. In her spare time, she loves sharing things about her game experience on Facebook or Twitter.
Related Articles
-
How to Repair Install Windows 10 in 3 Different Ways
![author icon]() Jerry/2024-01-11
Jerry/2024-01-11 -
How to Fix PS4 Safe Mode Loop Without Losing Data
![author icon]() Jean/2024-03-15
Jean/2024-03-15 -
How to Fix Your Computer Is Low on Memory on Mac
![author icon]() Jaden/2024-01-11
Jaden/2024-01-11 -
Can't Connect to a Current Time Machine Backup Disk [5 Tested Solutions]
![author icon]() Brithny/2024-01-31
Brithny/2024-01-31

EaseUS Data Recovery Services
EaseUS data recovery experts have uneaqualed expertise to repair disks/systems and salvage data from all devices like RAID, HDD, SSD, USB, etc.