Windows 10 is a powerful and user-friendly operating system, but it's not impervious to data loss. If you don't have a backup plan in place, you could find yourself in a very difficult situation if your system crashes or you suffer a ransomware attack. Fortunately, there are a number of ways to backup your Windows 10 system and files. The most straightforward method is to use the built-in Backup and Restore tool. This tool allows you to create a full image backup of your system, which can be restored if necessary. You can also use a third-party backup tool such as EaseUS Todo Backup to create more flexible backups that offer more features. Whichever method you choose, it's important to ensure that you have a recent backup to hand so that you can recover your data if the worst happens.
Ⅰ. Create A System Backup - Why and How
Creating a system backup is the best way to protect your Windows 10 PC from data loss. Why? The Windows system files are those files that Windows depends upon to operate properly. These range from hardware drivers to configuration and DLL files and even the various hive files that make up the Windows Registry. If, unfortunately, your computer breaks down due to a system crash or you've become the victim of a ransomware attack, you might unable to access or even boot your computer. In this case, if you have a recent backup to hand, you can restore your system to an earlier state without losing any data.
You can't create a system image without preparing anything. First of all, it is highly recommended you prepare a large enough USB flash drive as the backup drive. The size of the USB flash drive should be at least larger than the used space of your C drive or the system drive. Then you should decide which backup tools you need to use. As mentioned before, Windows has a built-in system image backup tool - Backup and Restore (Windows 7). Or, a third-party free tool, EaseUS Todo Backup, can also help you back up the Windows system.
Ⅱ. What Is Windows Backup and Restore (Windows 7)
Windows Backup and Restore (Windows 7) is a system image backup feature firstly introduced in Windows Vista and continued in Windows 7/8/10. It can create complete backups of your entire computer, including your operating system, applications, settings, and files. Once you've created a system image backup, you can use it to restore your computer if it stops working properly.
Backup and Restore (Windows 7) give every user two options to back up the system: One is to create a system image, and the other is to create a system repair disk. Also, on the main interface of Backup and Restore (Windows 7), you could see there are both "Backup" and "Restore" columns for you to back up or restore a system image.
Before starting to use the Backup and Restore (Windows 7), you should set up the settings. Windows allow users to customize two backup settings, the backup location and the backup content.
Backup Destination:
The reason backup destination matters is that you should always ensure your backup image files are safe and accessible. According to the 3-2-1 backup strategy, users should create three backup copies and store the backup in at least two types of storage media. An external hard drive is considered one of the best locations to store a backup image.
Window Backup and Restore recommends users store the system image on an external or network hard drive. You could choose where to save your backup during the setup process.

Backup Content:
The backup content means the files and data you want to back up. When creating a system image, Windows will default select all system files for backup. On this basis, if you have other important files that you want to back up, you can choose which files to add to the backup.

Ⅲ. How to Create a System Image with Windows Backup and Restore
Once you've set up backup settings, you could start to create a system image. The detailed steps are listed below, and you can now follow the guide to use Backup and Restore (Windows 7).
Applies for Windows 10/11
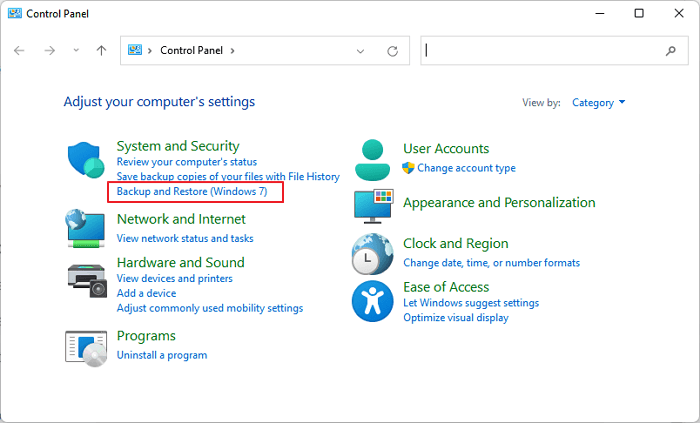
Step 1. Go to Control Panel, under System and Security, click Backup and Restore (Windows 7).
Step 2. First, choose what kind of backup you will create. Click the "Create a system image" on the left side panel. You could also start by clicking the "Set up backup" on the right side. Once set up, both the system image and the selected files will be contained in the backup.

Step 3. First, you need to choose where to save the backup. You should use an external hard drive as the backup destination. The network drive and DVD also work perfectly.

Step 4. Click the Next button to continue. Then you need to decide which drive you want to include in the backup. Here you could see that the Backup and Restore chooses the system partition by default, so even if you don't know what the system image should contain, don't worry.
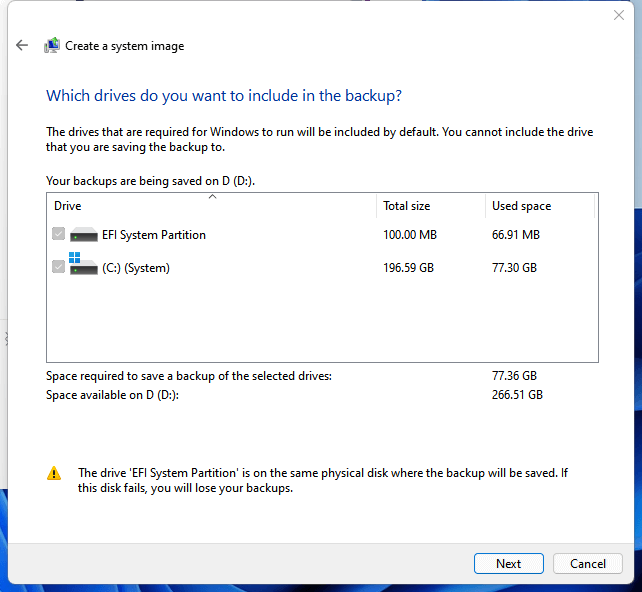
Step 5. Click Next, and Windows will tell you to confirm the backup settings. Have a re-check, and click "Start backup" to start creating a Windows system image.

Ⅳ. Better and Easier: How to Create a System Backup Using EaseUS Todo Backup
We've mentioned that both Windows built-in and third-party tools can help to create a system image. The advantage of using a third-party tool is that you don't have to be an expert in backup or computer. EaseUS Todo Backup makes the backup process pretty clear and simple. Just follow the on-screen guide. You could create a system image on your own.
Secure Download
Step 1. On the main page, click "Select backup contents".

Step 2. Among the four available categories, click OS.

Step 3. EaseUS Todo Backup will automatically select your system partition, you only need to select the backup destination.

Step 4. Both Local Drive and NAS are available for you to save the backup file.

Step 5. After finishing the backup process, you can check the backup status, recover, open, or delete the backup by right-clicking the backup task on the left.

LEARN MORE
Apart from an external hard drive, you could also back up Windows 10 to a USB drive. Click here to learn about how to back up Windows 10 to USB in three ways.
Ⅴ. What's the Difference: Creating a System Backup vs. Create a System Repair Disk
The two backup options that Windows provides have different purposes. You could use a system repair disk to fix common computer problems or use it to factory reset your computer. While the system image is mainly used for data protection and system recovery in emergencies. In the content above, we've introduced why and how to create a Windows 10 OS backup. Here in this part, if you find it is necessary to create a system repair disk, follow the detailed guide below to see how to create one on Windows 10/11.
Step 1. Go to Control Panel, under System and Security, click Backup and Restore (Windows 7).
Step 2. Choose "Create a system repair disk" on the left side panel. If you haven't created a system image backup yet, you'll see a message telling you that. Just click "Create a system image" and follow the wizard to create one.
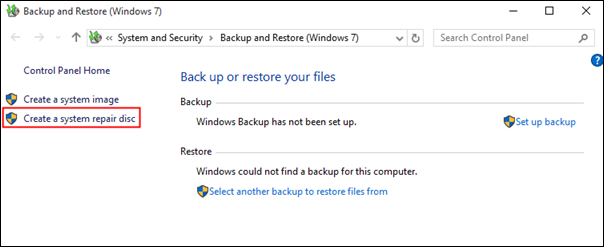
Step 3. Insert a blank CD or DVD into your computer, and click "Create disk". Windows will immediately begin writing to the disc. Unlike creating a recovery drive, burning a system repair disc takes only a few minutes because it doesn't back up system files to the disc at the same time. Be sure to keep the repair disk in a safe place because you'll need it if something goes wrong with your computer in the future.
NOTE: If you are prompted to insert a Windows installation disc, it means that the files needed to create the system repair disc cannot be found on your computer.
Apart from the system repair disk and system backup, users are often confused about another thing - the Windows recovery drive. If you're also one of the confused novices, read the article below to see the difference between the system repair disc and recovery drive.
System Repair Disc vs. Recovery Drive: Same or Not?
Are you confused about the system repair disc and recovery drive? Don't worry. Let's explore all the details and learn to back up your data using EaseUS quickly.

Ⅵ. Create A File Backup - Using Windows File History
The Windows system image created in the previous part only contains the operating system and installed programs. If you want to create a backup for your files, you'll need to turn to File History or Backup and Restore (Windows 7). Here we'll focus on how to use File History to back up your important data in Windows 10/11.
File History is an easy and effective way to back up your data, including photos, videos, music, documents, etc. Even if you've never used File History before, you can quickly get started by following the steps below.
Before getting started:
- 1. Connect an external hard drive or USB flash drive to your computer. The drive should have enough space to store your backup data.
- 2. If you're backing up to an external hard drive, we recommend that you connect the drive directly to your computer instead of connecting it to a USB hub.
- 3. If you don't have an external hard drive, you can also back up files to a network location or OneDrive.
Now you can follow the steps below to back up files with Windows File History:
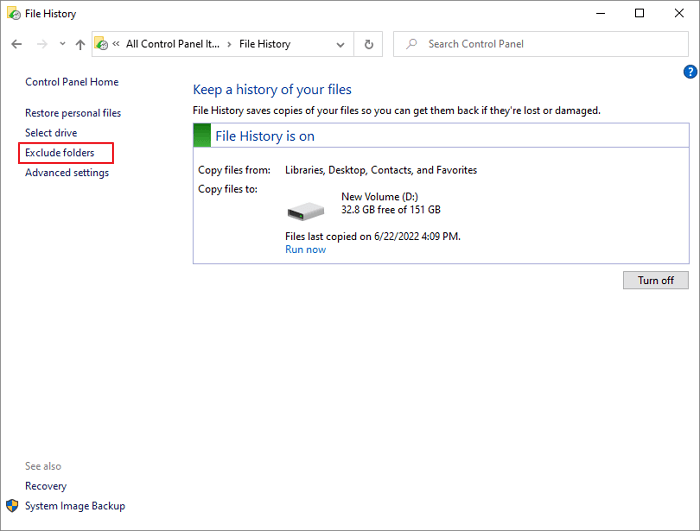
Step 1. Go to Control Panel > System and Security > File History.
If you don't see the File History option, it's probably because you're not in the Small icons or Large icons view. In that case, click the down arrow in the upper-right corner of the Control Panel window and select either Small icons or Large icons.

Step 2. On the left side panel, click "Turn on" to enable File History if it's not already enabled.

Step 3. File History will automatically back up files in your Libraries, Desktop, Contacts, and Favorites folders. If you want to add other folders to the list, click "Add a folder" and choose the folder you want to add.
Notice: In the latest Windows 11, Microsoft doesn't give users the authority to add a folder. You could only back up the default folders in Windows 11 File History.
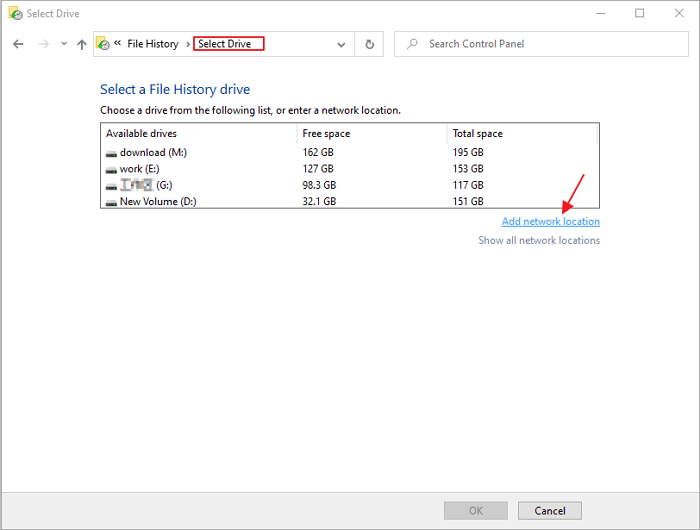
Step 4. To change the location where File History saves backups, click "Select drive" and choose a new location.
Step 5. To change how often File History backs up files, click the down arrow next to "Back up changes" and select how often you want File History to run. The default setting is Every hour, but you can also choose Every 10 minutes, Every 15 minutes, Every 20 minutes, Every 30 minutes, or other options.
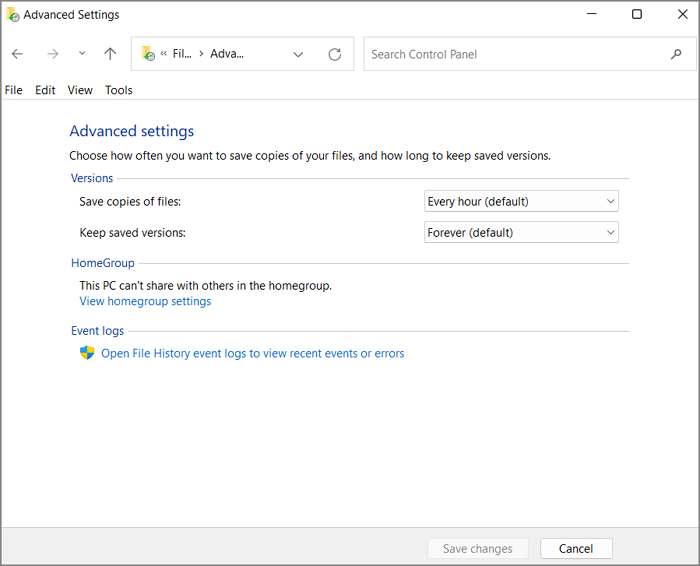
Step 6. To change how long File History keeps backups, click the down arrow next to "Keep saved versions" and select how long you want File History to keep backups. The default setting is Forever, but you can also choose until space is needed, 3 months, 6 months, 9 months, or 1 year.

Step 7. To exclude certain files from the backup, click "Exclude folders" and add any folders you want to exclude.
Step 8. When you're finished making changes, click "Save changes."
Ⅶ. Create An Automatic File Backup - 3 Ways
- The most common backup location is the external hard drive, while there is a newly raised backup destination choice - cloud drive. So read the following guide to learn how to backup Windows 10 to OneDrive - Microsoft's cloud drive.
- Creating backup files is necessary but can also cause storage space problems - too many backup files take up your disk space. Is there any solution? Yes, you can choose to create an incremental backup - which means only backs up added files to save space.
Once you've set up File History backup, it will back up selected folders to your backup drive at a set frequency. However, File History only allows users to back up limited numbers of folders, which means you might have a problem backing up all important data with File History. So it is recommended to use an alternative. EaseUS Todo Backup is one of the best alternatives you should have a try. Here are the reasons why we recommend this tool:
- Flexible backup content, more than File History supported folders
- More backup options: incremental backup, back up upon certain events, etc
- More backup destination choices: local drive, cloud drive, and NAS
- Offer every user 250GB of FREE EaseUS cloud space (based on AWS service)
After knowing what you can get from EaseUS Todo Backup, you can download and install this free backup software and have a try.
Secure Download
What are the three ways to automatically back up Windows files?
1. File History - Backs up different versions of selected files so that you can restore them to a previous version.
2. Backup and Restore (Windows 7) - Other than creating a system image, you could also customize the backup content by adding additional folders.
3. EaseUS Todo Backup - It is a third-party backup tool that provides more backup options. Users are able to back up more data and make a more flexible schedule with this tool.
LEARN MORE
Now you know that you have three ways to create an automatic file backup. But what are the differences between these three methods, and how to execute each method? Click here to learn about how to automatically backup files to an external hard drive in 3 ways.
Ⅷ. How Do I Restore from Backup in Windows 10?
The backup files created by Windows built-in features also can be restored through these two utilities. According to the type of backup created by the user, there are generally two scenarios for restoring backups: one is to restore files, and the other is to restore the system. In this part, we will tell you how to restore backup files on Windows 10.
Restore Specific Files
Backup and Restore (Windows 7) could be regarded as the restore center of Windows backup. No matter whether you have created a backup with File History or Backup and Restore (Windows 7), you should go here to perform a backup restore.
1. Restore Backup and Restore (Windows 7) Backup
Step 1. Go to Control Panel > System and Security > Backup and Restore (Windows 7).
Step 2. On the left side panel, click "Restore my files."
Step 3. Click the Browse for files button.
Step 4. Go through the backup and choose the specific files you wish to restore. Then click Add files.
Step 5. Now click Browse for folders, go through the backup, choose the specific folders you wish to restore, click Add folders, and then finally click the Next button.
Step 6. You can have the backup and restore utility restore selected files to their original or new locations. To save the recovered files in a new location, select In the following location and specify the desired location.
Step 7. Click the Restore button and then finally click Finish.

Restore System Image
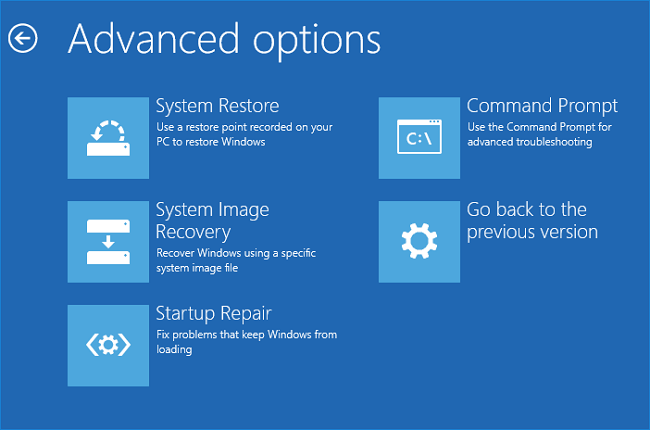
You need to go to Settings > Update & Security > Recovery to restore a system image. In the Advanced startup section on the right, click the Restart now button under Advanced startup. Windows 11 users should open Settings > System > Recovery and then click the Restart now button next to Advanced startup.
LEARN MORE
Other than restoring a backup created by Windows built-in utilities, you may want to restore backup files created by other tools. Click here to learn about the full guide to restoring files from Windows backup.
Was This Page Helpful?
Daisy is the Senior editor of the writing team for EaseUS. She has been working at EaseUS for over ten years, starting as a technical writer and moving on to being a team leader of the content group. As a professional author for over ten years, she writes a lot to help people overcome their tech troubles.
Jean is recognized as one of the most professional writers in EaseUS. She has kept improving her writing skills over the past 10 years and helped millions of her readers solve their tech problems on PC, Mac, and iOS devices.
Related Articles
-
File Backup - 2026 Guide to Understand It Comprehensively
![author icon]() Larissa/Jan 21, 2026
Larissa/Jan 21, 2026 -
2026 Ultimate Guide to Clone Hard Drive to SSD
![author icon]() Jean/Jan 21, 2026
Jean/Jan 21, 2026 -
(2026) An Ultimate Guide to Backup Hard Drive and Restore Your Computer
![author icon]() Jean/Jan 21, 2026
Jean/Jan 21, 2026 -
A Complete Guide to System Image Recovery in Windows 11/10/8.1/7
![author icon]() Jean/Jan 21, 2026
Jean/Jan 21, 2026