
iPhone Files App | How to Use Files App and How to Recover Files on iPhone and iPad
Summary
Where is the Files app on my iPhone? How to use Files app on your iPhone or iPad? Read this post and learn the full guide to Files app. We also provide detailed guides about how to recover recently deleted documents in Files app on iPhone and iPad as well as how to recover permanently deleted files on iPhone or iPad with a professional iOS data recovery tool.
| Workable Solutions | Step-by-step Troubleshooting |
|---|---|
| Where Is Files App | Accessing the Files app on iPhone or iPad is as straightforward as it gets. Once you're on the home screen of your handheld device...Full steps |
| How to Use Files App | Open the iPhone Files app > tap the drop-down menu on the top-right corner of...Full steps |
| Recover Recently Deleted Documents in Files App | The Files app will keep your deleted files for thirty days before the system finally removes them. Open the Files app > in the bottom section...Full steps |
| Recover Permanently Deleted Files on iPhone | To recover permanently deleted photos, contacts, call histories, and more on iPhone, use EaseUS iOS data recovery software...Full steps |
The Files app in Apple products is very handy. So, how do you use it to manage and recover files on your Apple devices? Apple's iPhones and iPads are known for many exclusive features. These phones offer many things such as cameras and UI design that no other phones do. One such feature of these phones is the in-built file explorer, simply called Files App.

This application has many remarkable yet simple features. However, a lot of people who aren't well-versed with Apple devices are unable to use them properly. Moreover, if they lose their files, then they have a hard time recovering them.
So, how do you use the iPhones Files app? And, how do you recover files on it? Let's dive in and find the answers.
iPhone Files App Overview
Files on iPhones is an application made by Apple, specifically for its iOS devices. As the name suggests, the purpose of this application is to access the files that you store inside your phone. Furthermore, you can sync this application with various online storage as well, such as:
- Apple's iCloud or iTunes
- Google Drive
- Microsoft Drive

This means you can access your files from your device, regardless of where they are stored. Nowadays, Apple constantly sends out newer updates to its primary applications, such as Files. Therefore, you should make sure your application is up-to-date by doing this:
Step 1. Head to "Settings".
Step 2. Tap "General".
Step 3. Find and tap "Software Update".
Step 4. Wait for updates to download and install.
This will ensure you have the latest edition of this application and have access to all its exciting new features.
Where Is the Files App on iPhone and iPad
Accessing the Files app on iPhone or iPad is as straightforward as it gets. Once you're on the home screen of your handheld device, navigate to a folder-like blue icon. This is the Files app that you wish to access. However, if you're unable to locate it right away, then you can follow these steps:
Step 1. Swipe down your home screen from the top.
Step 2. Tap on the search bar.
Step 3. Type Files in the search box.
Step 4. Files app should appear as the top result.
Step 5. Tap the Files app icon to run it.

The basic UI of this application allows you to navigate through your phone effectively. However, you can find various options such as:
- Locations, i.e., iCloud or the storage of your phone
- Favorites - the most commonly used folders
- Tags - files you've tagged, i.e., important or work
Now, the other way you can Files app on your iPad or iPhone is by swiping your screen right until you locate it on your home screen. However, the bright blue icon is difficult to miss. Therefore, you should be able to find and use it without any hassle.
How to Use Files App on iPhone or iPad
If you're wondering how to use the Files app on iPhone, it is a straightforward affair. All you have to do is find the app, following the steps mentioned above. Then, you can use it for various purposes. The first purpose should be to connect your Files app to online storage, such as Google Drive, OneDrive, etc.
Here's how to do that:
Step 1. Open the iPhone Files app.
Step 2. Tap the drop-down menu on the top-right corner of your screen.

Step 3. Navigate to the third option, i.e., "Edit".
Step 4. Navigate the list and find "Google Drive & OneDrive".
Step 5. Toggle "On" every online server/cloud server you wish to turn on.
Step 6. Sign in to the service to make it work effectively.
Now that you've connected accounts to your iPhone device, you can search across cloud storage to find the files you wish for. Here's how to do it:
Step 1. Tap the "Search" bar.
Step 2. Type the file or folder you wish to find.
Then, you can add those files to your favorites to access them quickly without having to wonder where the Files app is on your iPhone. Then, you can add specific files as your favorites, so you won't have to search for them again.
You can follow the same steps on iPads as well. Besides that, you can attempt various actions on your files. Here's how:
Step 1. Navigate to the file you wish to make changes to.
Step 2. Tap and press on the file.

Step 3. From this pop-up menu, you can conduct various actions.
Now, you can compress your files to save space. Moreover, you can move or copy the files to another space in your storage. Or, you can rename, share, or open in a new window as well. Once again, this applies to both iPhones and iPads.
How to Recover Recently Deleted Documents in Files App
The Files app on iPhone has an automatic recovery option for your files. In other words, it will keep your deleted files for thirty days before the system finally removes them.
So, if you accidentally delete documents or other important files, then the Files app gives you a chance to recover them. This is one of the most convenient features of this in-built application. So, recovering your files from the Files app on your iPhone doesn't require you to take any extraordinary steps.
Here's how to do it:
Step 1. Open the Files app once more.
Step 2. In the bottom section, tap on "Browse".

Step 3. Once you enter this section, look for "Recently Deleted".

Step 4. Here you will find all the recently deleted files.
Once you're in, you can pick one or more files that you wish to recover. Remember, these are only recently deleted files. Therefore, anything deleted before 30 days won't be here.
Now, select and hold the file that you wish to recover. You can pick multiple files at once. Once you do, the File app will change the bottom prompts to "Recover" or "Delete".
Picking the Delete option will rid these files for good. While tapping on Recover will restore the files in their primary location. Therefore, you must remember the file's original location before you recover them.
How to Recover Permanently Deleted Files on iPhone or iPad
If you've deleted your files permanently, then you don't need to despair. You can use a reliable iOS data recovery tool - EaseUS MobiSaver to restore deleted data from your phone. And, yes, this includes the deleted and lost data that you have no backup for.
You might be wondering how it's possible to recover without backup? EaseUS iPhone data recovery software has the ability to deep scan iPhones and recovers deleted files that you might not even recover from the in-built Files app. Besides just restoring deleted photos or documents, this tool can help you recover much more, such as text messages, contacts, chat histories, application data, etc.
Step 1. Connect iPhone to Your PC
Launch EaseUS MobiSaver. Click "Recover from iOS device" on the left and click "Start".

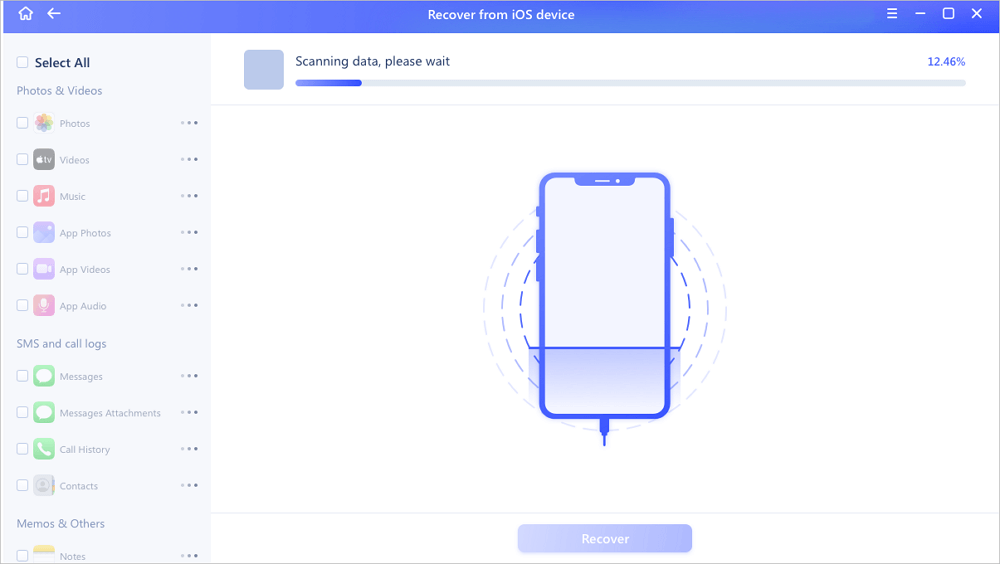
Step 2. Scan for Lost iPhone Data
EaseUS MobiSaver will automatically scan iPhone/iPad/iPod, and find present data and even some lost data for you. Just wait for the scan to complete.
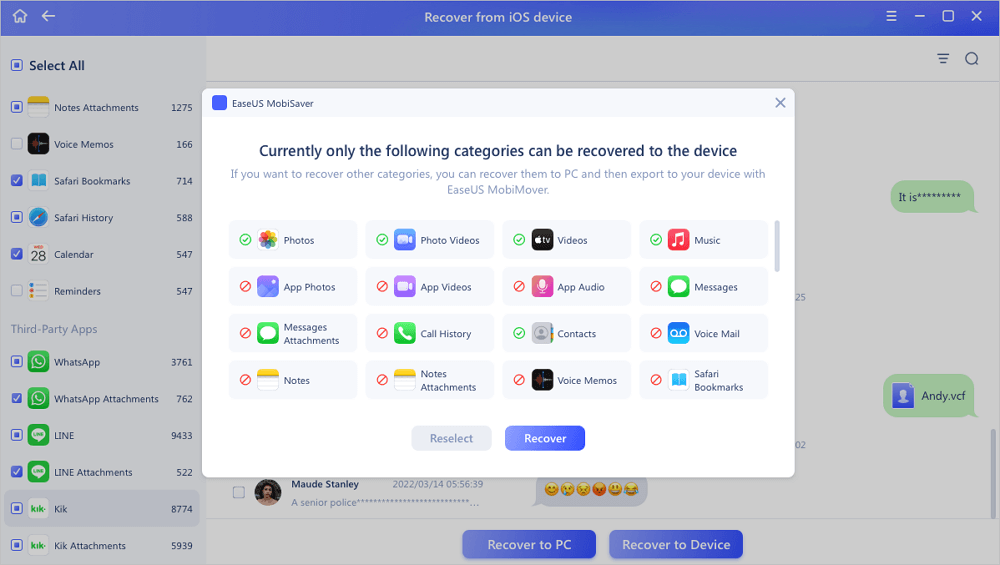
Step 3. Click the "Recover" Button
You can choose the lost data such as your photos, videos, contacts, SMS, notes, voice mails, and other files you want to recover and save those data to another location.
Most of all, you can recover all this data without having to look for a backup or restorable file. However, perhaps the one thing you will like the most about this tool is how many cases it can handle - if you delete your files.
Including:
- Recover accidentally deleted files.
- Recover files removed in locked or disabled iPhones.
- Restore files in case of Jailbreak failure or factory reset.
- Recover your data from an iPhone with a damaged or broken screen.
All these factors point towards the prowess of EaseUS MobiSaver, and how much hassle it can save you. Therefore, all you have to do is download and install this tool on your computer. Then, connect the iPhone to the computer and let the tool scan for it.
Conclusion
Using the Files app on iPhone isn't a complicated affair. However, for some users that find difficulty operating it, if they're new to iPhones or just switching from Android phones, then this article should guide them. On top of that, they can easily recover lost files on your iPhone or iPad with EaseUS MobiSaver.
Was This Page Helpful?
Related Articles
-
[Solved] iPhone Keeps Freezing After Update iOS 12/11.3/11
![]() Brithny/2023-07-20
Brithny/2023-07-20 -
3 Methods to Retrieve Deleted Text Messages on iPhone 6/6s
![]() Tracy King/2023-07-20
Tracy King/2023-07-20 -
How to View and Retrieve Call History from iCloud [iOS 15 Available]
![]() Cedric/2023-07-20
Cedric/2023-07-20 -
Top 8 Best iPhone Data Recovery Software for Windows/Mac [Free and Paid]
![]() Cedric/2023-09-15
Cedric/2023-09-15