Quick navigation to the fixes for Windows Update Troubleshooter not working problem:
| Workable Solutions | Step-by-step Troubleshooting |
|---|---|
| Fix 1. Run SFC & DISM Scan | DISM and SFC are two command-line tools that can be used to repair corrupted system files...Full steps |
| Fix 2. Clear DNS Cache | A bulked-up DNS cache might lead to Windows Update Troubleshooter not working...Full steps |
| Fix 3. Change Local Group Policy Settings | Local Group Policy Editor can stop Windows Updates and Update Troubleshooter. Edit a particular setting...Full steps |
| Fix 4. Update Windows to the Latest Version | Upgrading Windows to the latest version might solve the Windows Update Troubleshooter not working...Full steps |
| Fix 5. Perform a System Restore | Open Control Panel on Windows 10. Go to Recovery and click on Open System Restore...Full steps |
| Fix 6. Reset Your PC | Running the Windows Reset option is a good way to ensure that your PC doesn't cause any issues...Full steps |
Windows Update is a remarkable service that keeps people's computer's in the loop of the latest upgrades. It also dispatches security patches that keep a computer safe and secure. Besides, they offer better stability regarding drivers and Windows' core services.
However, sometimes issues like existing drivers or hardware-related problems get in the way, and Windows update not working problem occurs. Hence, Windows Update Troubleshooter comes into play. But what happens when it doesn't work, either?
There are a few ways to work around that too. This article will explore those options and how you can deal with Windows Update Troubleshooter not working issue. So, let's dive right into it.
What Is Windows Update Troubleshooter
The Windows Update Troubleshooter is a utility that helps you identify and fix problems with Windows updates. The Troubleshooter will analyze your System and recommend fixes for any issues it finds. This program aims to fix issues that might get in the way of Windows Updates.
Let's say you have the latest update ready to download. However, the Windows Update then runs into an unknown issue. So, the Troubleshooter's job is to determine what prevents the update from downloading or installing. It could be:
- Bad internet connection or slow internet connectivity
- Hardware or driver issue
- Computer viruses or malware
- Issues like outdated or inactivated Windows
So, when the Troubleshooter runs, it figures if one of these or more issues is getting in the way. If it finds a particular issue, then it tries to fix that. However, there are times when even the Windows Update Troubleshooter won't work. So, let's find out.
🔥Read More: How to Fix Windows Recovery Environment Servicing Failed.
How to Run Windows Update Troubleshooter in Windows 10/11
It's important to understand that Windows Update Troubleshooter is the same in Windows 10 and 11. So much that even the steps to get to it are the same. However, some users worry that accessing this particular program might be difficult or tough.
However, running the Troubleshooter is as easy a task as any. All you need to do is ensure that your PC is connected to the internet. Suppose it is, and your update is failing. In that case, you will have to go to additional settings to run the Windows Update Troubleshooter. Here's how:
Step 1. Head into System "Settings". Go to the troubleshooting menu
Step 2. Go to "Update & Security" > "Troubleshoot" >"Additional troubleshooters".
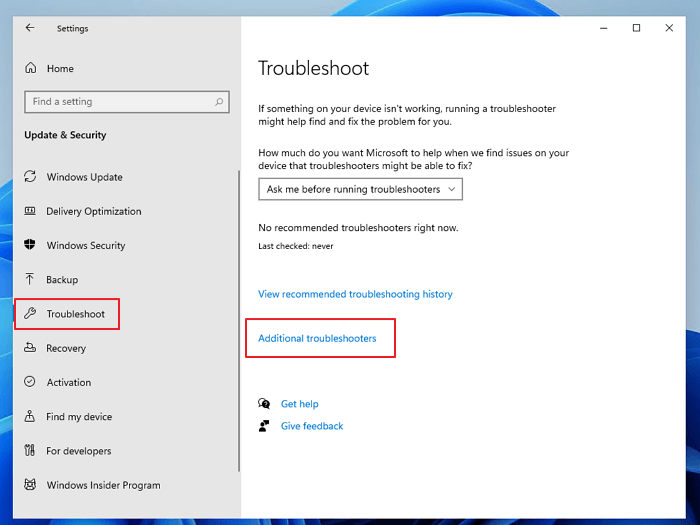
Step 3. Find Windows Update. Click it, and you will see "Run the troubleshooter".
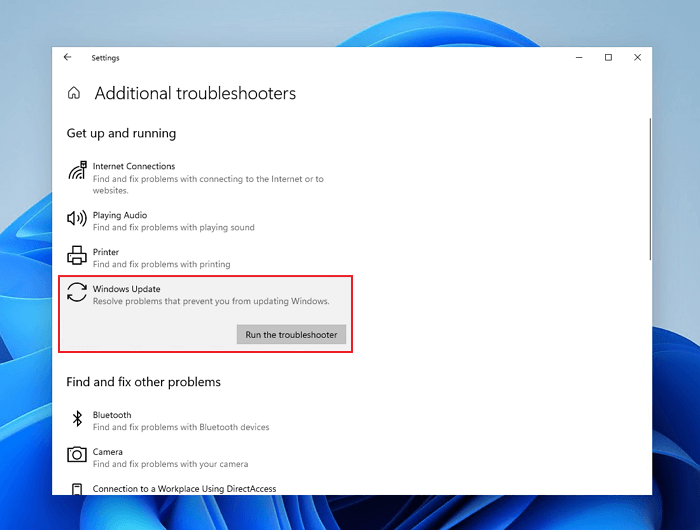
Step 4. Click on "Run the troubleshooter".
This will start the Windows Update Troubleshooter utility on your PC. It'll take a while, depending on the issue that your Windows might be facing. However, after a few minutes, the results should be clear.
It will either result in further errors or tell you to restart your PC to apply the fix. Once your PC has restarted, Microsoft suggests that you should try running your updates again. Because the Troubleshooter has most likely fixed your issue.
Windows Update Troubleshooter Not Working Windows 11/10 [Solved in 6 Ways]
In this section, we're going to explore a few ways that you can fix your Windows Update Troubleshooter not working issue. As mentioned before, it could be your internet, a simple driver issue, or a problem related to Windows itself.
Therefore, the six fixes we will explore will target each potential reason behind this problem. Each of these fixes will guide you through simple steps. So, try to follow each step and stop at the one that works for you. So, let’s get started.
Fix 1. Run SFC & DISM Scan
The first method is to try SFC and DISM scans. DISM and SFC are two command-line tools that can be used to service Windows images. DISM is a command-line tool for servicing a Windows image. It can be used to install, uninstall, configure, and update Windows features, packages, drivers, and international settings.
SFC is a command-line tool for scanning and repairing issues in the installed image of Windows. With DISM & SFC scan, you can:
- Install new features from the Windows Features node in the DISM GUI.
- Uninstall unwanted or unneeded features from the same node
- Enable or disable international settings from the international node in the DISM GUI
Therefore, you need to use one or both of these methods. So, here's how you can do that:
DISM command:
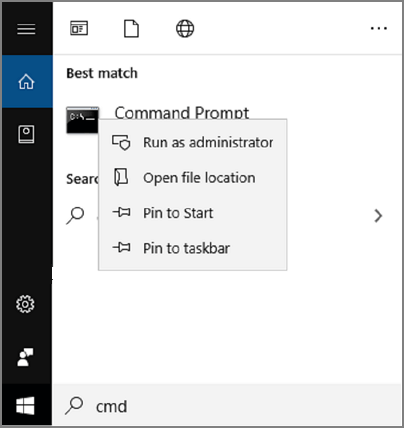
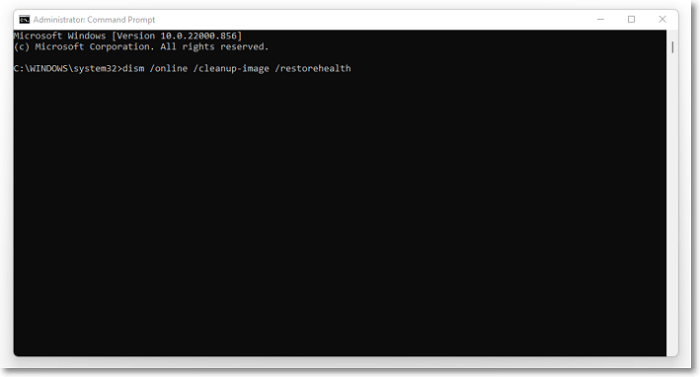
Step 1. Open CMD as administrator on your PC.
Step 2. Type DISM /online /cleanup-image /Scan Health and press Enter. Wait for the scan to complete.
Step 3. Now type DISM /Online /Cleanup-image /RestoreHealth.
Step 4. Wait for it to finish and restart your PC.
You can try to run the Windows Update Troubleshooter after this step, but it's better to follow it up with the SFC Command:
Step 1. Open CMD as administrator again.
Step 2. Type SFC /ScanNow and press Enter.
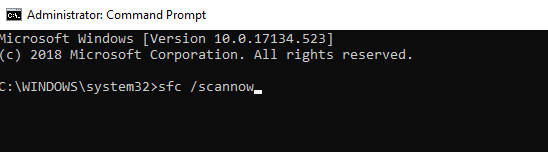
Step 3. Let it finish.
After this, restart your PC and run the Troubleshooter again. It's most likely that your problem will be fixed after this.
Read Also: SFC scannow There is a system repair pending
Fix 2. Clear DNS Cache
It's important to note that Windows Update Troubleshooter takes a lot of suggestions and necessary files through the internet. So, it needs the internet to work flawlessly. So, a bulked-up DNS cache might be getting in its way.
Therefore, it's important to clear it up by following these steps:
Step 1. Open CMD as administrator on your PC. Type ipconfig /flushDNS.
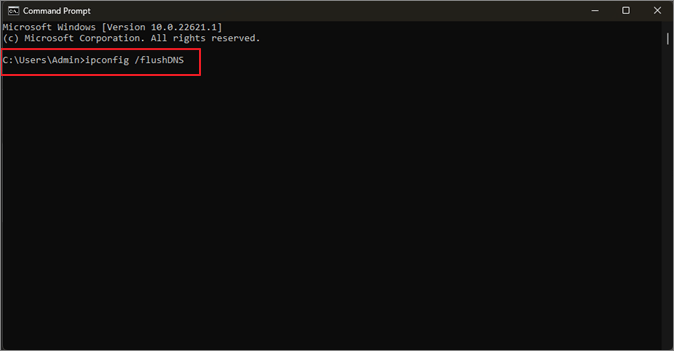
Step 2. Wait for it to finish.
Once this is done, you can try running the Windows Update Troubleshooter again. Since flushing the DNS restores your internet to prime quality, it's highly likely this will fix the issue.
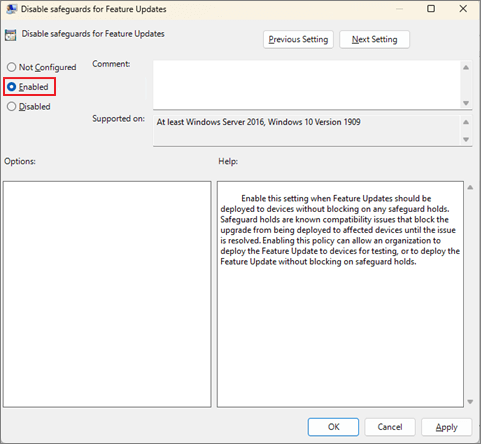
Fix 3. Change the Local Group Policy Settings
There are times when wrongly configured settings in Local Group Policy Editor can stop Windows Updates and Update Troubleshooter. To fix this issue, it's imperative to find and edit a particular setting.
This setting will disable any safeguards or preventions that might be causing the Windows Update or the Troubleshooter to not work. So, here's how you'll edit it:
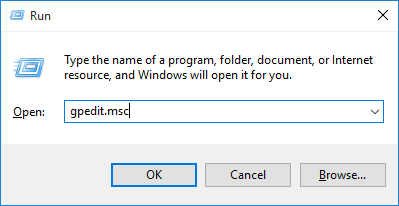
Step 1. Type GPEdit.msc in the Run command.
Step 2. Head into "Computer Configuration"> "Administrative Templates" > "Windows Components".
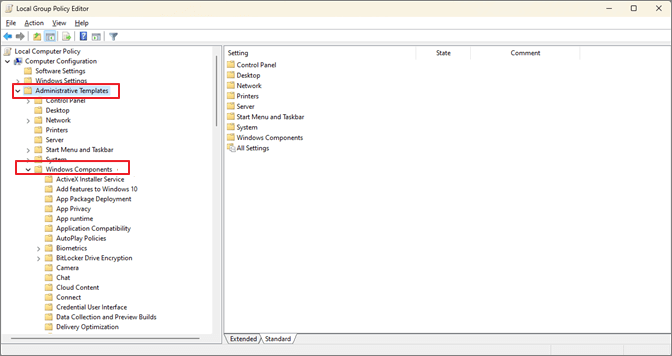
Step 3. Scroll down and find "Windows Update". Then select "Manage updates offered from Windows Update".
Step 4. Find & double-click "Disable Safeguards for Feature Updates".
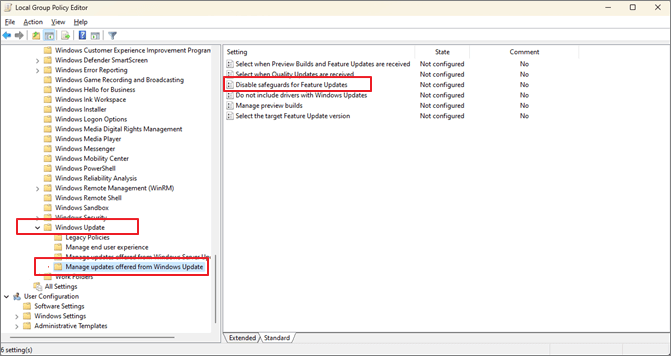
Step 5. Under configurations, select "Enabled", then click "Apply" and "OK".
Step 6. Exit the group policy editor. Restart your PC.
Once this is done, restart your PC for the settings to take effect. Once done, try running the Troubleshooter again to see if it works. If it doesn't, move on to the next fix.
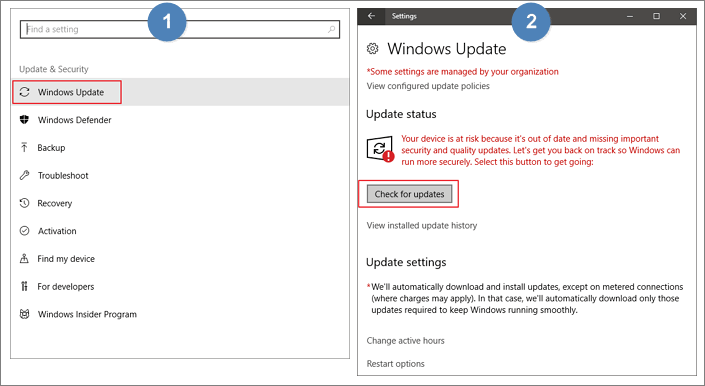
Fix 4. Update Windows to the Latest Version
Sometimes the simplest & easiest fix is the most convenient. Sometimes, you don't need to take extraordinary steps in Windows to fix any issues. In this case, all you might have to do is update Windows to the latest version.
Microsoft is notorious for launching overnight upgrades and updates. So, it might as well be that your Windows is simply outdated. So, here's what you need to do:
Step 1. Press the Start button on your keyboard. Type "Settings" and click on it
Step 2. Under the side panel, go to the bottom and click "Windows Update".
Step 3. Click on "Check for updates".
Fix 5. Perform a System Restore
There are times when installing software, a new driver, or any sort of update might hinder your PC. In this case, it's better to revert to normal settings or a previous restore point where things worked flawlessly.
NOTICES:
Before you proceed with this method, it's recommended that you create a recovery point or make a backup. So, if you end up losing any data after the System restores, you can recover it. But what if you restore your system without a backup and lose important data? Don't worry. You can resort to a professional data recovery tool like EaseUS Data Recovery Wizard to get files back.
This efficient data recovery software utility will restore any files you lose. It even can restore data from a hard drive that won't boot.
Follow the steps below to perform a system restore in Windows 10 or Windows 11:
Step 1. Open Control Panel on Windows 10.
Step 2. In the top-right corner, search for Recovery options. Open "Recovery". Under these options, find and click on "Open System Restore".
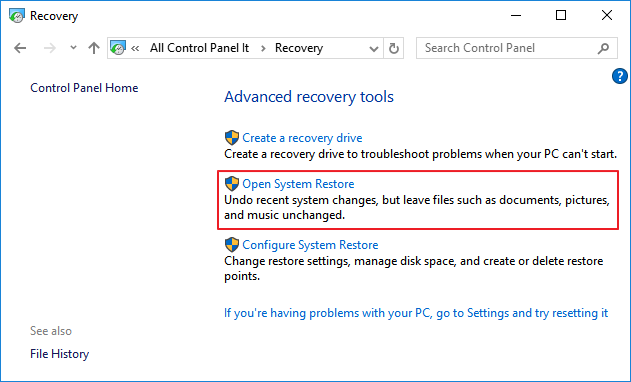
Step 3. Once into the options, find and click "Choose a different restore point".
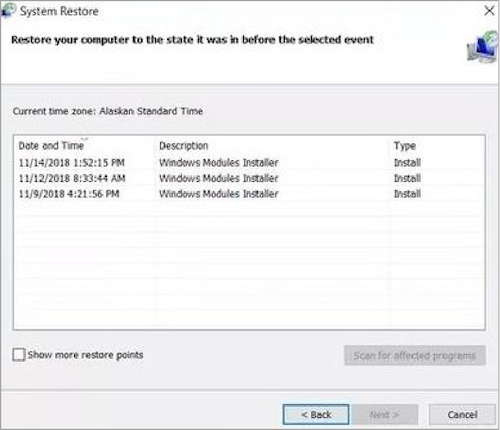
Step 4. Pick the restore point from a few days ago - or when things worked normally. Let Windows reset your PC to that restore point.
And this will restore your PC to a restore point where Windows Update Troubleshooter will work again. So, make sure you follow these steps correctly.
Fix 6. Reset Your PC
A good way to ensure that your PC doesn't cause any issues when running Windows Update Troubleshooter is by running the Windows Reset option. To do that, you'll have to reboot your PC into a recovery environment.
And then follow the steps mentioned to reset your PC. Here's how:
Step 1. Head into the start menu and click on shutdown options. Press Shift on your keyboard and click on Restart.
Step 2. Before restarting, Windows will prompt a few options. Click on "Troubleshoot".
Step 3. Press the "Reset this PC" button.

Step 4. Then press "Keep my files".
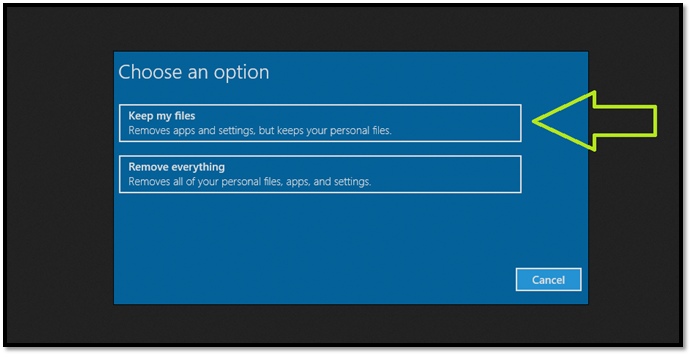
Step 5. Once you enter your password, Windows will ask for confirmation once more. Press "Reset" to confirm.
This will reset your PC and also uninstall any secondary software. Therefore, securing any data before proceeding with this operation is recommended.
Conclusion
These are some of the most viable fixes if your Windows Update Troubleshooter has stopped working. All these steps will implement a variety of fixes, which will get your Windows Updates back up and running once more.
And it's important to reiterate that some of these steps might end up losing your files. So, you need to use a professional utility like EaseUS Data Recovery Wizard to restore your files efficiently and quickly.
Windows Update Troubleshooter FAQs
If you have further queries, then you'll find their answers here.
1. Why is troubleshoot not working on Windows 10?
As mentioned earlier on in this article, the problem might be because of bad internet or a hardware issue. If neither of these is the case, you simply have to reset your PC to ensure your operating System is up and running again normally.
2. How do I run the Windows Update Troubleshooter?
Here is the complete process to run Windows Update Troubleshooter in Windows 10 and 11:
Step 1. Click "Start", go to "Settings", and choose "Update & Security".
Step 2. Click"Troubleshoot" and select "Additional troubleshooters".
Step 3. Click "Windows Update" and "Run the troubleshooter".
3. What do I do if Windows Update Troubleshooter is not working?
We explored six different fixes, and all of them are known to work as a viable option to get Windows Update Troubleshooter up and running again.
- Fix 1. Run SFC & DISM Scan
- Fix 2. Clear DNS Cache
- Fix 3. Change the Local Group Policy settings
- Fix 4. Update Windows to the latest version
- Fix 5. Perform a System Restore
- Fix 6. Reset PC
4. How do I fix a corrupted Windows 10 Update?
The easiest way is to go to System restore and restore your PC to an early System Restore point before the Windows update. If that doesn't work, reset your PC, as it can reinstall Windows without losing files. However, you will lose all of the installed software and drivers.
Was This Page Helpful?
Roxanne is one of the main contributors to EaseUS and has created over 200 posts that help users solve multiple issues and failures on digital devices like PCs, Mobile phones, tablets, and Macs. She loves to share ideas with people of the same interests.
Cedric Grantham is a senior editor and data recovery specialist of EaseUS. He mainly writes articles and how-to tips about data recovery on PC and Mac. He has handled 10,000+ data recovery cases and is good at data recovery of NTFS, FAT (FAT32 and ExFAT) file systems, and RAID structure reorganization.
Related Articles
-
How to Factory Reset Mac Mini M1[with Video Tutorial]
![author icon]() Dany/2024-03-18
Dany/2024-03-18 -
How to Fix iMessage Not Working on MacBook Air/Pro [Step-by-Step Tutorial]
![author icon]() Brithny/2024-01-11
Brithny/2024-01-11 -
How to Solve Bitlocker Keeps Asking For Recovery Key? [Full Guide]
![author icon]() Tracy King/2024-03-14
Tracy King/2024-03-14 -
macOS Monterey Update Not Found | How to Solve Monterey Update Issue
![author icon]() Dany/2024-01-11
Dany/2024-01-11

EaseUS Data Recovery Services
EaseUS data recovery experts have uneaqualed expertise to repair disks/systems and salvage data from all devices like RAID, HDD, SSD, USB, etc.