The looming possibility of data loss might be frightening when deciding to remove macOS Sonoma. Can you uninstall Sonoma without losing data? In such cases, EaseUS Data Recovery Wizard for Mac Pro proves to be a trustworthy ally. This powerful program is intended to handle many data loss scenarios, providing a smooth recovery procedure.
As one of the best Sonoma data recovery software, EaseUS software is the comprehensive solution for data loss caused by Sonoma uninstalling or other unanticipated events.
After Apple released the official version of macOS Sonoma, users can't wait to download and enjoy Sonoma's new features and experiences. However, many users reported multiple macOS Sonoma issues, including:
- 😓The macOS Sonoma runs slow after the update
- ⛔macOS Sonoma is stuck on the loading screen
- ❎Apps not working on macOS Sonoma
- 😫macOS Sonoma freezing and crashing
- ......
Unfortunately, suppose you are one of those who encountered macOS Sonoma glitches and decided to downgrade Sonoma to Ventura; the EaseUS data recovery tool is ready to recover lost files as you begin on the mission to uninstall Sonoma without losing data.
This article will walk you through various data recovery issues, ensuring your data will be protected. Explore EaseUS Data Recovery Wizard for Mac Pro to safeguard your data during and after the Sonoma removal procedure!
Step 1. Backup Your Data
Keeping your data secure is critical, especially while removing macOS Sonoma. Using Time Machine, a built-in backup capability on Mac, is one effective way to safeguard your information ahead of time.
Step 1. Navigate to the Apple menu, pick "System Preferences", and then "Time Machine".

Step 2. Click on the "Select the Backup Disk" option. Connect an external drive and configure Time Machine to use it as your backup disk.

Step 3. Click on "Backup Automatically", and Time Machine will start preparing the files for backup.
Time Machine guarantees that your data is routinely archived by following these easy procedures, giving a restore point in case of unanticipated data loss during the Sonoma uninstalling so that you can restore your Mac from Time Machine.
Furthermore, try the EaseUS Data Recovery Wizard for Mac Pro, which assists in data recovery and provides a seamless backup option for enhanced security. Investigate the twin powers of Time Machine and EaseUS to protect your data completely.
Back Up Your Mac and Never Lose Data
Back up and restore your MacBook/iMac without Time Machine, iCloud, or external hard drives.
Step 2. Erase Your Mac Using Disk Utility
Preparing your Mac for a clean slate is critical before removing macOS Sonoma. To efficiently erase all content and settings on your Mac, use "Disk Utility". Here are the steps:
Step 1. Restart your Mac. Press and hold the "Command + R" buttons until the Apple logo appears. Select "Disk Utility" from the menu.
Step 2. From the left sidebar, locate and pick up your Mac's main drive.
Step 3. Click the "Erase" button to confirm your decision to erase the drive.

This step guarantees a clean environment for the uninstalling procedure. Follow these steps precisely to prepare your Mac for smooth Sonoma removal without jeopardizing data integrity.
However, erasing your Mac is not always a smooth operation, and sometimes there are many obstacles, such as the error message: Erase Assistant is not supported on this Mac. In this case, you can read the following article to solve this error.

How to Fix 'Erase Assistant Is Not Supported on This Mac' Error
This article discusses how to fix the error: Erase Assistant is not supported on this Mac. Read more >>
Share this article on social media if it is informative, and help others learn how to uninstall macOS Sonoma without losing data.
Step 3. Preparation Before Uninstall macOS Sonoma
Before beginning the uninstallation process, perform a comprehensive pre-check to guarantee a seamless experience. To prepare your Mac, take the following steps:
🌐Internet Connection
Confirm a stable internet connection to ensure a smooth uninstallation. An unbroken connection guarantees that the required files and resources are readily available during the uninstallation.
💾Examine Storage Space
Examine your Mac's storage space to ensure enough space for the uninstallation. This eliminates the possibility of pauses or mistakes caused by inadequate space, guaranteeing a seamless removal of macOS Sonoma.
✅Power Supply Connection
Ensure your Mac is linked to a dependable power supply throughout the uninstallation. This precaution reduces the danger of data loss and other system faults during the procedure by preventing unexpected shutdowns.
These tests are essential to avoid any disturbances during the uninstallation. A reliable internet connection, huge storage, and a connected power supply safeguard your data and the uninstallation process from unexpected outages.
Step 4. Choose a Fix to Uninstall Sonoma Without Losing Data
After confirming that your data is properly backed up, you can uninstall macOS Sonoma without jeopardizing your content. We give four tried-and-true solutions, each with its own approach:
Fix 1. Uninstall Sonoma Using Factory Reset
If your Mac comes with macOS Sonoma and you want to downgrade to Ventura, a factory reset is a simple method. This procedure restores the operating system to its original macOS build. The procedure is the same for Intel and Apple CPUs.
Step 1. To open "System Preferences", click the Apple symbol in the upper left corner of your Mac screen.
Step 2. Select "Erase All Content and Settings" and input your Mac password to confirm.

Step 3. Enter your password and click "Continue" to sign out of your Apple account. Then, select "Erase All Content & Settings" to begin the factory reset.
Step 4. Wait for the language interface to appear, indicating that the downgrade to MacOS Monterey has begun. When asked, continue with the installation.
Forget your password? Don't worry! Here's a guide on factory resetting a Mac without a password; take a look!

Factory Reset Mac Without Password [for macOS Ventura/Monterey]
This article discusses how to factory reset a Mac without a password. Read more >>
Fix 2. Uninstall Sonoma with a Time Machine Backup
The uninstalling process is straightforward if you used Time Machine to back up your Mac before upgrading to Sonoma. Your Time Machine backup contains the original macOS installation files, allowing for a smooth uninstallation. Follow the steps below:
Step 1. After deleting Macintosh HD in macOS Recovery, open "Disk Utility" and dismiss it to return to "macOS Utilities".
Step 2. Connect your Mac backup drive and restart your Mac in Recovery Mode.
Step 3. On the "macOS Utilities" menu, click "Restore From Time Machine Backup" and "Continue".

Step 4. Select your Time Machine backup and click "Continue".

Step 5. Choose the Time Machine backup location, usually your Mac's internal hard disk.
Step 6. To restore the backup with your preferred macOS version and personal data, click "Restore".
| Note: The repair procedure may take time. After the uninstallation, your Mac will restart with macOS Ventura or the selected macOS version. |
Fix 3. Uninstall macOS Sonoma via Recovery Mode
Using macOS Recovery Mode allows you to remove Sonoma without losing any data. Here's how it's done:
Step 1. Connect your Mac to the network, then restart it while holding down the "Shift + Option + Command + R" keys.
Step 2. Wait until the globe starts rotating, then let go of the keys to reboot the Mac into Recovery mode.
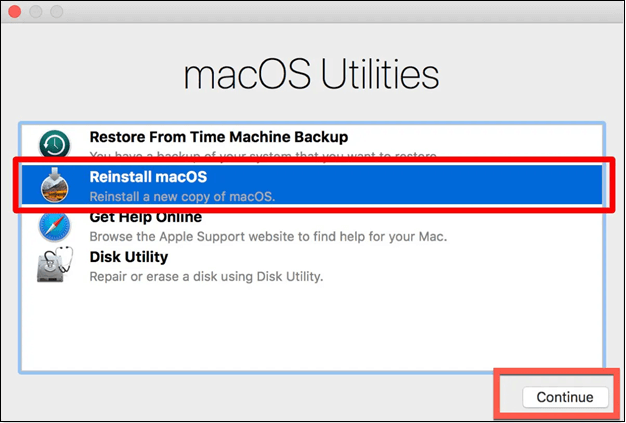
Step 3. Once the device restarts, select the "Reinstall macOS" option in the macOS Utilities box.
Step 4. Install the macOS version you want by following the instructions.
Have you ever encountered the error "The recovery server could not be contacted" on macOS? If so, don't worry! This article will introduce 8 practical methods to fix the error.

How to Fix the Recovery Server Could Not Be Contacted on macOS Sonoma/Ventura
This article will introduce 8 practical methods to fix the error: The recovery server could not be contacted. Read more >>
Fix 4. Use a Bootable USB Drive to Uninstall Sonoma
creating a macOS Ventura bootable USB is a great way to remove Sonoma while protecting your data. Carry out the following steps:
Step 1. Get the macOS Sonoma installer from the Mac App Store, published on September 26, 2023. Back up your Mac files simultaneously.
Step 2. In "Disk Utility", pick the USB drive and click "Erase" to format it (Figure out what format on macOS is better, APFS vs. Mac OS Extended?).
Step 3. Connect the formatted USB to your Mac and launch "Terminal" in "Spotlight". Enter the command:
sudo /Applications/Install\ macOS\ Sonoma.app/Contents/Resources/createinstallmedia --volume /Volumes/MyVolume Replace "MyVolume" with your USB drive's name and press Enter.
Step 4. Insert the bootable USB into your Mac. Press "Option" (hold Power for Apple silicon Macs), turn on your Mac, and choose the bootable disk.
Step 5. Clean and install macOS on your Mac using on-screen instructions.
Conclusion
Uninstalling macOS Sonoma without losing important data takes careful planning and execution. This article has given people clear instructions and various solutions based on their preferences.
Use EaseUS Data Recovery Wizard for Mac Pro to protect your data better. This expert program provides complete data recovery options in a variety of settings. Downloading our recovery software is a proactive move toward protecting your digital data and ensuring your peace of mind during complicated activities such as removing Sonoma.
Uninstall Sonoma Without Losing Data FAQs
As users navigate the process of uninstalling Sonoma without data loss, common questions may arise. Let's address some of these queries.
1. Can you uninstall Sonoma?
Yes. Download the macOS version you want, such as Ventura or Monterey, create a bootable USB installer from that, start with the USB Installer, erase your Mac hard drive, reinstall macOS, and then migrate from your Time Machine backup. Don't forget to back up your essential data before uninstalling macOS Sonoma.
2. How do I downgrade Sonoma without losing data?
To downgrade Sonoma without losing data, make a backup using Time Machine or something similar before reinstalling the desired version of Sonoma. Or install EaseUS Data Recovery Wizard for Mac Pro to recover your lost or deleted data after downgrading your Mac OS.
3. How do you erase a Mac Sonoma?
To erase your Mac with macOS Sonoma, go to "Applications > Utilities > Disk Utility", and select the Mac hard drive in the left panel, click the "Erase" button to erase your Mac. To uninstall macOS Sonoma, you should go to "macOS Utilities" choose the "Reinstall macOS" option, and select the macOS version you want. Refer to the screen instructions to uninstall your macOS Sonoma.
Was This Page Helpful?
Brithny is a technology enthusiast, aiming to make readers' tech lives easy and enjoyable. She loves exploring new technologies and writing technical how-to tips. In her spare time, she loves sharing things about her game experience on Facebook or Twitter.
Related Articles
-
How to Download and Install ADB Drivers on Windows 11[2024 Updated]
![author icon]() Daisy/2024-01-11
Daisy/2024-01-11 -
5 Solutions on Samsung 990 Pro SSD Health Drops Issue
![author icon]() Cici/2024-01-11
Cici/2024-01-11 -
Windows 10 Backup Command Line - How to Backup Files Using (from) Command Prompt in Windows 10
![author icon]() Jean/2024-03-15
Jean/2024-03-15 -
How to Encrypt Hard Drive on a Mac with 2 Reliable Methods
![author icon]() Dany/2024-01-11
Dany/2024-01-11

EaseUS Data Recovery Services
EaseUS data recovery experts have uneaqualed expertise to repair disks/systems and salvage data from all devices like RAID, HDD, SSD, USB, etc.