This article discusses three tried-and-tested ways to address and repair disk permissions on a Mac without risking the loss of important data. It is necessary to ensure that your Mac runs smoothly, and one important factor in doing so is maintaining disk permissions. Disk permissions restrict access rights to files and folders, ensuring that your Mac runs securely and efficiently. Over time, faults or anomalies in these permissions might occur, compromising the operation of your system.
Here are three effective methods to repair disk permissions on a Mac:
| Workable Solutions | Step-by-step Troubleshooting |
|---|---|
| Fix 1. Run First Aid in Disk Utility to Repair the Disk Error | Open Disk Utility from the Finder > Applications > Utilities folder, and click First Aid...Full steps |
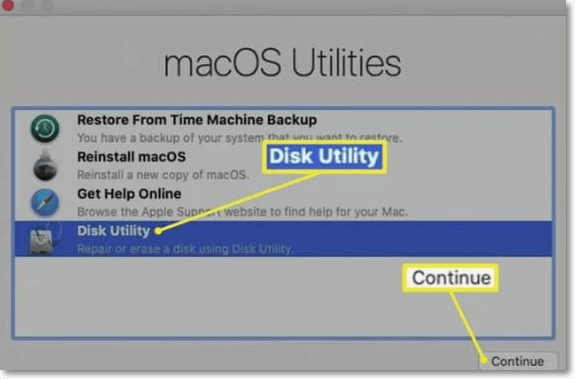
| Fix 2. Repair Disk Permissions in Disk Utility from Recovery Mode | Enter Recovery Mode on your Mac, choose Disk Utility, and click the Continue button...Full steps |
| Fix 3. Use Terminal to Repair Disk Permissions on a Mac | Launch the Terminal in the Finder > Applications > Utilities folder, copy and paste the command...Full steps |
From using Disk Utility's First Aid to entering Recovery Mode and using Terminal commands, each method offers a unique strategy for dealing with disk issues. A basic grasp of disk permissions is required to keep your Mac running smoothly and efficiently.
Recover Files on the Disk Without Permission Using Software🔥
No one would want to lose data on their disk due to the corrupted disk permissions. If you have backed up your data regularly, you can utilize EaseUS Data Recovery Wizard for Mac to avoid data loss. With an extraordinary 99.7% recovery rate, it can help you retrieve data from your HDD, SSD, Time Machine backup, and even fusion drives.
This powerful tool can help users recover data quickly and safely when the error message "the disk you attached was not readable by this computer" occurs on your Mac. Besides, when you insert a disk and can't access the stored data on it without permission, the EaseUS professional disk recovery software provides a deep scan capability to locate all the recoverable data even without permission.
Follow the steps below to recover files on the disk without permission using EaseUS Data Recovery Wizard for Mac:
Step 1. Launch the EaseUS software and connect the disk to your Mac with a USB cable. Select the disk in the EaseUS software window.

Step 2. Click "Search for lost files" to scan all the stored data on the disk. During the scanning process, you can click the eye icon to see the file's content.

Step 3. Choose the files you want, click "Recover" to recover them, and save the recovered files to a safe storage location on your Mac.
After saving the recovered data from the disk without permission, you can refer to the following three methods to repair the disk permission on your Mac.
Fix 1. Run First Aid in Disk Utility to Repair the Disk Error
If you suspect a problem with your Mac's internal drive or an external storage device, you may use Disk Utility's First Aid tool to diagnose and perhaps resolve the issue. First Aid runs diagnostic checks and automatically resolves any problems with your drive.
Knowing that you can't use First Aid to repair a boot disk while the operating system is running is important. Here are the instructions for running First Aid:
Step 1. Open "Disk Utility" from the path "Finder > Applications > Utilities > Disk Utility".

Step 2. Select the faulty disk from the sidebar drop-down menu. Choose "Show All Devices" from the dropdown menu above the "View" button if it isn't visible.

Step 3. Choose "First Aid" from the menu.
Step 4. Disk Utility will do an error check on the disk; if any problems are found, it will repair the volume. Click "Run".

The First Aid feature in Disk Utility also works when an external disk mounting error occurs, such as "Couldn't mount the disk [name] (com.apple.DiskManagement.disenter error -119930868)".
If you think this post is informative, add it to your bookmark and share it on social media to help others learn how to repair disk permissions on a Mac.
Fix 2. Repair Disk Permissions in Disk Utility from Recovery Mode
When normal troubleshooting methods fail, launching Disk Utility from Recovery Mode offers an additional way to resolve disk permissions problems on your Mac. The approach changes depending on whether your Mac is M1 series or Intel-based.
Whether you're working with an internal or external drive, the Recovery Mode Disk Utility may be a critical step in fixing disk issues. The model of Mac you possess determines whether you can access Recovery Mode.
For the M1 series, turn off the computer and press and hold the Power button during startup.
If you have an Intel-based Mac, restart while holding down the Command and R keys.

Start the procedure by following the directions for your specific Mac model.
Step 1. On the "Utilities" screen, choose "Disk Utility".
Step 2. Select the appropriate drive from the drop-down box, then click the "First Aid" option. Click "Run" from the pop-up.
Step 3. Disk Utility will run its tests and, if required, try to rectify the problems discovered. After repairing the disk, restart your device.
Fix 3. Use Terminal to Repair Disk Permissions on a Mac
When standard approaches fail to resolve disk permission problems on your Mac, using Terminal's advanced features provides a powerful option. Terminal, via properly performed commands, provides a more sophisticated method to reset user rights, making it a helpful resource for consumers looking for a thorough answer. Follow these instructions to use Terminal to repair disk permissions on a Mac:
Step 1. Go to the "Finder" menu and choose "Applications > Utilities > Terminal".

Step 2. In the Terminal, type sudo diskutil resetUserPermissions / 'id -u'.
Step 3. When requested to approve the activity, enter your Mac's administrator password.
Step 4. If you see the "Error -69841" error, run two extra commands: chflags -R nouchg and sudo diskutil resetUserPermissions / 'id -u'.
Terminal's command-line interface allows users to dig into the complexities of disk permissions, providing a personalized and powerful solution to permission-related issues on your Mac.
How to Use Disk Permissions on a Mac
Disk permissions on macOS are critical for managing access to files and ensuring their security. They operate as a precaution, preventing certain apps or users, particularly in shared Mac settings, from modifying system files without sufficient authority. These rights specify who may read, write, or execute certain files, which helps to ensure the system's overall security and stability.
Disk Utility on a Mac offers a variety of disk permissions-related features. You can manage data on internal and external drives, detect and resolve volume issues, protect drives with passwords or encryption, mount and eject drives, modify the file system, and work with RAID arrays to increase speed and reliability.
Disk permissions also allow you to create disk images for file transfer, archiving, or backup. Previously, Disk Utility was used to examine and correct faulty permissions, guaranteeing the file system's integrity.
Understanding the relevance of these rights is critical because they prohibit unauthorized access or alteration to system files. Most macOS files, especially those installed via package files, have rights specified in the Bill of Materials file. In previous macOS versions, these files were placed in /Library/Receipts/. They list installed files and their permissions.
Conclusion
From MacOS X EI Capitan and above, system files are already protected, and there is no need for disk permissions. However, regular disk permissions checks and repairs are required to ensure maximum performance and security on your Mac.
The three approaches described here - running First Aid in Disk Utility, fixing disk permissions in Recovery Mode, and utilizing Terminal commands - are viable ways to handle possible difficulties. These procedures are applicable to a variety of settings, including troubleshooting internal disks and external storage devices.
Understanding the importance of disk permissions in protecting your information and maintaining system integrity is critical. By implementing these practices into your normal maintenance, you help to create a more robust and secure computer environment.
Repair Disk Permissions on Mac FAQs
Below, we have the top searches of what people ask for regarding the repair disk permissions Mac issue:
1. How do I fix disk permissions on a Mac?
To fix disk permissions on a Mac, you can use the First Aid option from the Disk Utility or launch your device in recovery mode to repair the disk permissions error.
2. Can I restore data on a disk without permission on a Mac?
Restoring data from a drive without permission on a Mac might be difficult. Disk permissions are critical for file security, and trying to access or recover data without them may result in limitations. EaseUS Data Recovery Wizard for Mac can help you quickly scan all recoverable data on a disk without permission and recover it with user-friendly steps.
3. How long does it take to repair permissions on Mac?
The time it takes to fix permissions on a Mac is determined by factors such as disk size and performance. Disk Utility might take anything from a few minutes to an hour to examine and fix permissions.
Was This Page Helpful?
Brithny is a technology enthusiast, aiming to make readers' tech lives easy and enjoyable. She loves exploring new technologies and writing technical how-to tips. In her spare time, she loves sharing things about her game experience on Facebook or Twitter.
Related Articles
-
How to Open Task Manager on Mac [Activity Monitor]
![author icon]() Jaden/2024-01-11
Jaden/2024-01-11 -
[Solved!] Your Device Is Missing Important Security and Quality Fixes
![author icon]() Jerry/2024-01-11
Jerry/2024-01-11 -
SN850 vs SN850X: Which Is Better?🔥
![author icon]() Larissa/2024-01-11
Larissa/2024-01-11 -
What Is Chrome.exe *32 and How to Remove Chrome.exe *32 Malware
![author icon]() Daisy/2024-01-11
Daisy/2024-01-11

EaseUS Data Recovery Services
EaseUS data recovery experts have uneaqualed expertise to repair disks/systems and salvage data from all devices like RAID, HDD, SSD, USB, etc.