For an iMac equipped with an Intel processor, the non-volatile RAM, commonly known as NVRAM, holds critical settings necessary for the computer's functioning before accessing the hard drive or initiating the operating system.
In case these settings encounter corruption, a reset procedure during the iMac's startup allows you to restore them to their default state.
However, if you find yourself in a situation where the NVRAM reset isn't working, worry not. This guide will walk you through three practical steps to rectify this problem and get your Mac back in top-notch condition:
- Step 1. Restart Your Mac
- Step 2. Check the Update on Your Mac
- Step 3. Try to Reset NVRAM Again on Your Mac
NVRAM Reset Not Happening, Why
Resetting NVRAM on a Mac is a crucial troubleshooting step to fix various system-related issues. NVRAM (Non-Volatile Random-Access Memory) stores critical settings like volume, display resolution, and startup disk selection, which resetting can often resolve.
However, if the NVRAM reset not working, it could be due to several factors. One common reason could be setting a firmware password, preventing the reset process.
Plus, software glitches or hardware malfunctions may obstruct the normal NVRAM reset, causing the Mac to boot up regularly without the reset happening as intended.
In Advance: Back Up Your Data Before Resetting NVRAM
Before undertaking any major system modifications like resetting NVRAM on your Mac, it's crucial to ensure your valuable data is safeguarded. Data loss can occur due to various unexpected circumstances during such processes. Therefore, it's highly recommended to create a comprehensive backup of your important files and documents.
Back Up Your Mac and Never Lose Data
Back up and restore your MacBook/iMac without Time Machine, iCloud, or external hard drives.
Data loss can happen, whether due to a technical glitch, accidental deletion, or system modifications like NVRAM resets.
In these unforeseen situations, having a reliable data recovery solution is paramount. EaseUS Data Recovery Wizard for Mac Pro stands as a reliable tool, ensuring your data remains retrievable. It is designed to recover permanently deleted files on Mac, including documents, photos, videos, audio, emails, and more. Whatever you've lost, this tool can likely retrieve it.
Check out the following steps to back up your data in case you lose it:
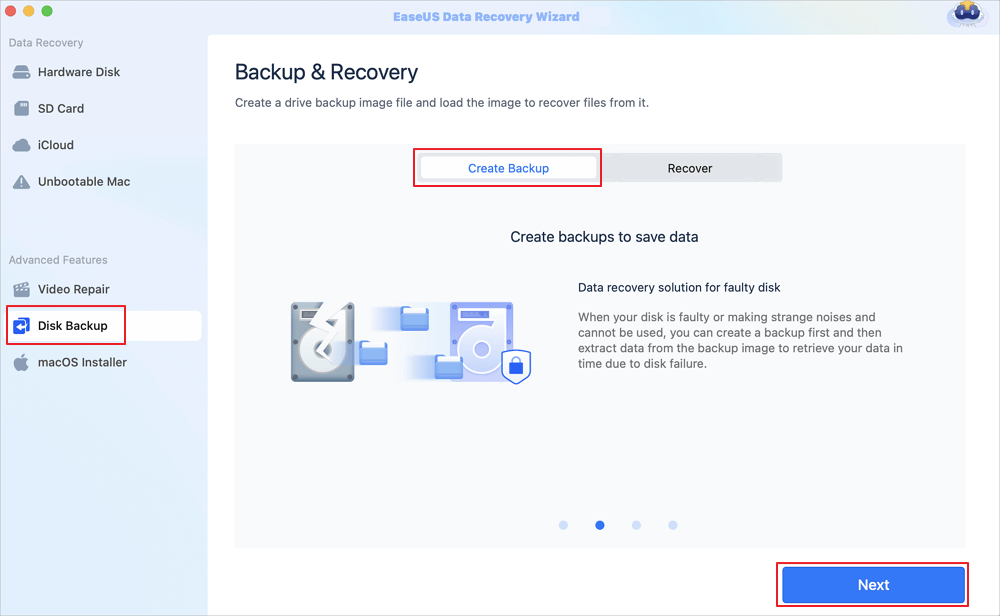
Step 1. Click "Disk Backup" > "Create Backup" > "Next" in EaseUS Data Recovery Wizard for Mac's main interface. You can create a drive backup image file in case the data is overwritten.
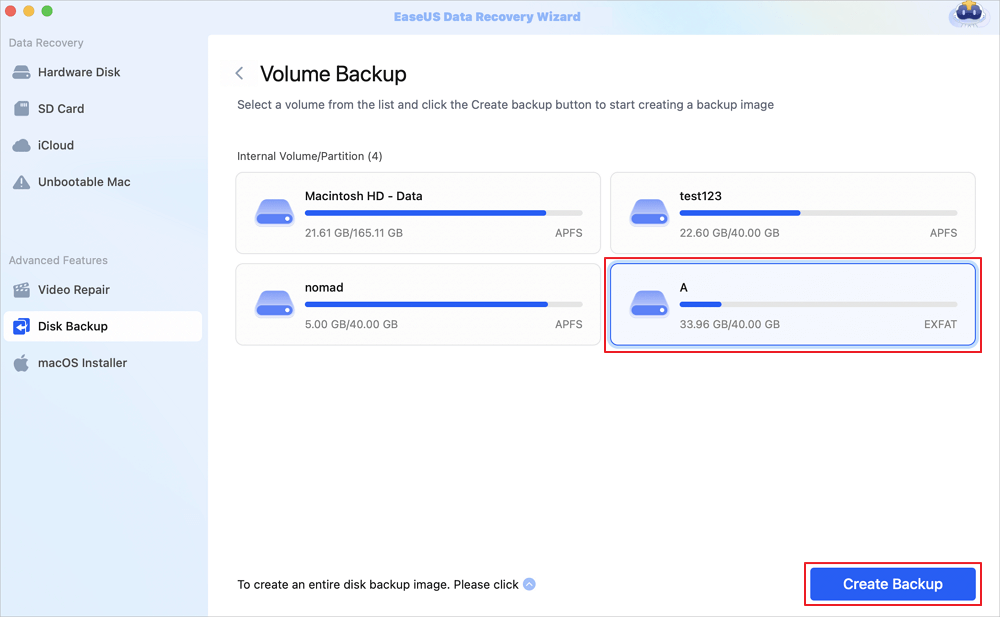
Step 2. Select an internal volume to back up, and click "Create Backup". If you want to create backups and recover data from an external hard drive, USB flash drive, or SD card, remember to connect the storage device to your Mac in advance.
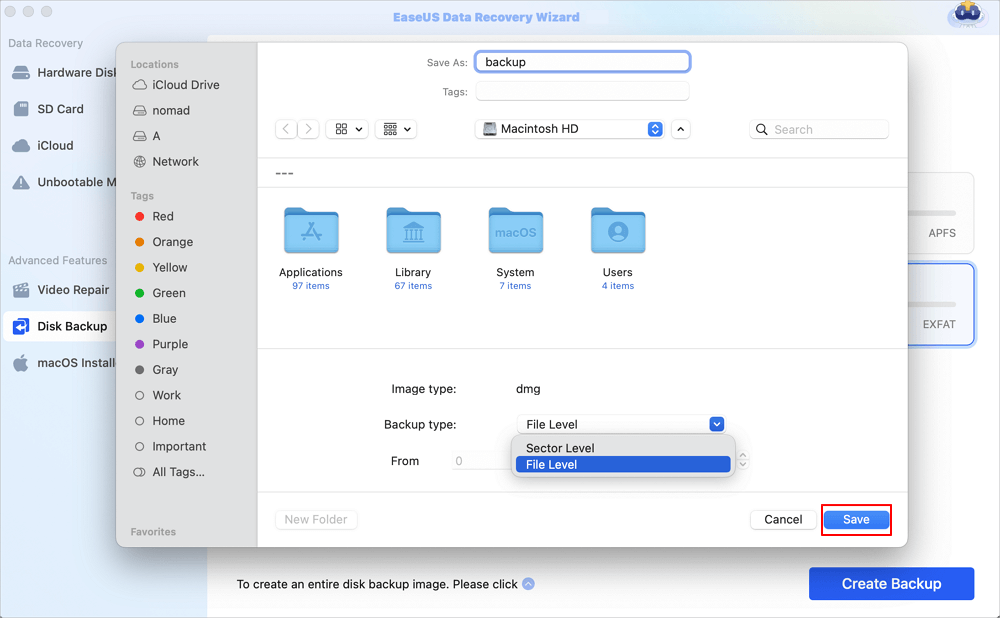
Step 3. Choose a place to save your backup files, and change the name of your backup file, then click "Save". It is not wise to save backups in the same storage device that you want to recover data from.
With an intuitive user interface, even those with limited technical expertise can navigate and use this tool effectively.
It also prioritizes the security and privacy of your data by ensuring a secure recovery process without risking further damage or loss to your files.
How to Fix NVRAM Reset Not Working
Now that you know more about backing up your data for a secure reset, let's head straight to the essential steps to fix the issue of NVRAM reset not working on Mac.
Step 1. Restart Your Mac
This method provides the simplest way to initiate the Mac restart command, provided your cursor is functioning correctly. The process is similar to all MacBook Pro models, regardless of the macOS version they run.
Here are the steps to restart a MacBook from the Apple menu:
Step 1. Navigate to the Apple menu situated at the upper left corner of the screen.
Step 2. Choose the "Restart" option from the menu.

Step 3. Tick the box next to "Reopen windows when logging back in" if you wish.
Step 4. Proceed by clicking "Restart" again, or allow the timer to count down for an automatic restart.

6 Ways to Fix Mac Won't Restart After Update
This article introduces 6 ways to fix Mac won't restart after the update, and run EaseUS Mac data recovery software to get help. Read more >>
Step 2. Check the Update on Your Mac
Here are the steps to update your Mac:
Step 1. Tap on the Apple logo at the top-left corner of your screen.
Step 2. Then, select "System Preferences". If there's an available update, you may notice a notification within the dropdown menu.
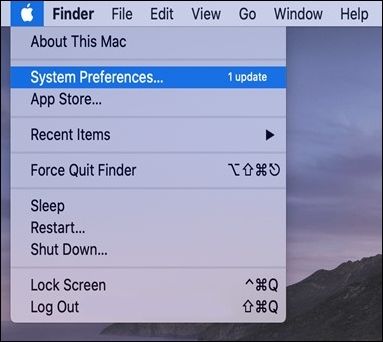
Step 3. Proceed by choosing "Software Update", identifiable by the gear icon. If there's an update, a red badge icon might appear at the top-right corner of the gear icon.

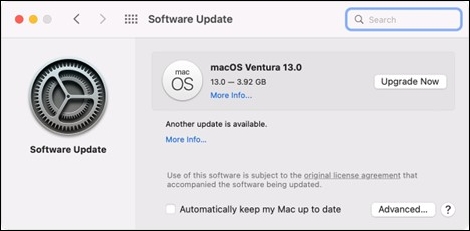
Step 4. Be patient while your Mac checks for updates. The progress wheel may spin for a moment as it searches.
Step 5. Next, click on "Upgrade Now". In the appearing window, you'll see a countdown clock indicating the estimated time for the update to download.
Below are the steps for updating App Store Apps on your Mac:
Step 1. Launch the "App Store".
Step 2. Select "Updates" from the sidebar.
Step 3. Click "Update All" to install all updates available.
For upgrading Mac applications not obtained from the App Store, you'll need to visit the developer's website to install the latest versions. Plus, these apps may prompt you to update when you launch them.
Share this article on social media to help others learn how to fix NVRAM reset not working on Mac.
Step 3. Try to Reset NVRAM Again on Your Mac
Another way to get the NVRAM reset to work is by trying to repeat the resetting. There are three ways to do so:
Method 1. Resetting NVRAM with Mac Terminal
This procedure is also applicable for M1 or M2 devices if you suspect any issues but aren't sure if the device has reset itself.
Step 1. Open "Spotlight" and type terminal in the search box.
Step 2. Open Terminal when the app occurs.
Step 3. Enter sudo nvram -c and press "Enter".

Step 4. Provide your password when prompted.
Step 5. Key in sudo shutdown -r now and press "Enter" again. Wait for the Mac to restart.
Method 2. Resetting NVRAM on Intel-based MacBook
This approach is most effective with a wired keyboard; wireless keyboards might not bring the desired results for resetting NVRAM on Intel-based Mac:
Step 1. Begin by switching off your MacBook.
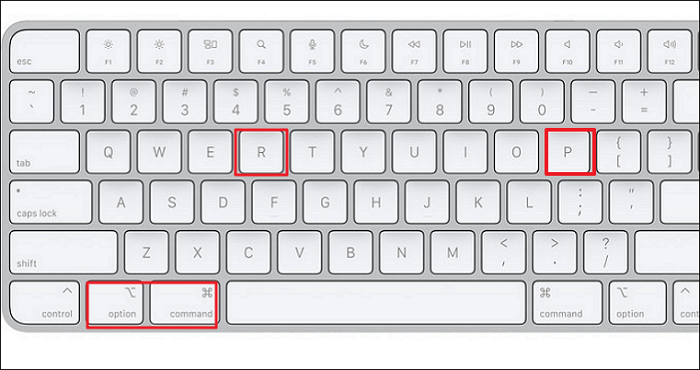
Step 2. Power it on by pressing the power button, and then simultaneously hold down "Command + Option + P + R".

Step 3. Release these keys once the Apple logo reappears.
Step 4. Your Mac's NVRAM is successfully reset once it completes the startup process.
Method 3. Resetting NVRAM on Silicon-based MacBooks
If you have an Apple Silicon-based Mac (equipped with Apple M1 chip or Apple M2 chip), manual NVRAM reset isn't possible. These MacBooks with advanced processors automatically test and reset the NVRAM during startup if issues are detected.
Therefore, it's crucial to confirm your MacBook's chip type before attempting a reset. Trying the Intel-based MacBook method on an M-chip MacBook can result in unexpected errors.
Conclusion
After looking at the possible fixes for the “NVRAM reset not working on Mac” error, it's evident that resolving such issues can be critical for smooth system functionality.
However, if, despite attempts, the reset isn't successful or essential data is lost during this process, dependable data recovery software like EaseUS Data Recovery Wizard for Mac Pro is essential.
The software's efficiency in recovering lost data, combined with its user-friendly interface, makes it a go-to tool for restoring valuable files, ensuring a safety net during troubleshooting activities.
After downloading this software, you'll rest assured that your data is well protected when dealing with complex technical procedures like NVRAM resets on Mac.
NVRAM Reset Not Working FAQs
Here are some frequent questions that people ask about the "NVRAM reset not working on Mac" issue.
1. How to do an NVRAM reset?
To perform an NVRAM reset, follow these steps:
Step 1. Switch off your Mac.
Step 2. Turn the Mac back on, and as soon as it starts, press and hold “Command + Option + P + R.”
Step 3. Maintain this key combination for roughly 20 seconds, then release them, allowing your Mac to proceed with its regular startup. For older Macs that produce a startup chime, hold the keys until you hear a second chime.
Step 4. Verify and adjust preferences in the Startup Disk, Display, and Date & Time sections within System Preferences to ensure they align with your preferences.
2. How long does it take to reset NVRAM on Mac?
Resetting NVRAM on a Mac usually takes around 20 seconds. During the process, the screen might go blank momentarily, followed by the startup chime, indicating the reset is complete. However, the exact duration can vary slightly depending on the Mac model and its specifications.
3. How do I reset my NVRAM terminal?
To reset your NVRAM using the terminal, follow these quick steps:
Step 1. Head to "Spotlight".
Step 2. Type in terminal in the search button and choose the application when it pops up.
Step 3. Input sudo nvram -c and tap "Enter".
Step 4. Key in your password when requested.
Step 5. Input sudo shutdown -r now and tap "Enter" again. After that, wait for the Mac to restart.
4. Do I need to reset NVRAM before selling a Mac?
Yes. You need to reset NVRAM on a Mac before selling it. This helps erase potentially sensitive information stored in NVRAM, like Wi-Fi passwords or system settings, providing a clean slate for the new user. It also ensures privacy and prevents any potential data leakage. On top of that, doing a complete system wipe and reinstalling macOS is also crucial to guarantee all personal data is removed, leaving the Mac in a state as if it were new.
Was This Page Helpful?
Brithny is a technology enthusiast, aiming to make readers' tech lives easy and enjoyable. She loves exploring new technologies and writing technical how-to tips. In her spare time, she loves sharing things about her game experience on Facebook or Twitter.
Related Articles
-
macOS Monterey Update Not Found | How to Solve Monterey Update Issue
![author icon]() Dany/2024-01-11
Dany/2024-01-11 -
Fix Windows 10 Hangs or Stuck on Shut Down Error
![author icon]() Tracy King/2024-03-18
Tracy King/2024-03-18 -
Fixes for Windows 10 Corrupt/Crash in Boot
![author icon]() Tracy King/2024-01-11
Tracy King/2024-01-11 -
What Laptop Hard Drive Size Should I Use [2024 Explanation]
![author icon]() Sherly/2024-01-11
Sherly/2024-01-11

EaseUS Data Recovery Services
EaseUS data recovery experts have uneaqualed expertise to repair disks/systems and salvage data from all devices like RAID, HDD, SSD, USB, etc.