CS: GO has recently grown in popularity, with the number of players increasing daily. The game's popularity has skyrocketed since it became free to play. Recently, some players have been having a lot of trouble with a very common issue in the game. When they start the game, they get an error saying, " VAC was unable to verify your session." Some players believed the error was due to a VAC ban, while others thought the culprit was hidden on the backend.
VAC, or Valve Anti-Cheat, is the game's built-in cheat detection mechanism that detects and punishes hackers and cheaters. When you get verify game session error, it is most likely because some files are found corrupt, preventing VAC from verifying the game's source. If you are experiencing the problem and unsure how to resolve it, this article has covered you.
| Workable Solutions | Step-by-step Troubleshooting |
|---|---|
| Fix 1. Reboot Your Computer | Some apps and processes (such as disc indexing) on your computer are responsible...Full steps |
| Fix 2. Run the Game as an Admin | Running the game as an administrator prevents the game from crashing due to a lack...Full steps |
| Fix 3. Restart PC | To fix this, startup Steam, navigate to the Library, right-click Counter-Strike...Full steps |
| Fix 4. Repair the Steam Client | Another reason for this error may be that your Steam client could be corrupted...Full steps |
| Fix 5. Completely Reinstall CS: GO | If none of the above fixes work, your problem is likely not one that can be solved...Full steps |
"VAC was Unable to Verify Your Game Session" Error
To fix this problem, you must first understand how VAC works.
This software works with Steam to track down players who attempt to enter a game session while using a hack or cheat software. This suspicious attempt not only detects an unallowed program or script running alongside the game but also detects abnormal changes to the game files. When the software detects unfair play, the user is immediately banned.
As a result, the error message "VAC was unable to verify your game session" appears on the screen. This indicates that VAC, an anti-cheat program, could not verify your game session. Usually, it's because a third-party program or script tried to alter the game processing or Tempered game files, which caused problems in your game verification.
Perform Some Preliminary Checks
Perform some preliminary checks if you still need to do so.
- Leave your game session, restart it, and try again to matchmake.
- Relaunch the Steam client.
- After logging out, re-enter your Steam.
- Restart your Windows computer.
- Disable Windows Defender or any other antivirus software you use, or allow the Steam client and directory folders.
- If you've been using a VPN, now is the time to disconnect.
If none of these steps work, it's time to look for another easy solution.
Fix 1. Reboot Your Computer
Some apps and processes (such as disc indexing) on your computer are responsible for accessing your game files, causing VAC to fail to verify the files. This can be resolved by rebooting your computer. Take the following steps:
Step 1. Close all applications and windows.
Step 2. Press the Windows key on your keyboard, or click the icon in the lower-left corner of your screen.
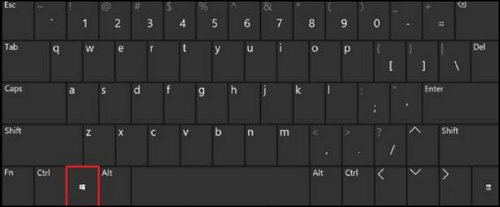
Step 3. When the Start menu appears, click the Power icon. Then press the Restart button.
Step 4. After restarting your game, check to see if the error has been resolved.
Fix 2. Run the Game as an Admin
Running the game as an administrator prevents the game from crashing due to a lack of permissions. Here's how to go about it:
Step 1. Right-click the.exe shortcut file for the game on your device.
Step 2. Select Properties.
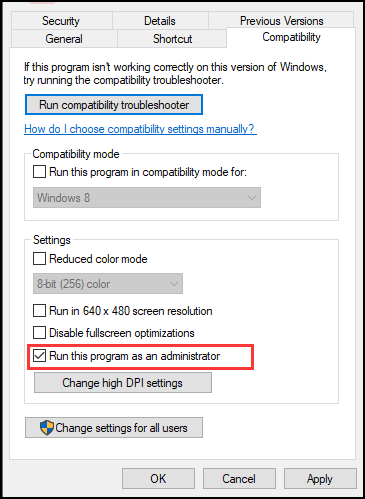
Step 3. Go to the Compatibility tab.
Step 4. Check the box Run this program with administrative privileges.
Step 5. To save the changes, click "OK".
Fix 3. Verify Integrity of Game Files and Restart PC
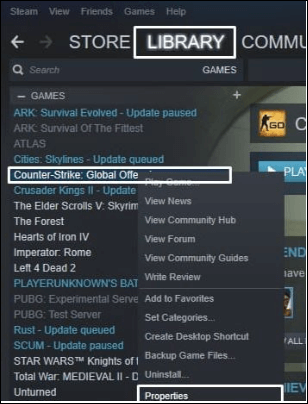
To fix this, startup Steam, navigate to the Library, right-click Counter-Strike: Global Offensive, and then select "Properties".
Step 1. After you've opened the properties window, navigate to "Local Files" and click the "Verify Integrity of Game Files" button.
Step 2. CS: GO's Local Files tab has a button for "Verifying the Integrity of Game Files".
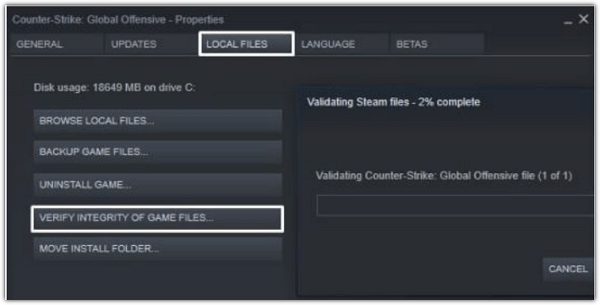
Step 3. Allow this to finish before restarting your computer.
After completing the steps outlined above, your CS: GO should be operational, and you should no longer receive "Matchmaking Failed - VAC was unable to verify your game session" errors.
Hope these fixes have worked to solve your current problems, and if you like the provided solutions please share this guide to help more people around you!
Fix 4. Repair the Steam Client
Another reason for this error may be that your Steam client could be corrupted or contain malicious files. Here's what you need to do:
Step 1. On your screen, click the Start button.

Step 2. Click on Command Prompt in the Power User menu that appears (Admin).
Step 3. When the UAC prompt appears, select 'Yes.'
Step 4. Copy and paste the following line. Then press Enter: "C:Program Files (x86)SteambinSteamService.exe"/repair.
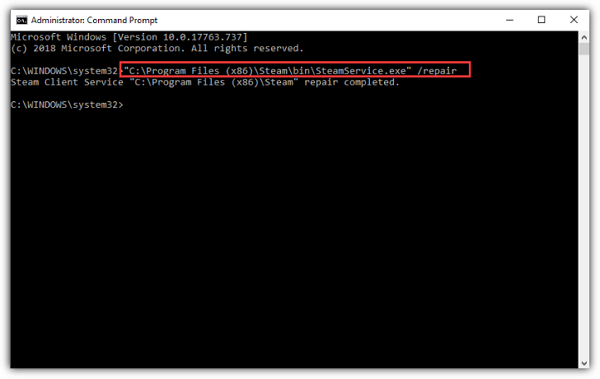
Step 5. Wait for the process to complete. It'll take some time.
Step 6. Restart your computer after closing Command Prompt. Check if the 'VAC was unable to verify the game session' error has been resolved.
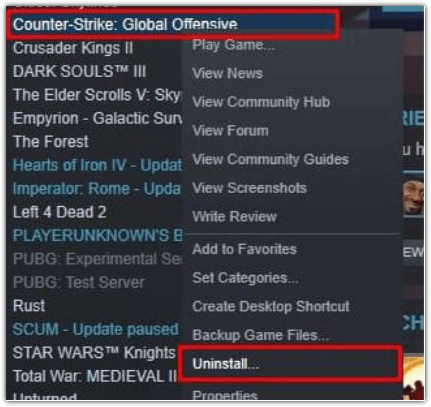
Fix 5. Completely Reinstall CS: GO
If none of the above fixes work, your problem is likely not one that can be solved by changing a setting or restarting your computer. While we recommend you search the web to see if anything else might work, reinstalling CS: will save you time. Reinstalling the game will resolve the issue quickly and save you from having to try a variety of fixes (which are unlikely to work).
Step 1. To completely reinstall Counter-Strike: Global Offensive, go to your Steam Library, right-click "Counter-Strike: Global Offensive," and select "Uninstall":
Step 2. Click "Delete" in the window that appears.
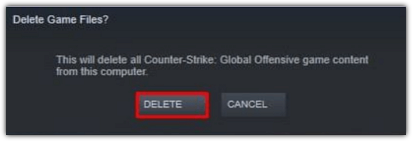
Then you'll have to reinstall CS: GO.
Final Words
Through this article, we hope you have found a solution to the CS: GO "VAC was unable to verify your game session" error. By putting all the solutions in one place, we made it easy for you to fix the CS: GO error in a matter of a few minutes only.
Was This Page Helpful?
Jaden is one of the editors of EaseUS who lives and works in Chengdu, China. She focuses on topics concerning PCs and Mac data recovery. Jaden is committed to enhancing professional IT knowledge and writing abilities. She is always keen on new and intelligent products.
Daisy is the Senior editor of the writing team for EaseUS. She has been working at EaseUS for over ten years, starting as a technical writer and moving on to being a team leader of the content group. As a professional author for over ten years, she writes a lot to help people overcome their tech troubles.
Related Articles
-
Fix 99% or 100% High CPU Usage Issue in Windows 10 Fall Creators
![author icon]() Tracy King/2024-03-18
Tracy King/2024-03-18 -
White Screen While Gaming - Try These Methods
![author icon]() Jerry/2024-03-15
Jerry/2024-03-15 -
[SOLVED] How to Open BitLocker Drive on Mac Ventura, Monterey, Big Sur
![author icon]() Jaden/2024-01-11
Jaden/2024-01-11 -
How to Fix "Disk Showing as Raw Instead of NTFS" [2 Methods]
![author icon]() Sherly/2024-03-22
Sherly/2024-03-22

EaseUS Data Recovery Services
EaseUS data recovery experts have uneaqualed expertise to repair disks/systems and salvage data from all devices like RAID, HDD, SSD, USB, etc.