If you encounter this "couldn't unmount disk 69888" error on your MacBook, it implies you're trying to partition, reformat, or delete a disk. Unfortunately, you couldn't do it because the OS won't let it.
After all, the disk is recently being utilized by other apps or hardware failure. Today's article will discuss everything about this error, the reasons, and the solutions.
| Workable Solutions | Step-by-step Troubleshooting |
|---|---|
| Fix 1. Exclude the Drive from Spotlight Indexing | Go to the Apple menu, followed by System Preferences and Spotlight, and hit the privacy tab...Full steps |
| Fix 2. Remove Drive from Time Machine on Mac | Open system preferences to eliminate the drive from Time Machine; select Time Machine...Full steps |
| Fix 3. Force Unmount Disk with Terminal on Mac | Open Terminal > Utilities folder, and type the command: diskutil list to get the disk identifier...Full steps |
| Fix 4. Boot into macOS Recovery to Fix Error 69888 | Enter macOS Recovery on the latest Macs having a recovery partition, opt for Disk Utility...Full steps |
| Other Practical Fixes | Delete the internal volume in Safe Mode and unmount each volume to unmount the disk...Full steps |
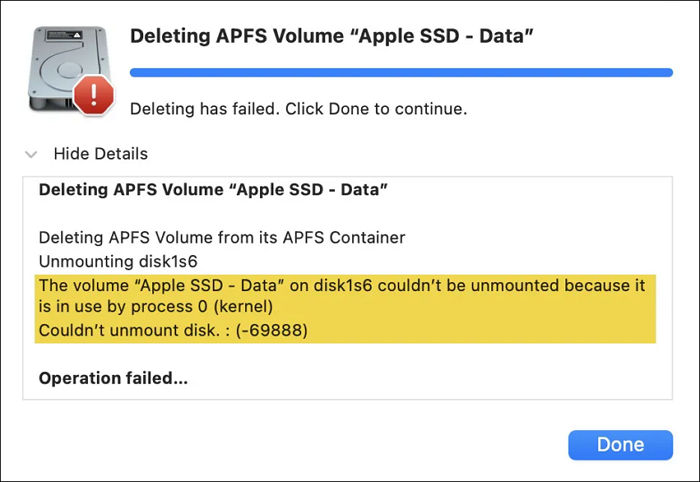
The incompetence of unmounting disk information on Mac ensues when you're unable to erase, delete, or partition an external or internal volume or disk on Mac, including an HDD or SSD, Time Machine backup disk, USB flash drive, and an internal fusion drive. Hence, it causes several errors, and one of the most significant errors is "error 69888: Couldn't unmount disk."
Why Couldn't Unmount Disk 69888 Error Occurs on Mac
"Couldn't unmount disk 69888" on macOS typically occurs when you perform some manipulations with the internal or external drive; for instance, disk0s2 is not mounted on a Mac. The MacBook won't let you make the changes if some other process or app uses the drive.
You may also not reformat, partition, or delete the disk you've recently booted from. However, you may try to change the drive and not get this error 69888.
How to Fix Couldn't Unmount Disk 69888
Countless fixes are there to solve this error message on macOS. But before proceeding with the below-mentioned 6 fixes, we will provide a video for help. These are the main outlines of the video:
- 00:14 - Hit the erase button
- 00:24 - Hit the OK button to continue, as the erase process has failed
- 01:14 - Enter the command diskutil list
- 01:58 - Enter the command diskutil unmountDisk force /dev/disk0
Note that in the below-mentioned fixes, solutions 1-3 are for the external disk on Mac, and the rest of the 4-6 solutions are for the internal disk.
Fix 1. Exclude the Drive from Spotlight Indexing
Spotlight aids you in finding things quickly on Mac and its linked devices by indexing files persistently. Nevertheless, you may face the "Couldn't unmount disk 69888" error if you're trying hard to format a drive Spotlight is indexing. Follow the steps below to unmount the drive:
Step 1. Navigate to the Apple menu, followed by System Preferences and Spotlight.
Step 2. Hit the "Privacy" tab.
Step 3. Click the "+" button to pick the external drive's folder.

Step 4. Select "Choose".
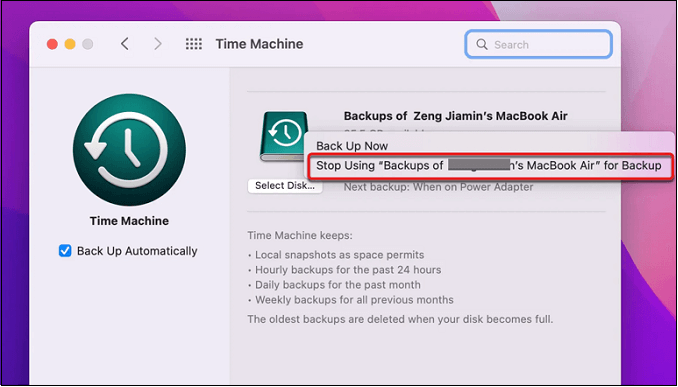
Fix 2. Remove the Drive from Time Machine
Disabling Time Machine from backing up to the hard drive is preferable if your Mac previously used the disk for a Time Machine backup. Follow the steps below to remove the external drive from Time Machine:
Step 1. Open "System Preferences" to eliminate the drive from Time Machine on macOS Monterey.
Step 2. Select "Time Machine".
Step 3. You need to right-click on the Time Machine disk, which causes error 69888, and opt for "Stop Using (drive name) for Backup."
Share this article on social media to help others learn how to fix error 69888 on Mac.
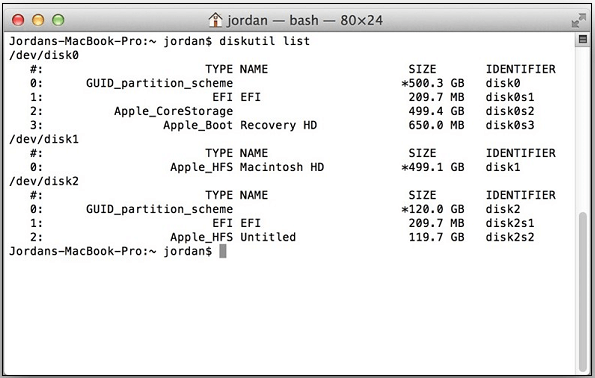
Fix 3. Force Unmount Disk with Terminal
Can't unmount the disk on Mac? If so, you may force an unmounted disk in the Mac Terminal. After that, try to partition or eliminate the external disk once more. These are the steps to follow to force unmount the disk with Terminal:
Step 1. From the Applications, open the "Terminal > Utilities" folder.

Step 2. Type the command diskutil list to get the disk identifier.
Step 3. To forcefully remove the drive, enter the command diskutil unmountDisk force /dev/disk and press "Enter".
Fix 4. Boot into macOS Recovery to Fix Error 69888
These are the best solutions if you can't unmount disk 69888 while adjusting volumes on the internal HDD on Mac. Disk elimination occurred in a few instances. You encounter the "Couldn't unmount disk 69888" issue when attempting to change the boot drive.
But since that's where the OS launches, you can't. To accomplish this, build the machine from a volume different from the one you would like to format. To repair issue 69888, take the following actions to start Mac in Recovery Mode:
Step 1. Enter Mac Recovery Mode on the latest Macs having a recovery partition.
Step 2. Opt for "Disk Utility" to format the boot disk.
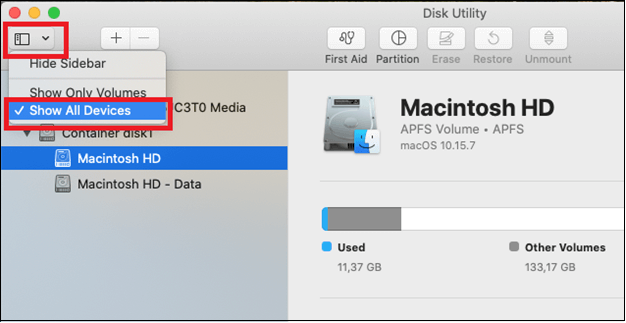
Step 3. Erase the entire disk if you can't erase the Mac startup disk in recovery mode after hitting "View > Show All Devices" rather than eliminating the data volume.
Step 4. Erase the Macintosh HD volume or restart the Mac Internet Recovery Mode.
The EaseUS data recovery software provides Mac data recovery in macOS recovery mode. Read this article if you need to perform a data recovery.

Run Mac Data Recovery in Recovery Mode [Without Creating USB Drive]
This post discusses how to run Mac data recovery in Recovery Mode when your Mac won't boot up. Read more >>
Fix 5. Delete the Internal Volume in Safe Mode
You must be capable of erasing or removing additional internal files in a standard boot, except for the internal disk and the Macintosh HD - Data volume categories. You may reboot in Mac Safe Mode and shut down again if Disk Utility exhibits the "Couldn't unmount disk" warning before trying again.
You may encounter data loss while deleting the internal volume in safe mode. To protect you from the hassles of data loss, EaseUS Data Recovery Wizard for Mac is the one-stop solution to recover deleted files on Mac.
It helps solve several hardcore data loss cases and recover internal hard drive unmounted Mac, including photos, documents, videos, emails, etc. The best features of EaseUS Data Recovery Wizard for Mac are the following:
- Recover emptied Trash Mac.
- Flexible scanning modes: fast and straightforward.
- Preview before recovery.
- Supports formatted/lost partition recovery Mac.
Download this data recovery tool, and follow the steps below to recover the accidentally deleted data with a few clicks:
Step 1. In the main EaseUS Data Recovery Wizard window, there will be a list of the drives connected to your Mac. Select the drive you need to recover accidentally deleted files from, and click the "Search for lost files" button.

Step 2. EaseUS Data Recovery Wizard for Mac will immediately scan your selected disk volume and display the scanning results on the left pane. You can sort the results to find the wanted files if you want certain files.

Step 3. Once you have found the desired files, preview the files and then click "Recover" to begin the recovery of your deleted/lost Mac files.

EaseUS Data Recovery Wizard for Mac Review [Update in 2023]
EaseUS Data Recovery Wizard for Mac is a trusted and effective data recovery software that supports data recovery of various file types. Read more >>
Fix 6. Unmount Each Volume to Unmount the Disk
You can also remove every partition or disk if you possess a fusion drive prior to installing the startup disk in Terminal if you get the error message "Forced unmount of disk0 did not work: at least a single disk couldn't be unmounted". Follow the steps below:
Step 1. Reboot Internet Recovery on your Mac.
Step 2. Select "Terminal" under Utilities.
Step 3. To get a list of all connected drives and volumes, run the command diskutil list.
Step 4. Save the disk or volume identifier, for example, disk1, in your notes. If there's more than one drive or a volume mounted under one disk, use the command diskutil unmountDisk force /dev/disk_identifier to unmount it forcefully.
Step 5. You may eliminate the drive in the Terminal once the startup disk is unmounted with this command diskutil eraseDisk file_system disk_name /dev/disk_identifier.
Tips to Avoid Error Couldn't Unmount Disk 69888
How do you avoid error 69888: Couldn't unmount disk? These are the best tips to follow:
🔎Relaunch Finder to Fix Error 69888
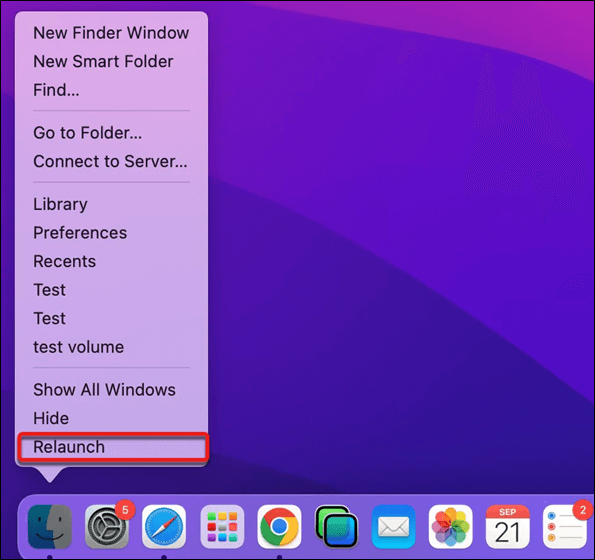
The process, which is employing your disk often and causes an error "Couldn't unmount disk" is Finder. You must relaunch Finder to stop it from accessing the drive:
Step 1. The Finder symbol needs to be right-clicked on along with holding the "Option" key.
Step 2. Hit the "Relaunch" option to restart Finder.
Step 3. Eject the external drive on your MacBook safely.
Step 4. You need to replug the drive into your MacBook.
Step 5. Keep trying until it eliminates or partitions the disk.
💽Quit Apps/Processes Using Disk
If rebooting Finder doesn't work, you can identify which programs currently use the hard drive or its volume by their PID number and terminate them. The error message should be your first port of call. Once you have the PID of the complicated procedure, follow these instructions to end it:
Step 1. Open "Terminal" from the "Applications > Utilities" folder.
Step 2. Enter this command sudo kill PID and hit the "Enter" button.
Step 3. Type your password, and hit the "Enter" button.
Step 4. Force terminate the process by typing this command sudo kill -9 PID.
📂Ensure the Same Files System Before Merging Two Partitions
You must select your chosen file system and reformat every partition with it before combining them if you encounter the error "Error: -69888: Couldn't unmount disk" while trying to combine two differently configured partitions.
For example, if one has been formatted as APFS and the other as Mac OS Extended(HFS+), you may combine the two volumes after first formatting the Mac OS Extended disk to APFS.
Conclusion
Couldn't remove a disk on macOS may not be an everyday occurrence on your Mac because the macOS is typically good at preventing problems. However, users may still run through this issue when employing Disk Utility to fix, lay out, and divide the boot drive.
You are only required to utilize the remedies provided above the next time you run into the "error 69888: Couldn't unmount disk". Also, to avoid data loss during the process, EaseUS Data Recovery Wizard for Mac is the best recovery software to try!
Couldn't Unmount Disk 69888 FAQs
Consider the below-mentioned FAQs to avoid Couldn't unmount disk 69888 error:
1. How do I fix error code 69888 on Mac?
You may create a non-APFS partition before eliminating the disk. Follow the steps below:
Step 1. Your Mac will start up in macOS Recovery.
Step 2. Select "Disk Utility".
Step 3. Choose the startup disk container.
Step 4. Hit the (+) button after selecting the partition. Any system that supports files but not APFS should be used.
Step 5. Pick any size that you want, and tap "Apply" to re-format the drive.
2. How do I force my Mac to unmount the disk?
To force mount an external hard drive on a Mac, choose the disk group you are interested in unmounting in the sidebar of the Disk Utility software on your Mac. In the toolbar that appears or next to the title of the disk set, select the Unmount option. The disk member you intend to unmount must be disconnected.
3. Why can't I unmount the hard drive on Mac?
Make sure your Mac and external hard drive are connected properly. Make sure the hard drive's USB cable or adapter is properly fastened by reattaching it. Your Mac's hard drive needs to be linked to a different Mac or USB port. Repair any USB cables or adapters that may be damaged.
4. What does it mean to unmount a hard drive on Mac?
Firstly, disconnecting an optical disc or a disk drive from a PC. The operating system unmounts the media when an individual chooses "Eject" to remove an optical disc from the computer compared to the mount. Unmounting means taking a tape or disk cartridge out of the drive.
Was This Page Helpful?
Brithny is a technology enthusiast, aiming to make readers' tech lives easy and enjoyable. She loves exploring new technologies and writing technical how-to tips. In her spare time, she loves sharing things about her game experience on Facebook or Twitter.
Related Articles
-
There Are No Users on This Volume to Recover [with Step-by-Step Tutorial]
![author icon]() Brithny/2024-03-06
Brithny/2024-03-06 -
Short DST Failed! How to Fix Hard Disk DST Short Test Failed
![author icon]() Jean/2024-01-11
Jean/2024-01-11 -
How to Factory Reset Dell Laptop [Step-by-Step Guide]
![author icon]() Brithny/2024-02-21
Brithny/2024-02-21 -
[FIXED] How to Fix Hogwarts Legacy AutoSave Not Working
![author icon]() Jaden/2024-01-11
Jaden/2024-01-11

EaseUS Data Recovery Services
EaseUS data recovery experts have uneaqualed expertise to repair disks/systems and salvage data from all devices like RAID, HDD, SSD, USB, etc.