In this article, you'll learn:
- Causes: Why Can't Install macOS Sonoma
- Methods: macOS Sonoma Not Installing Fixes
- Recover Data from Mac That Won't Update to Sonoma 🔥
- Can't Install macOS Sonoma FAQs
macOS Sonoma beta version can be downloaded and installed by Mac users without spending a dime due to the latest modification in the Apple Developer Program. The previous developer beta of macOS 14 needed to be more stable and buggier. The official version of macOS 14 will arrive in late September or October. As the era's latest macOS version, Sonoma fetches excellent features and enhancements for Mac users.
Do you want to acquire the novel features and avail first-hand experience with this latest version? If so, install the macOS Sonoma developer beta with a free Apple Developer account. But macOS Sonoma can't be installed if you have low storage space on Mac and others. If you can't install macOS Sonoma, go through this article to explore the reasons and 10 best solutions to remove the error!
Download macOS 14 Sonoma Beta on Mac, MacBook, iMac
Are you looking forward to downloading macOS 14 Beta? It's Apple's 2023 big macOS version for its attractive Mac models.

Causes: Why Can't Install macOS Sonoma
Wondering why you can't install macOS Sonoma? There may be a few probable reasons for macOS Sonoma not installing issues. These are the 4 main reasons that macOS Sonoma can't be installed on your compatible MacBook.
🚀Reason 1. Low Storage Space
Insufficient storage space could be one of the biggest reasons that cause the "can't install macOS Sonoma" error. There may be less available free disk storage on your Mac HDD than the macOS installer.
⚔️Reason 2. Software Incompatibility
Apple has an extended list of devices which are compatible with macOS Sonoma. This latest upgrade will be incompatible with the 2017 MacBook Pro, 2017 iMac, and 2017 MacBook (12-Inch).
🍎Reason 3. Not Registering as an Apple Developer
As Apple has released this macOS Sonoma for the beta developers, you can't install macOS Sonoma if you don't register with the Apple ID.
😨Reason 4. No Backup
This latest macOS version might have unanticipated bugs. If you don't back up your Mac before proceeding with macOS 14 installation, you may face unforeseen data loss.
Methods: macOS Sonoma Not Installing Fixes
If you can't install macOS Sonoma, you must go through the 10 fixes below to solve this error. But before proceeding with the fixes, you must protect your data security first.
- Restart the Mac
- Try a macOS Sonoma Clean Installation
- Turn Off FileVault or Firewall
- Reset NVRAM/PRAM or SMC
- Create a New macOS Sonoma USB Installer
- Use Personal WiFi or Internet Connection
- Check the Hardware and Software Compatibility
- Check the Mac Disk Storage Space
- Verify and Repair via Disk Utility
- Delete the Sonoma Installer App
Method 1. Restart the Mac
One of the most hassle-free ways to restart your MacBook Air or Pro is using the keyboard. Follow the steps below to continue your Mac:
Step 1. Press the keyboard shortcuts, such as Control + Command + Power button or Touch ID sensor.

Step 2. Let's wait a few minutes to allow the screen to darken and restart the chime to play before releasing the keys.
You may force your MacBook by pressing the power button if this doesn't work!
Method 2. Try a macOS Sonoma Clean Installation
Clean installation clears every file on your MacBook, which is why it entails a backup. Suppose you're bored of using macOS Ventura and want to upgrade to macOS Sonoma. In that case, eliminating all the records before installing the latest version will help free up storage and impede potential bugs. Follow the steps below to clean and install macOS Sonoma:
Step 1. Create macOS Sonoma bootable USB, and boot your Mac to the startup manager.
Step 2. Press and hold the power button for Apple Silicon Mac until you notice the startup option.
Step 3. Clean the macOS Sonoma bootable USB end, and then from the startup option, select "install macOS 14 beta."

Step 4. Hit the continue button, and install it.
Step 5. Opt for disk utility, which will erase the drive instead of volume with the following parameters.

Step 6. If you're prompted with the "Erase Mac" notification, hit the "Erase Mac" option following "Erase Mac and restart."
Step 7. Follow the on-screen procedures to continue.
Method 3. Turn Off FileVault or Firewall
Turning on the firewall or FileVault on your MacBook will not allow you to install macOS 14 Sonoma. Have you recently upgraded to macOS 14 beta? You may need to be well-acquainted with how to turn off the Firewall on this latest macOS. Follow the steps below:
Step 1. Hit the Apple logo in the menu bar, and opt for system settings.

Step 2. Opt for Network, and then choose Firewall.
Step 3. Now, if it's toggled on, you may toggle it off.
Let us learn more ways to fix can't install macOS Sonoma. Moreover, don't forget to mark this passage by sharing it on Facebook, Twitter, or SNS.
Method 4. Reset NVRAM/PRAM or SMC
The latest MacBooks no longer utilize PRAM. Instead, they use NVRAM, which stores dozens of details. If you're using Intel Macs, follow the steps below to reset NVRAM:
Step 1. Shut down your MacBook.
Step 2. Hit the power button, and as soon as you boot your PC up, press down Command + Option + P + R.

Step 3. Press the keys for approximately 20 seconds, release those keys, and let your MacBook continue booting up normally.
Step 4. You need to check the "Startup Disk", "date & time", and display of system preferences.
What is NVRAM and How Can You Reset it on Mac
NVRAM can help keep data secure even when the power is off. It's used in all computer devices to ensure the settings remain constant between power on and off. Read more >>
Method 5. Create a New macOS Sonoma USB Installer
The whole process of creating a brand-new macOS Sonoma USB installer involves three significant steps:
Step 1. Download the macOS Sonoma installer
You may download the macOS Sonoma beta from Apple's website using these steps:
- Download the massive 13GB pkg file.

- Double-click on the file to finish the elementary installation.

- Open your Mac's launchpad once you complete the installation, and you will notice the macOS 14 Sonoma installer.

Step 2. Set the USB flash disc to Mac OS Advanced format
Follow the steps below:
- Attach your USB flash drive to your Mac.
- hoose this thumb drive in "Disk Utility" by opening it.
- Select "Erase".

- Name it Sonoma because this is how you won't need to edit the Terminal command and copy & paste the command.
- Ensure Mac OS Extended (Journaled) is selected in the Format box. Choose GUID Partition Map if you find Scheme.
- Select the "Erase" button, and don't try erasing it.

Step 3. Employ Terminal to create a macOS Sonoma bootable installer
- The terminal needs to be opened on your Mac.
- Type this command: sudo /Applications/Install\ macOS\ 14\ Beta.app/Contents/Resources/createinstallmedia --volume /Volumes/Sonoma, and hit the enter button.
- Input your MacBook's password, and hit the enter button.
- You may now observe, 'We must remove the volume at… 's consent in order to keep going. In Terminal, enter once more after typing Y.
- Hit the OK button, and Terminal will erase the disk, make the disk bootable, and more.
How to Open Terminal on Mac and How to Use it
The Terminal is one of the essential utilities in a Mac device. So, how do you open and use it? Here are the quick fixes. Read more >>
Method 6. Use Personal WiFi or Internet Connection
Can't install macOS Sonoma? There could be issues with Wi-Fi! You may try Mac safe mode to fix the macOS 14 Wi-Fi menu working issue:
Step 1. Scroll to the upper-left corner, and hit the "Recovery Assistant" Option.
Step 2. Hit the "Erase Mac" button.
Step 3. Mac will take a little time to reboot.
Step 4. Once it enters the recovery panel after a reboot, look in the upper right corner to determine if the Wi-Fi option has returned.
Step 5. Reinstall macOS 14 after connecting to your Wi-Fi network.
Step 6. Set up your Mac usually once the macOS is installed.
Method 7. Check the Hardware and Software Compatibility
If your MacBook doesn't work with macOS 14, you can't install it then! Therefore, it would be essential to verify the hardware and software compatibility. You may discover your MacBook model by visiting "Settings" > "General" > "About". If you're willing to operate macOS 14 Sonoma beta, you can do this on the below-mentioned Macs:
| ✅Mac Studio from 2022 and later |
| ✅MacBook Air from 2018 and later |
| ✅Mac Mini from 2018 and later |
| ✅iMac from 2019 and later |
| ✅Mac Pro from 2019 and later |
| ✅iMac Pro from 2017 |
| ✅MacBook Pro from 2018 and later |
Method 8. Check the Mac Disk Storage Space
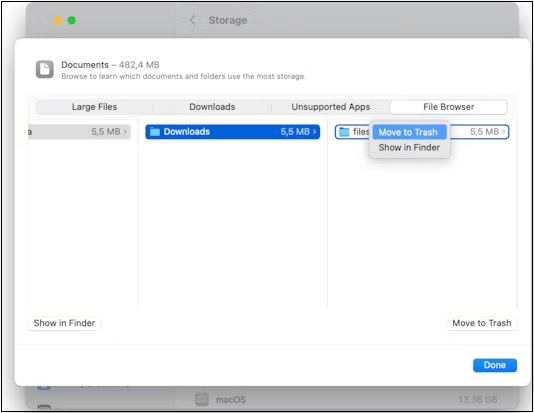
Follow the steps below to find out Mac's disk storage space:
Step 1. Hit the Apple logo, which is located at the top left side of your screen.
Step 2. Select "About This Mac."
Step 3. Opt for "Storage." You may notice a stacked bar graph showing how much of the total storage has been used by different data.

Mac Startup Disk Full: 6 Effective Solutions
A startup drive is a one-type of volume on Mac's hard disk where the OS and other applications get installed by default. Read more >>
Method 9. Verify and Repair via Disk Utility
You may utilize the disk utility in macOS to mend many issues. Let's see how to check and repair a disk using the disk utility:
Step 1. Run first aid
- Run "First Aid" on every volume and container on the hard drive one at a time before running it on the storage unit to check it out and fix a disc.
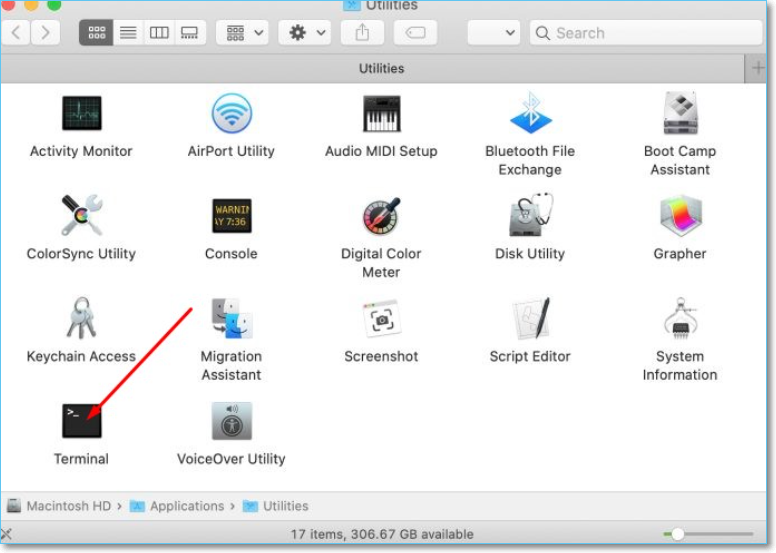
- Open the disk utility from "Finder" > "Applications" > "Utilities".
- Select "view" > "show all devices".

- Opt for the disk you're having issues with.
- Hit the First Aid, and hit the Run option.
Method 10. Delete the Sonoma Installer App
Deleting the Sonoma Installer application will help fix the "can't install macOS Sonoma." Once you downgrade to macOS Ventura from Sonoma by deleting the Sonoma Installer App, try it again to upgrade to macOS 14.
Recover Data from Mac That Won't Update to Sonoma
A few individuals claim that a problem with their Mac's setup necessitates reinstalling macOS. So, you may need help with data loss while trying to upgrade to Sonoma. Similarly, you will also face data loss from Mac, which cannot update to Sonoma. Therefore, a specialized data recovery tool, EaseUS data recovery software, is beneficial to protect your data from getting lost.
It was developed to help recover information from file system errors, system failures, and unintentional file deletions. The software's intuitive design allows even inexperienced users to retrieve deleted files rapidly. These are the main features of EaseUS Data Recovery Wizard for Mac:
- It can retrieve music files, videos, emails, documents, and more from Mac-based devices, including SSD, HDD, camera, and fusion drive.
- It helps recover emptied trash Mac regardless of the size.
- You can retrieve files due to formatting, system crash, virus attack, repartition, and deleting.
Download this professional data retrieval software now!
Step 1. Launch EaseUS Software in Recovery Mode
Select "Utilities > Terminal" from the top menu, and enter the command sh <(curl https://d3.easeus.com/mac/boot.sh). Hit "Return". Wait for the application to open, and it will take several minutes.

Note: If the Terminal displays either "No such file or directory" or "Could not resolve host," you should verify that the command line you entered is correctly spelled, ensure your Mac has a stable internet connection, and confirm that your macOS version is not lower than macOS 10.15.
Step 2. Select the Volume on Your Mac Hard Drive
Select the volume where your lost data is stored, and click "Search for lost files". The EaseUS software will quickly locate all the recoverable data on the selected volume.

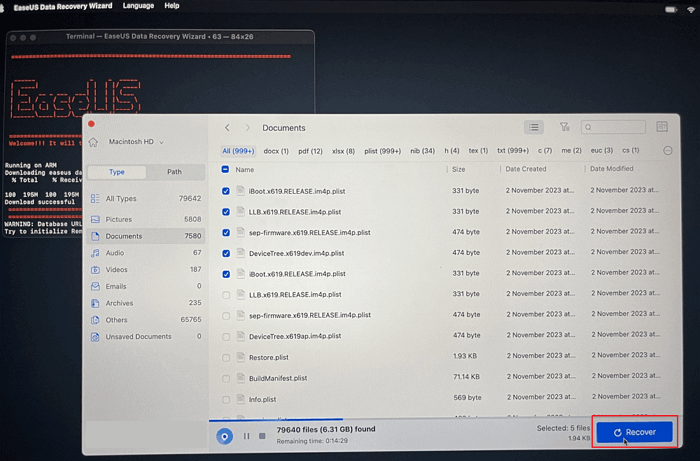
Step 3. Choose the Lost Data You Want
EaseUS software categorizes the scanned recoverable data by file type and storage path. Find the data you want by clicking "Type" or "Path" in the left panel. Then, check the boxes in front of the data you want to recover.

Step 4. Recover and Save Data on an External Disk
Click the "Recover" button, and a pop-up window will show up saying, "Please select a target location to save". Choose the external disk as the new storage location of your recovered data.
Final Words
Hopefully, the issue "can't install macOS Sonoma" has been solved with the help of any of the aforementioned fixes. If you're unhappy, you can delete the Beta version and downgrade to macOS Ventura. An essential step is constantly backing up your Mac before performing significant actions. Try EaseUS Data Recovery for Mac when you face unforeseen loss of information to recover your data quickly!
Can't Install macOS Sonoma FAQs
Consider the below-mentioned FAQs to understand this topic better:
1. Can I downgrade from Sonoma to Ventura?
Initially, you need to download the macOS Ventura on your Mac from the App Store, and the second step is to build a macOS Ventura installer drive. Lastly, you can install macOS Ventura in recovery mode. The entire process will eliminate your Mac partition.
2. How to install macOS Ventura on an unsupported Mac?
You may install macOS Ventura using OCLP.
- Therefore, you must format the external USB drive by going to Finder > Applications > Utilities > Disk Utility App.
- Next, install OCLP, aka OpenCore Legacy Patcher.
- Then, download the macOS Ventura, and create a bootable Mac Ventura USB drive.
- Finally, install it!
3. How do I install the Sonoma beta on Mac?
These are the steps to follow:
- Open the Apple menu, and select system settings.
- Opt for General, and hit Software Update.
- Hit the button, and select macOS Sonoma Developer Beta.
- Hit the done button.
- Select Upgrade now to commence the installation.
4. How do I fix macOS 14 installation failure?
You may perform disk first aid, verify Apple server status, and use a wired connection to fix macOS 14 installation failure.
Was This Page Helpful?
Finley is interested in reading and writing articles about technical knowledge. Her articles mainly focus on file repair and data recovery.
Jaden is one of the editors of EaseUS who lives and works in Chengdu, China. She focuses on topics concerning PCs and Mac data recovery. Jaden is committed to enhancing professional IT knowledge and writing abilities. She is always keen on new and intelligent products.
Related Articles
-
How to Fix "Disk 1 Removable No Media" Error [Detailed Guide]
![author icon]() Sherly/2024-01-19
Sherly/2024-01-19 -
Bash Profile on Mac - One Post for All Information
![author icon]() Daisy/2024-01-11
Daisy/2024-01-11 -
How to Solve 'Can't Delete Partition on SD Card' [100% Working Solutions]
![author icon]() Cici/2024-01-11
Cici/2024-01-11 -
Internet Browsers Not Working after Windows Upgrade? Fix It Now!
![author icon]() Tracy King/2024-01-11
Tracy King/2024-01-11

EaseUS Data Recovery Services
EaseUS data recovery experts have uneaqualed expertise to repair disks/systems and salvage data from all devices like RAID, HDD, SSD, USB, etc.