If you are facing a BIOS ID check error, you are at the right place. This post from EaseUS will discuss why this error occurs and provide the six best solutions to fix it. You should not ignore the BIOS ID check error because BIOS configures the hardware during setup and ensures that all PC components work correctly. Now, the question is why this error occurs, and the reason may be different; we will discuss this in the next part of this post; make sure to read the post till the end.
What Causes BIOS ID Check Error
According to reports, the BIOS ID check error usually happens when the user updates the BIOS on the motherboard. The main reason behind this error is the mismatch of the BIOS version you downloaded with your motherboard. It might also happen due to other causes, like a corrupted BIOS version, a failed USB drive, incomplete external devices, and poor internet connection. Here is a user case from Reddit; continue to read and fix this error using the following fixes.
BIOS ID CHECK ERROR
byu/Damii3 ingigabyte
How to Fix BIOS ID Check Error
This section will provide six fixes to successfully fix the BIOS ID check error. Let's discuss this in detail.
Fix 1. Download the Correct BIOS Version
As we already discussed, the leading cause behind the BIOS ID check error is the mismatch of the BIOS version. Many users reported in the forum that downloading the correct BIOS version can quickly resolve this error. You can download the correct BIOS version by visiting its official manufacturing website, selecting your motherboard model, going for the latest BIOS driver update, and installing it. If you find this post helpful, share it with your friends and on social media.
Fix 2. Reset BIOS
Many users reported fixing the BIOS ID check error by resetting the BIOS. Follow the steps given below to reset the BIOS,
Step 1. Completely turn off your PC. Start your computer and immediately press the F2 or Delete key when the first log screen appears. Then, you will enter the BIOS interface.
Step 2. Look for an option named Restore Defaults or Reset to Default. Once found, select it and press F10 to save and exit the BIOS window. Also, you can try pressing the F9 key to reset the BIOS.
Fix 3. Change BIOS Boot Mode
Changing the BIOS boot mode can fix the BIOS ID check error. Let's see how to do it.
Step 1. Completely turn off your PC. Start your computer and immediately press the F2 or Delete key when the first log screen appears. Then, you will enter the BIOS interface.
Step 2. Now, navigate to the Boot or Security tab from the BIOS screen.
Step 3. Change the BIOS boot mode from legacy to UEFI. Then, you can enable the Secure Boot option.
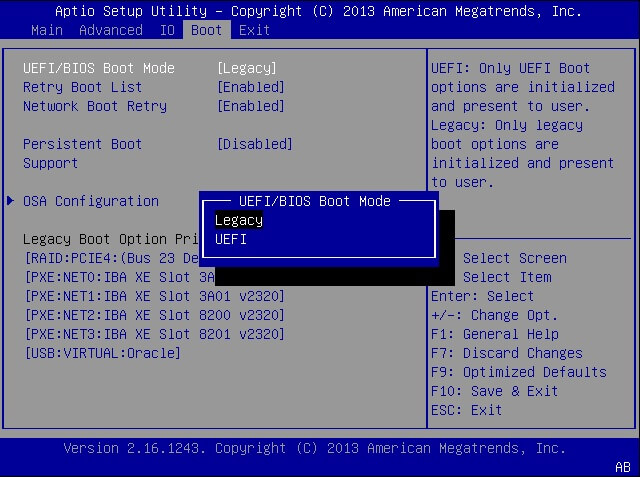
Step 4. Press the Save & Exit correspondent key on the screen, and it's done.
Fix 4. Check the USB Format
According to research, the BIOS ID check error happens due to the corrupted USB flash drive. The BIOS update also requires a USB formatted to FAT 32. So it's necessary to check the USB drive. Here, we highly recommend you use EaseUS Partition Master to contain file system errors and bad sectors on the USB.
This top-rated, highly reliable third-party tool can help users format the USB to FAT32 for BIOS updates. To understand the complete process, follow the steps below.
Step 1. Select the USB drive to format.
Connect the USB drive or pen drive to your computer. Download and launch EaseUS partition software. Right-click the USB drive you intend to format and choose "Format".
Step 2. Set the drive letter and file system on USB.
Assign a new partition label, file system (NTFS/FAT32/EXT2/EXT3/EXT4/exFAT), and cluster size to the selected partition, then click "OK".
Step 3. Check "Yes" to confirm formatting USB.
Click "Yes" if you see the Warning window. If you have important data on it, back up the data in advance.
Step 4. Apply the changes.
Click the "Execute 1 Task(s)" button first, and then click "Apply" to format the USB drive.
Fix 5. Reset CMOS
Resetting CMOS can effectively fix the BIOS ID check error. In general, CMOS is a small amount of memory on a computer motherboard that keeps the Basic Input /Output system BIOS settings. To reset the CMOS, follow the steps below.
Step 1. Power off your PC and remove all peripheral devices connected to your computer.
Step 2. Now disconnect the power connections and remove the computer cover.
Step 3. Find the battery on the motherboard. The battery may be in a horizontal or vertical holder or connected to an onboard header with a wire.
Step 4. Now, remove the battery carefully and pay attention to the + and - side of the battery setup.
Step 5. Wait for 1 to 5 minutes; then reconnect the CMOS battery to the PC and set the cover on your computer.
Step 6. Now reconnect all your peripheral devices and reboot your computer.
When all the steps are finished, you have successfully reset the CMOS. Now check whether the BIOS ID check error is resolved. If you find this post helpful, don't forget to share it with your friends and social media portals.
Fix 6. Upgrade the Motherboard
If none of the above solutions work for you, your motherboard might be an issue. With time, your hardware might become damaged due to a power surge or other reasons. In such a case, we recommend you use a new motherboard to resolve this error.
Conclusion
If you are still following this post, you have a clear idea of how to successfully fix the BIOS ID check error. We have provided the six most effective ways to fix this error and recommend trying all these fixes to understand which one works better for you.
BIOS ID Check Error FAQs
Here, we have answered some of the frequently asked questions related to the Fix BIOS ID check error, which might clear up your additional doubts. So don't skip this section.
1. How do I check for BIOS updates on Windows 11?
You can check for BIOS updates by using the system information tool. Follow the steps below.
Step 1. Press the Windows key + R to open the Run dialog.
Step 2. Type msinfo32 and press Enter.
Step 3. In the System Information window, under BIOS Version/Date, you'll see your current BIOS version.
2. How do I fix a black screen after a BIOS update?
You can fix the black screen after a BIOS update in several ways, like
- Resetting BIOS
- Resume interrupted update
- Clear CMOS
- Reinstall BIOS
3. How do I know if I need to update my BIOS?
Updating your BIOS isn't necessary unless you have a specific reason. Here are some key reasons you need to update your BIOS.
- Security patches: If THE BIOS version addresses known security vulnerabilities, updating is crucial to protect your system.
- Bug fixes: Newer versions may fix specific bugs you are experiencing with your motherboard or related hardware.
- New hardware compatibility: Updating might be necessary if you install new hardware like a CPU or RAM, and your current BIOS version doesn't support it.
- Performance improvements: Certain updates might offer optimizations for performance or stability. However, these are usually minor and rarely the main reason to update.
Was This Page Helpful?
Sherly joined EaseUS in 2022 and she has always loved writing articles and enjoys the fun they bring. She receives professional training here, focusing on product performance and other relative knowledge. She has written over 200 articles to help people overcome computing issues.
Related Articles
-
Windows Update Not Installing - Try These 6 Fixes
![author icon]() Jerry/2024-02-21
Jerry/2024-02-21 -
[Quickly & Easily] How to Update BIOS with USB in 2024
![author icon]() Jerry/2024-01-11
Jerry/2024-01-11 -
Wi-Fi not Working on Laptop, but Working on Phone | Solutions
![author icon]() Daisy/2024-02-21
Daisy/2024-02-21 -
How to Solve Zsh: Command Not Found: Pip | 4 Fixes
![author icon]() Dany/2024-01-11
Dany/2024-01-11

EaseUS Data Recovery Services
EaseUS data recovery experts have uneaqualed expertise to repair disks/systems and salvage data from all devices like RAID, HDD, SSD, USB, etc.