Do you often use AirDrop to send photos? AirDrop is an essential feature of Apple devices that allows users to send crucial files using Bluetooth and Wi-Fi. It identifies nearby devices from the Apple ecosystem and enables sending and receiving images, documents, videos, and more. Besides, it can be used with iPhones, iPads, and Macs. You can quickly find solutions to fix AirDrop issues on Mac with the following solutions:
| Workable Solutions | Step-by-step Troubleshooting |
|---|---|
| 1. Make Sure AirDrop Is Enabled on the Mac | Open Finder. Select the "Go" menu. Choose the AirDrop option from the drop-down menu. Click on...Full steps |
| 2. Reboot Your Mac and iPhone/iPad | To reboot your Mac, you can use the Apple Menu and then select Restart to reboot Mac...Full steps |
| 3. Check Bluetooth and Wi-Fi | Since AirDrop works on Wi-Fi and Bluetooth, ensuring it is turned on is critical. To fix the AirDrop...Full steps |
| 4. Adjust Firewall Settings on the Mac | Click on the Apple menu. Select the "System Settings" option from the drop-down menu...Full steps |
| More Solutions | Shut down the system. Press the Power button. Press the Cmd, P, R, and Option keys...Full steps |
However, several users have reported AirDrop not working on Mac. Several reasons can explain the occurrence of the issue.
| ❌Wi-Fi disabled | If the Wi-Fi is not turned on, the AirDrop will not work. You need to check that out first. |
| ⚠️Bluetooth not turned on | t is vital to ensure it is enabled. |
| 📱Compatibility issues | If the iOS version is before 2012, compatibility problems might arise. |
| 📳More distance between the users | Both users must be at least 30 feet from each other for AirDrop to work. |
Luckily, you can apply several quick fixes to remedy the problem. For instance, you can shut down personal hotspots. You can also ensure that the devices are closer to each other and check the compatibility of the devices for AirDrop.
This guide will discuss how you can fix AirDrop not working on a Mac.
Fix 1. Make Sure AirDrop Is Enabled on the Mac
One of the most straightforward solutions to resolve the AirDrop not working on Mac problem is to ensure AirDrop is enabled. For that, you need to follow these steps:
Step 1. Open Finder.
Step 2. Select the "Go" menu.
Step 3. Choose the AirDrop option from the drop-down menu.

Step 4. Click on "Allow me to be discovered by:".
Step 5. You can choose "Contacts Only" or "Everyone" from the drop-down menu.

If this simple method works for you, you can share this method on social media to let more readers know.
Fix 2. Reboot Your Mac and iPhone/iPad
Another quick fix is to reboot the device. It is an easy solution and doesn't take much time.
To reboot your Mac, you can use the Apple Menu and then select Restart to reboot Mac. Make sure to save your work before doing that.

If the system becomes unresponsive, you can force restart your Mac. You need to press the Power button and hold it until the Mac gets shut down. After a few seconds, you can turn it on.
To reboot the iPhone and iPad, the steps are the same. You need to press any of the volume buttons and side buttons at the same time. Once you release the buttons, the power slide will appear, which you need to drag. This will turn the device off. To reboot, press the power button, and you are done.

(Note: These steps are for iPhone X, 11, 12, 13, and later versions.)
Fix 3. Check Bluetooth and Wi-Fi
Since AirDrop works on Wi-Fi and Bluetooth, ensuring it is turned on is critical. To fix the AirDrop not working on Mac problem, turn Wi-Fi and Bluetooth off and then turn them on. For that, you can select the Control Center icon. Now, click the down arrow beside Wi-Fi and turn off the toggle. You can do the same for Bluetooth. Disable Wi-Fi may cause internet connection issues, and Mac stuck on checking for updates.

If you want to turn on Bluetooth and Wi-Fi, follow the same steps and turn on the toggle. Now, check if the AirDrop is working on your system.
Fix 4. Adjust Firewall Settings on the Mac
The in-built firewall of the Mac offers protection and blocks unauthorized applications. It safeguards the system from allowing incoming connections. One of the primary reasons for AirDrop not working correctly is blocking this particular feature on the Firewall settings. If you have blocked incoming connections, AirDrop will not work.
To fix this issue, here are the steps to follow:
Step 1. Click on the Apple menu.
Step 2. Select the "System Settings" option from the drop-down menu.

Step 3. Choose Network from the left sidebar settings, followed by Network from the right.
Step 4. Choose "Options" to proceed further.

Step 5. Turn off "Block all incoming connections". Turn on "Automatically allow built-in software to receive incoming connections". Click on "OK" once done.

Step 6. Close System Settings. If you encounter System Settings or System Preferences not responding. The following passage may help:

System Preferences Not Responding on Mac [Fixed]
The System Preferences Not Responding prevents users from gaining access to the app. However, there are multiple solutions to the issue. Read more >>
Fix 5. Reset NVRAM and PRAM
Resetting the NVRAM and PRAM is another solution to fix the AirDrop not working on Mac problem. For M2 and M1 Macs, there is no need to reset NVRAM. It takes place automatically when you restart the system. All you have to do is reboot the system.
The process to reset PRAM or NVRAM is the same for the older systems. So, you need to follow the steps given below:
Step 1. Shut down the system.
Step 2. Press the Power button.
Step 3. Press the Cmd, P, R, and Option keys simultaneously.

Step 4. Release all the keys when you hear the startup chime for the second time.
Note: Some settings, such as time, trackpad settings, etc., will be lost. You will need to set them up again. If you want to check a more detailed tutorial, read the following passage:

NVRAM Reset | 3 Proven Ways to Reset NVRAM/PRAM on Mac
Doing an NVRAM reset is one of the most effective Mac troubleshooting methods. We will introduce how to reset NVRAM on your Mac. Read more >>
Fix 6. Update macOS on Your Mac
Before you proceed with this solution, ensure you backup your data. While not always applicable, in some cases, data loss does take place. However, if you haven't backed up your data, don't worry!
Backup Your Mac Before Update
If an update gets stuck in between, the power drops, then it can corrupt the whole system, including all the files inside it. You must reinstall the macOS and set up everything from the start.
So, it would be best to back up everything before updating the Macbook. The process is simple, and you can use any professional backup software. EaseUS Data Recovery Wizard for Mac Pro is an all-in-one recovery software that allows you to back up all the volumes connected to your Mac.
Back Up Your Mac and Never Lose Data
Back up and restore your MacBook/iMac without Time Machine, iCloud, or external hard drives.
It is an efficient yet reliable software that helps Mac users back up their Mac and recover data. This tool can restore images, videos, documents, etc. This software is also handy if you don't have the backup and need to get back data. If you are eager to explore EaseUS Data Recovery Wizard for Mac Pro, you can follow these steps:
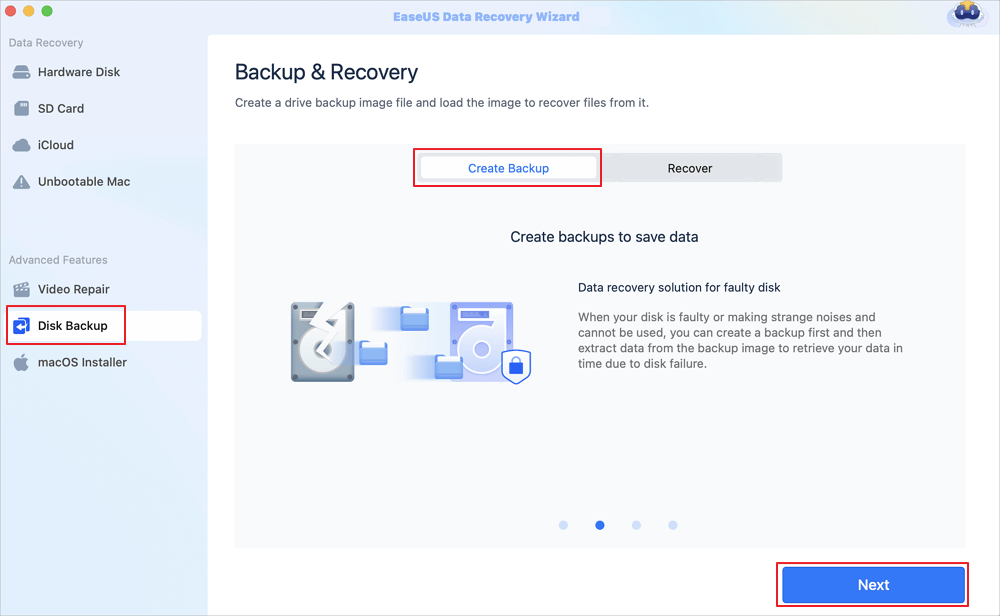
Step 1. Click "Disk Backup" > "Create Backup" > "Next" in EaseUS Data Recovery Wizard for Mac's main interface. You can create a drive backup image file in case the data is overwritten.
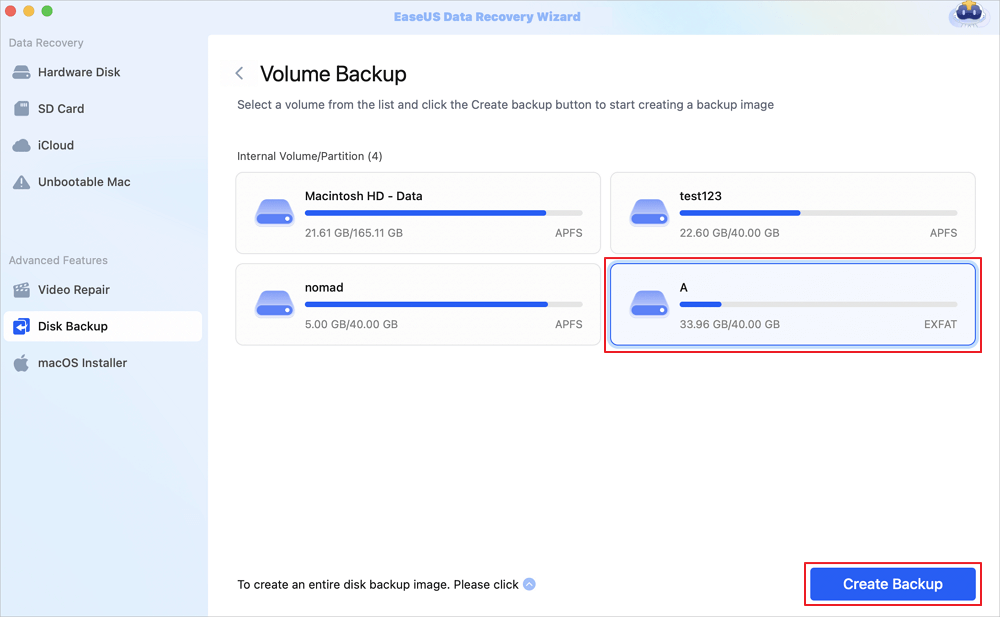
Step 2. Select an internal volume to back up, and click "Create Backup". If you want to create backups and recover data from an external hard drive, USB flash drive, or SD card, remember to connect the storage device to your Mac in advance.
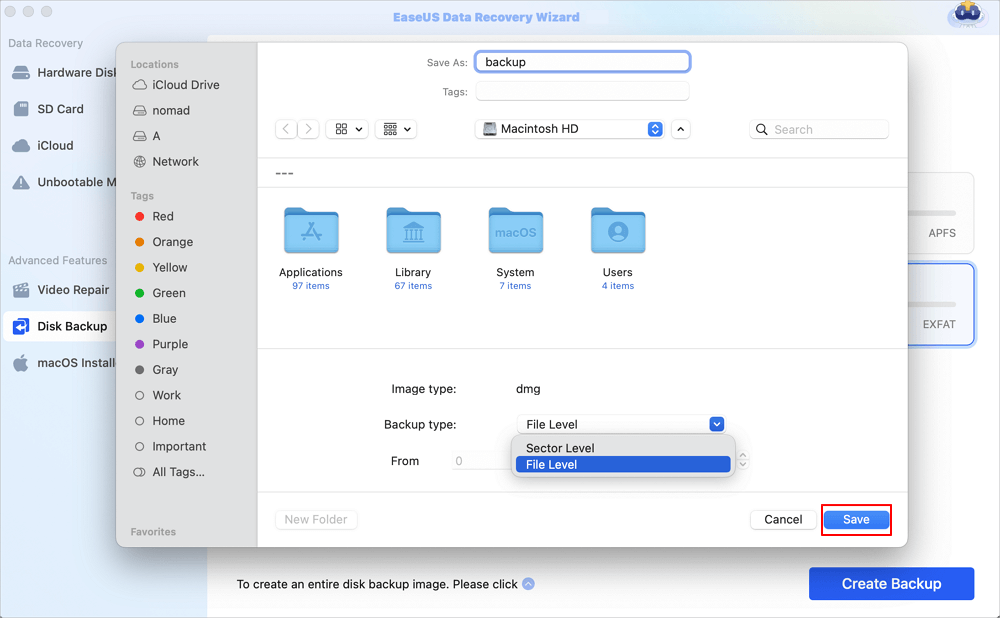
Step 3. Choose a place to save your backup files, and change the name of your backup file, then click "Save". It is not wise to save backups in the same storage device that you want to recover data from.
Now that you have backed up all the data, it's time to update your Mac to the latest version available. If you think this tool is useful and handy, please share this page on social media.
How to Update Your Mac
After you have backed up data, you can start the update process. It is one of the quickest yet most straightforward fixes for AirDrop not working on Mac to ensure it's up-to-date. For that, you need to follow some easy steps:
Step 1. Click on the Apple menu.
Step 2. Select "System Settings".
Step 3. From the left sidebar, choose "General".
Step 4. Now, choose "Software Update".

If you find any update, you need to download and install it. You can also checkmark the option – Automatically keep my Mac up to date. In that case, the system will automatically update itself, and you won't have to do so manually.
Alternatively, you can follow these steps on macOS Monterey and older versions:
Step 1. Click on the Apple menu.
Step 2. Select "System Preferences".
Step 3. Choose "Software Update".
If there's no available update, you can check the following passage to solve the update issues:

How Do I Update My Mac When It Says No Update | 8 Solutions
How do I update my Mac when it says no update? Well, there are numerous solutions you can try! Read more >>
Fix 7. Factory Reset Your Mac
Lastly, if nothing works, you can factory reset your system. However, it is vital to understand that this method should be the last option. It will wipe away all data and leave your Mac where you received it. That means you must actively back up data before factory resetting the Mac.
Here are the steps to follow:
Step 1. Click on the Apple menu.
Step 2. Select "System Settings".
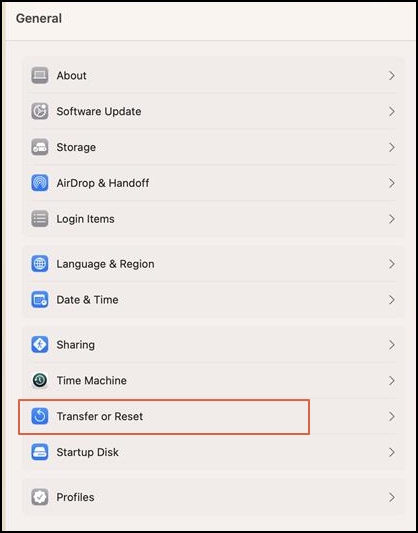
Step 3. Choose "General".
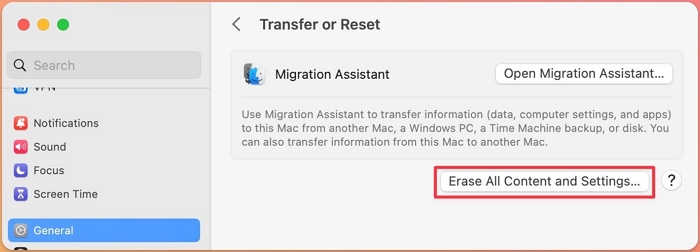
Step 4. Go to "Transfer or Reset" on the right side.
Step 5. Click on the "Erase All Content and Settings" option.
Step 6. Enter the admin credentials when asked.
Step 7. You can use Time Machine to back up data or skip it.
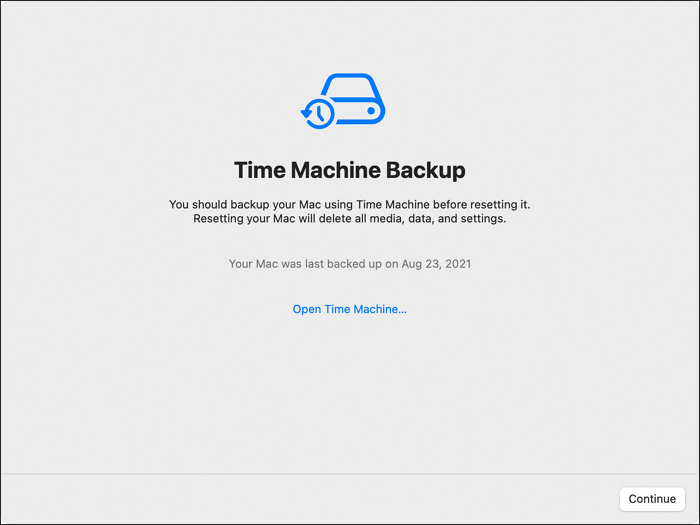
Step 8. When you see the window that shows you the items to be removed, press Continue.
Step 9. Click on "Erase All Content and Settings".
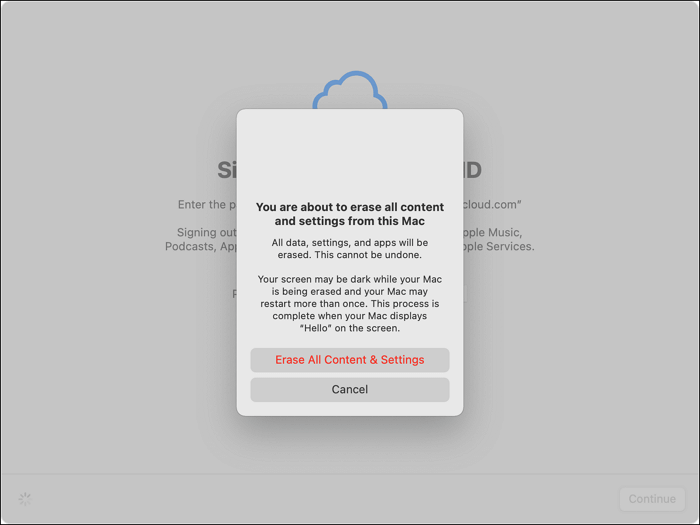
Step 10. The Mac will restart.
Step 11. You will see the progress bar. Please wait for it to complete, then set up the system again.
If you lost essential data after factory resetting macOS, you can download EaseUS Data Recovery Wizard for Mac Pro to recover files after factory resetting Mac.
To Wrap Up
AirDrop is inevitably one of the best features of Apple. It allows users to send and receive images, videos, etc. It works on Wi-Fi and Bluetooth and is a great help for Mac users. However, issues regarding it not working have caused alarm for the Apple users.
Several reasons explain why AirDrop is not working on Mac. These include greater distance between the devices, Bluetooth turned off, personal hotspot enabled, and more. However, there are multiple solutions you can apply to fix the issue.
For instance, you can ensure AirDrop, Wi-Fi, and Bluetooth are turned on. You can also reset NVRAM and PRAM. However, if data loss occurs while applying any solutions, you needn’t worry! You can use the professional data recovery software - EaseUS Data Recovery Wizard for Mac Pro.
The EaseUS data recovery software is a reliable data recovery software. You can use this software to recover different types of data. Download and install EaseUS Data Recovery Wizard for Mac today!
AirDrop Not Working FAQs
To know more about AirDrop not working on Mac, read these questions and answers:
1. Why is my AirDrop sending but not receiving?
If your AirDrop is sending but not receiving, the problem could be the old software. If you don't have the recent Apple software, you might face receiving issues. That is why one needs to ensure the software is up-to-date.
2. How do I AirDrop from iPhone to Mac?
To share data from iPhone to Mac via AirDrop, choose the data and go to the Share menu. From there, click on the AirDrop icon. After that, you must choose the Mac icon to send the data. On Mac, you need to accept the incoming data.
3. Why is my AirDrop not showing up on Mac?
Check the distance between the devices if your AirDrop is not showing up on Mac. You need to lessen the distance if it’s more than 30 feet. You also need to make sure Bluetooth and Wi-Fi are turned on.
4. Why my AirDrop cannot find any device?
Your AirDrop cannot find your device because the distance between the devices is more than 9 meters or 30 feet. You also need to check if both Bluetooth and Wi-Fi are turned on.
Was This Page Helpful?
Dany is an editor of EaseUS who lives and works in Chengdu, China. She focuses on writing articles about data recovery on Mac devices and PCs. She is devoted to improving her writing skills and enriching her professional knowledge. Dany also enjoys reading detective novels in her spare time.
Related Articles
-
System Preferences Not Responding on Mac: Possible Causes and Solutions
![author icon]() Brithny/2024-01-11
Brithny/2024-01-11 -
How to Make Mac Dark Mode [for macOS Ventura/Monterey/Big Sur]
![author icon]() Dany/2024-01-11
Dany/2024-01-11 -
How to Change DNS Settings [2024 New]
![author icon]() Daisy/2024-01-11
Daisy/2024-01-11 -
How to Format SD Card on Chromebook [With Specific Steps]
![author icon]() Tracy King/2024-01-11
Tracy King/2024-01-11

EaseUS Data Recovery Services
EaseUS data recovery experts have uneaqualed expertise to repair disks/systems and salvage data from all devices like RAID, HDD, SSD, USB, etc.