Page Table of Contents
Updated on Feb 26, 2024
Do you also struggle with the inability to return your computer system to a former state? Do not worry; this tutorial is here to help you locate a reliable method to carry out System Restore from BIOS in Windows 7. Continue reading to find out how.
❗Is It Possible to Run System Restore from BIOS on Windows 7
System Restore is a Windows built-in utility that helps to roll your computer back to a previous point in time, including system files, installed applications, Windows Registry, system settings, etc. This feature requires you to create a restore point before restoring and is very practical for computer malfunction or other issues.
But sometimes, you may not boot into your system successfully due to some uncertain issues. Is it possible to perform System Restore from BIOS in this situation?
The answer is Yes! You can restrive your Windows 7 system from the computer's basic input/output system(BIOS). Now, follow the step-by-step guide to run System Restore from BIOS.
📚[Step Guide] How to Perform System Restore from BIOS
The process may take 8-10 minutes, depending on many factors. Please make enough preparation before starting. Note that all your personal data except system files will be erased if you do the operation.
- 📝What to prepare
- A Windows 7 installation CD/DVD
- Stable Internet connection
- Working keyboard
Step 1. Insert the Windows 7 installation disk(CD-ROM) into your computer.
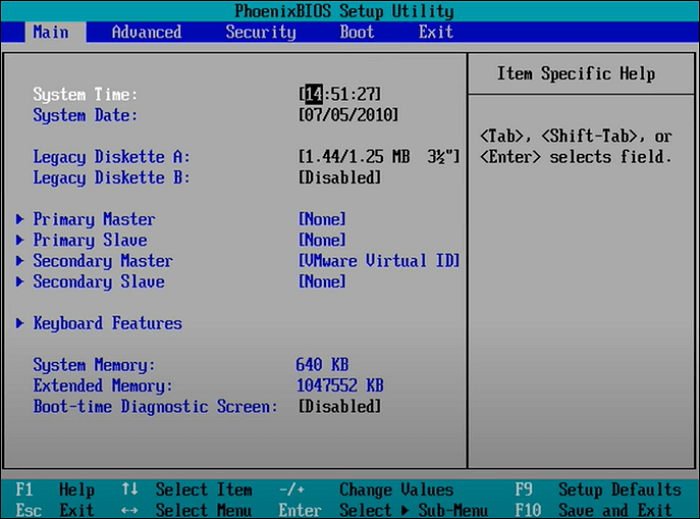
Step 2. Restart your computer and press the F8 key to enter into BIOS. (Other PCs may have different keys to enter into BIOS, like F2, F5, etc.)
- 💡Kind tip
- Follow the steps carefully because, with one wrong move in here, you will find your PC won't boot successfully.
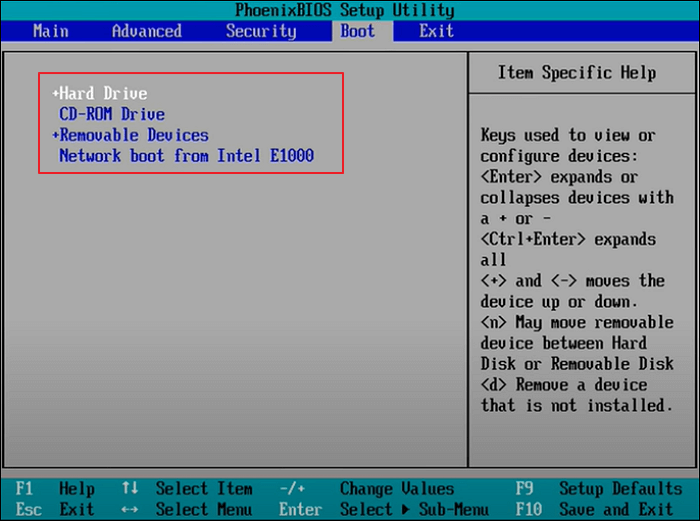
Step 3. Change to the Boot tab, and you'll see all hard drives installed on your computer, including CD-ROM, Removable Devices, and Network boot from Intel E1000. You can see an explanation on the right side.
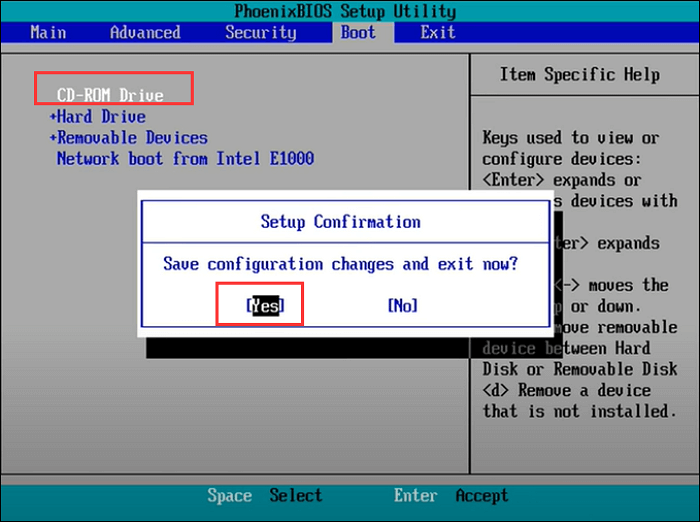
Step 4. Move the CD-ROM to the top by pressing the Plus and F8 keys together. Then it will pop up a window asking you to save the configuration changes and exit now. Click YES to exit.
Step 5. Now, your computer will reboot, and it will ask you to hit any key to boot from the CD or DVD.

Step 6. After clicking, wait for Windows to load files.

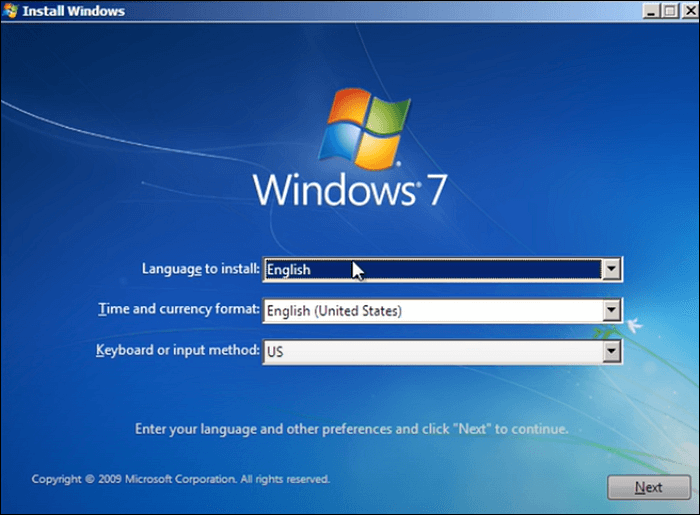
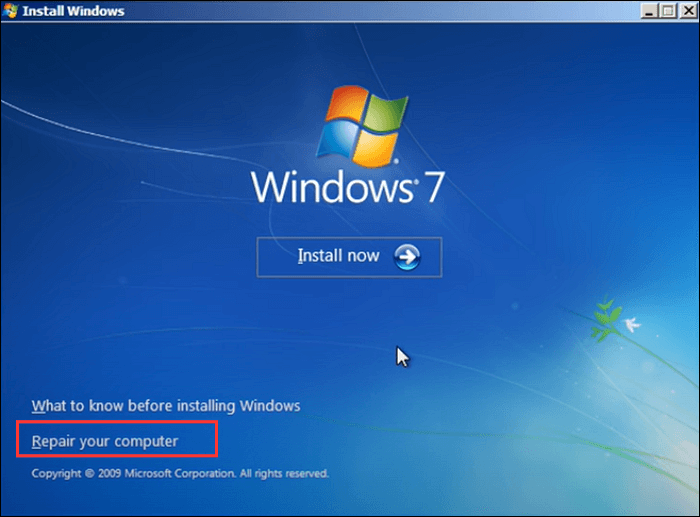
Step 7. In the Windows splash screen, choose the language, time and currency format, keyboard or input method, and click Next.
Step 8. Click Repair your computer in the bottom-left corner.
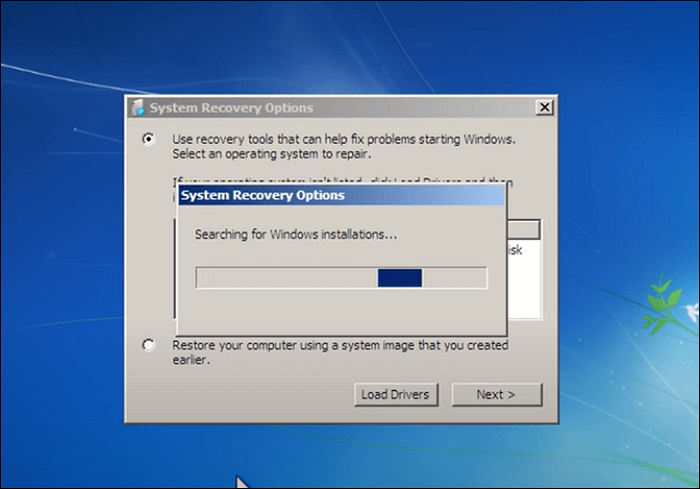
Step 9. It will start detecting which operating system is OK to restore.
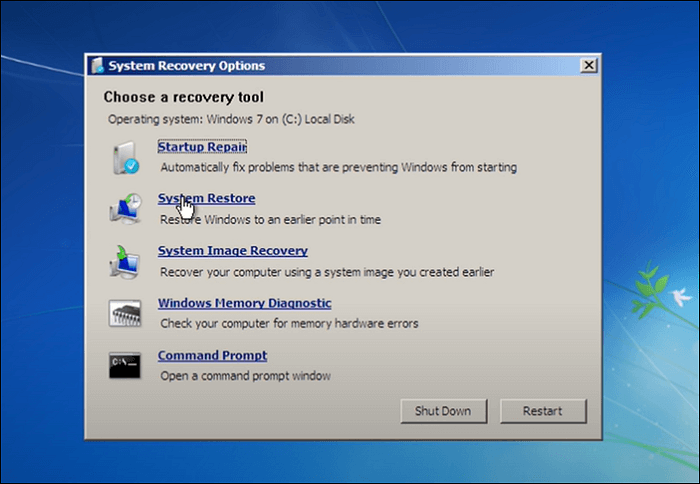
Step 10. Choose Windows 7 and click Next.

Step 11. Select and click the System Restore option.
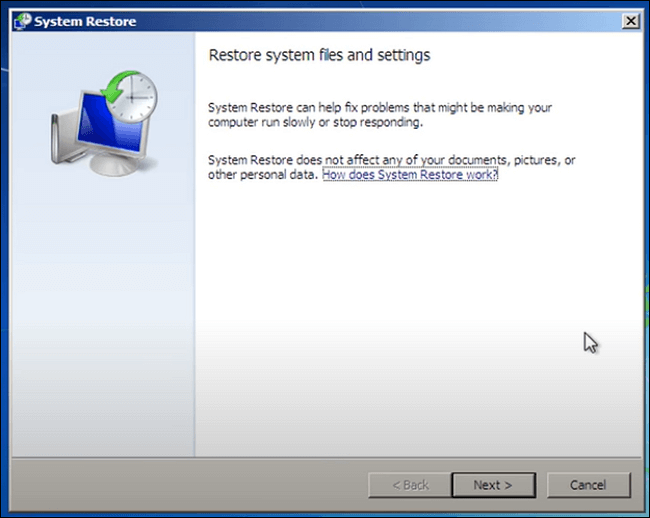
Step 12. In the System Restore window, confirm the information, and click Next.
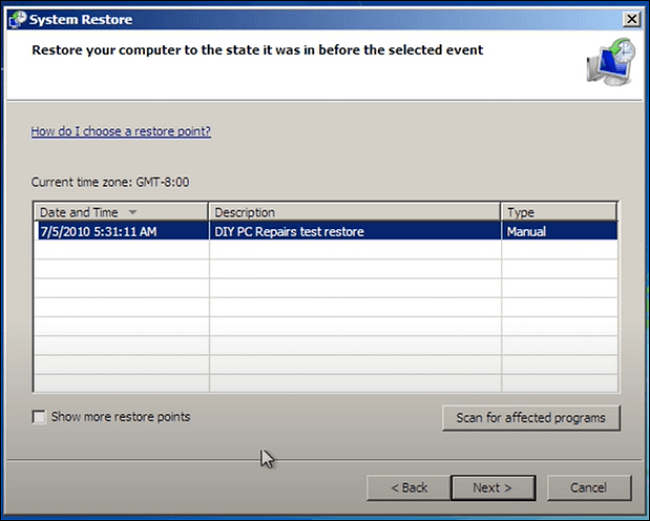
Step 13. Choose a Restore Point that you created earlier, and click Next.
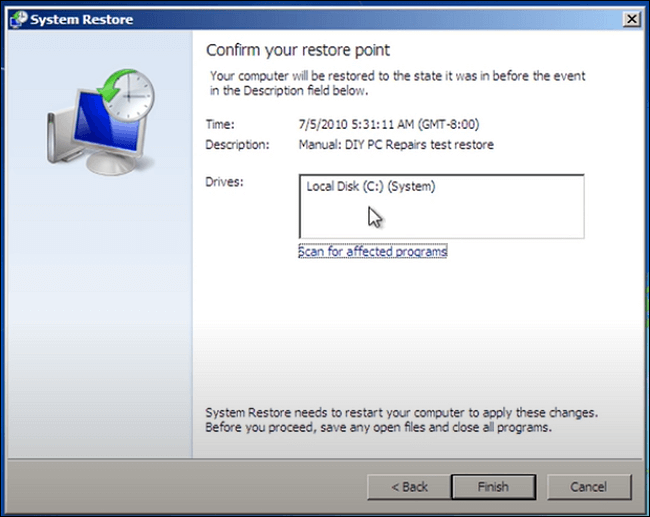
Step 14. Confirm the restore point and click Finish.
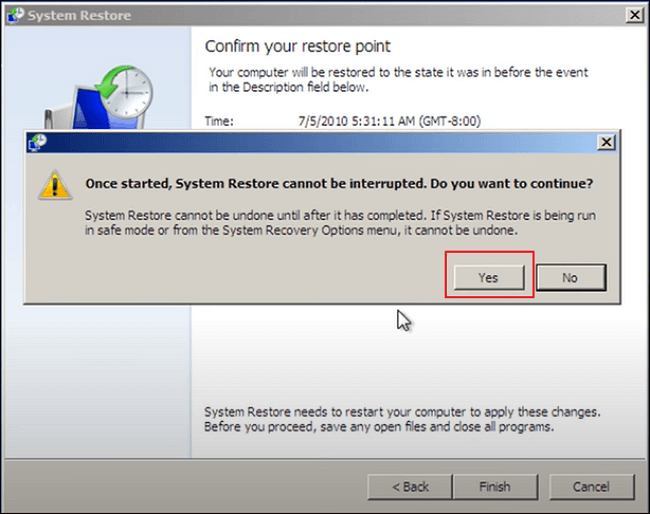
Step 15. A window will appear, warning that System Restore cannot be interrupted once started. Click Yes to continue. .
Step 16. Wait for your system to roll back to the restore point you've just selected. When finished, it will notify you the restore is done successfully.
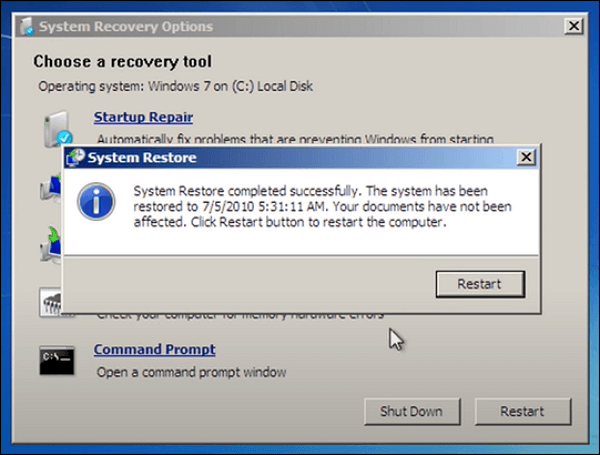
Now, you can restart your Windows 7 computer, and your system has been successfully restored to the point time.
Here is a video guide to recover your system to its former state. If you want a more straightforward
🎬Key points in this video tutorial:
- 0:00 - Introduction
- 1:29 - How to Access BIOS
- 1:55 - BIOS setup
- 4:30 - Perform Windows 7 System Restore from BIOS
📖Read also: Fixed: System Image Restore Failed | Factory Reset from BIOS on a Windows PC
👍Create Windows 7 Emergency Disk to Restore the System Easily
Computer booting failure can happen at any time for a variety of causes. You will be unable to access crucial files, applications, and data stored on your computer if your PC cannot start or load the operating system. This can lead to decreased productivity, missing deadlines, and other bad outcomes.
If this is the case, you can use EaseUS Todo Backup to build an emergency WinPE bootable disk to restore the system from Windows boot failure or OS crash problem without losing any data on your Windows 7.
With a WinPE emergency disk, you can run a system image recovery, files backup and recovery, partition/disk backup and restore, systemand disk cloning, and wipe data on the PC, etc.
Download it and use it to save your dead computer!
Secure Download

Start a live chat with an EaseUS Expert to tailor an enterprise backup solution specific to your requirements. We are here to assist you with the following as well:
- Commence a free trial
- Obtain a quotation
- Arrange a free demonstration
Follow the instructions to create a WinPE bootable disk with EaseUS Todo Backup now:
- 📝What to prepare
- Another working Windows computer
- A USB with enough space, can be read and write
- A USB cable
Step 1. Prepare a USB drive which can be written and read.
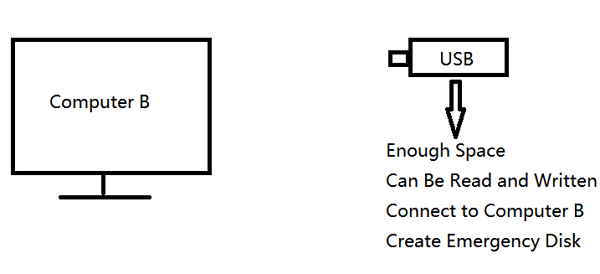
Step 2. Launch and install EaseUS Todo Backup on the Computer B.
Step 3. Find and click "Tools" and choose "Create Emergency Disk".

Step 4. Choose the Boot disk location. You can create an ISO file, a bootable USB or CD/DVD disc.

Step 5. Then click "Create" to start.
After WinPE emergency disk creation, now, you can use it to restore your Windows 7 PC:
Step 1. Plug in EaseUS emergency bootable USB disk to your dead, unbootable, or problematic Windows 7 PC.
Step 2. Press the power button to boot the computer, and then hold F2/F11/Del to enter BIOS.
Step 3. Go to the Boot Drive section and set EaseUS Emergency Bootable USB as the boot drive.
Step 4. Save the changes and exit BIOS.
Step 5. Wait for your computer to boot up from the EaseUS WinPE disk.
Now, you are on the EaseUS Todo Backup WinPE interface, and you can use its available features, like file backup, disk partition backup, system image recovery, etc., without booting into Windows.
🎯The Bottom Line
We have provided a stepwise guideline for the system restore from BIOS in Windows 7, which is a complex technique that requires some technical knowledge. We hope that by following the step-by-step instructions in this post, you will be able to restore your system to its prior state successfully.
Furthermore, utilizing EaseUS Todo Backup to create a WinPE bootable USB is an outstanding alternative approach that can save you time and bother. We strongly advise you to use EaseUS Todo Backup to resolve system restoration concerns. You may simply restore the system to its prior state using its user-friendly interface and strong capabilities without losing any vital data.
Secure Download
❓FAQs on System Restore From BIOS Windows 7
1. How do I boot into system recovery options?
System Recovery Options include several tools, including Startup Repair, System Restore, System Image Recovery, Windows Memory Diagnostic Tool, and Command Prompt. To open the System Recovery Options, you need to follow the steps:
- Remove all your floppy disks, CDs, and DVDs from your computer.
- Restart your computer, and press the F8 key before the Windows logo appears.
- In the Advanced Boot Options window, choose the Repair your computer option and press Enter key.
- Select a keyboard layout, and then click Next.
- Now, you have boot into the System Recovery Options, and you can choose any option.
2. How do I get into Windows recovery from BIOS?
To enter Windows recovery mode through the BIOS, perform the following steps:
- Turn on your computer and continuously click the F8 key until the Advanced Boot Options menu opens.
- Select "Repair Your Computer" with the arrow keys and press Enter.
- Log in as an administrator and select your language.
- Select the operating system to be repaired and press the "Next" button.
- To restore your computer to a prior state, click "System Restore" and follow the on-screen instructions.
Alternatively, you can use EaseUS Todo Backup to create a WinPE bootable disk and use it to boot your computer into the recovery environment. This is especially useful if you cannot access the Advanced Boot Options menu.
3. What is the F12 boot menu?
The F12 boot menu is a menu that shows during the boot process on some systems. It gives the user access to a number of boot-related options, such as booting from other devices or opening the BIOS setup program.
Was this page helpful? Your support is truly important to us!

EaseUS Todo Backup
EaseUS Todo Backup is a dependable and professional data backup solution capable of backing up files, folders, drives, APP data and creating a system image. It also makes it easy to clone HDD/SSD, transfer the system to different hardware, and create bootable WinPE bootable disks.
Secure Download
-
Updated by
![]()
Larissa
Larissa has rich experience in writing technical articles and is now a professional editor at EaseUS. She is good at writing articles about data recovery, disk cloning, disk partitioning, data backup, and other related knowledge. Her detailed and ultimate guides help users find effective solutions to their problems. She is fond of traveling, reading, and riding in her spare time.…Read full bio
Related Articles
![]() How to Fix "Google Photo Lost Photos" Issue (with Prevention Tips)
How to Fix "Google Photo Lost Photos" Issue (with Prevention Tips)![]() ISO Is Corrupted| How to Fix a Corrupted ISO Files in Windows 11/10
ISO Is Corrupted| How to Fix a Corrupted ISO Files in Windows 11/10![]() TotalAV VS McAfee: Full Comparison in 2024🔥
TotalAV VS McAfee: Full Comparison in 2024🔥![]() 3 Fixes to Completely Remove 0x0 0x0 Error for Windows 11/10/7
3 Fixes to Completely Remove 0x0 0x0 Error for Windows 11/10/7![]() Simple & Easy: Backup External Hard Drive to Cloud
Simple & Easy: Backup External Hard Drive to Cloud![]() How to Backup QuickBooks Desktop to Flash Drive [QuickBooks Guides]
How to Backup QuickBooks Desktop to Flash Drive [QuickBooks Guides]


EaseUS Todo Backup

Smart backup tool for your files, disks, APPs and entire computer.
Topic Clusters


Interesting Topics