Page Table of Contents
Updated on Feb 26, 2024
System image recovery is restoring your operating system to the previous working version if the current one misbehaves or has run into errors. Typically, this process entails moving back to the available system image and booting your computer from it.
It's possible to access this feature on your Windows computer anytime you want to use it for system restore. There exist two primary ways to perform system image recovery from Command Prompt Windows 10. The first method uses Safe Mode, while the second requires entering Command Prompt in the Windows recovery environment via a bootable disk.
Windows 10 System Image Recovery from Command Prompt
If your operating system has run into errors, you can restore it to a previous version by entering system image recovery using the following methods. Both methods entail the use of the Command Prompt Windows utility.
- Method 1. Perform System Restore with CMD in Safe Mode
- Method 2. Perform System Restore from CMD in WinRE
Method 1. Perform System Restore with CMD in Safe Mode
It is said that restoring your system from Safe Mode works well in Windows 10/11 and previous Windows versions. It's important to remember that it's hard to undo the process once you've restored your system using this method. Below are the steps to launch system restore with CMD in Safe Mode:
Step 1. While pressing and holding the Shift key, click on the Start menu. Click the Power button, then select Restart to restart your PC.
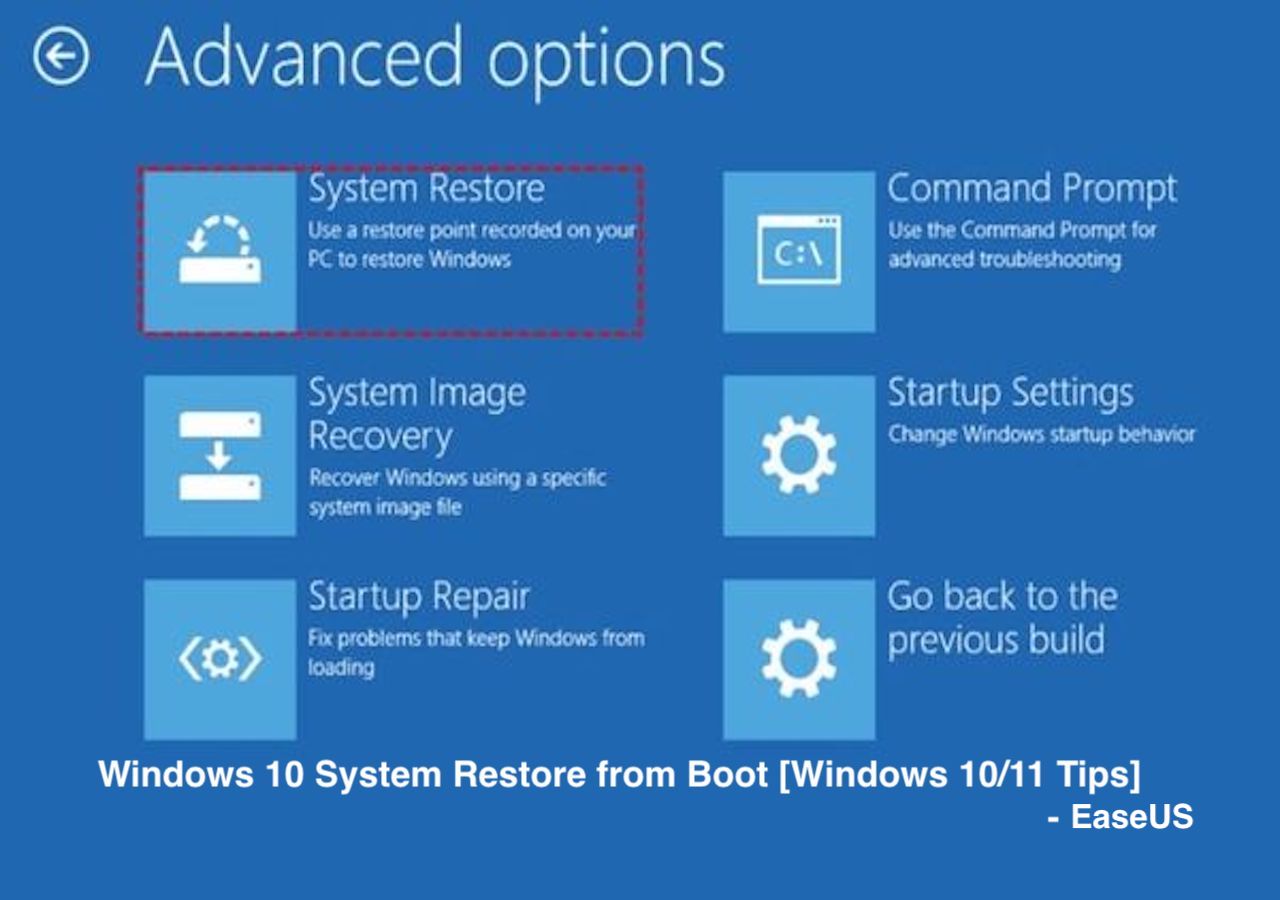
Step 2. Once the PC has restarted and the Choose an option screen appears, click on Troubleshoot, then Advanced options>Startup Settings>Restart.

Step 3. Next, select the Enable Safe Mode with Command Prompt option.

Step 4. If required, you should sign into your admin account. Next, type the command command in the Command Prompt window: rstrui.exe, and hit Enter.

Step 5. Once in the System Restore wizard, you can select either Use recommended restore point or Choose a restore point. After that, click on the Next button and follow the on-screen instructions to restore your Windows 10 to its previous version.
Share it with your friends if you find it helpful:
Method 2. Perform System Restore from CMD in WinRE
Another way to restore your operating system is by entering the Windows Recovery Environment (WinRE). From there, you can restore your OS to a previous date and possibly fix the errors causing it to hang. Follow the steps below to carry out a system restore from the command prompt:
Step 1. Create a Windows 10 installation disc for your computer.
Step 2. Insert the disk, then go to BIOS settings once you've started your computer. Under your BIOS settings, click on the Boot menu and make CD-ROM drive the first option. Next, press F10 to save changes and exit.

Step 3. Click Next, then go to the Repair your computer option. From there, go to Troubleshoot>Advanced options, then select Command Prompt. When the Command Prompt window opens, type rstrui.exe in the command line, then hit Enter. This process will initiate the System Restore Wizard. Follow the on-screen instructions to start the system restore process.

Windows 10 System Restore from Boot [Windows Tips]
In this post, we will provide the full guide on how to restore the Windows 10 system from the boot. We suggest you use EaseUS Todo Backup to manage system backup and restore. It is powerful and user-friendly.
Easier: Backup & Restore Windows 10 System Image With EaseUS Todo Backup
If you find it hard to follow the steps in Methods 1 & 2 above, there's an easier way to backup and restore Windows in the event of errors or system failure. This entails the use of a powerful backup and restore software like EaseUS Todo Backup.
This tool allows you to create a system image backup and restore it whenever needed. You can create a backup for your disk, partitions, OS, and other files. Specifically, you can create a bootable backup that could help in disaster recovery following events like hardware corruption, malware attacks, BSOD errors, or system crashes.
With EaseUS Todo Backup, you can perform both system image recovery and bootable recovery.
The key features of EaseUS Todo Backup include the following:
| Feature | Description |
| 🖥️Bootable backup & recovery | EaseUS Todo Backup allows you to create a WinPE bootable disk when your OS breaks down. |
| 💾Restore system to dissimilar hardware | You can restore your system backup image to a computer of dissimilar hardware. |
| 🌩️Enhanced backup efficiency | You can make differential and incremental backups based on a previous full backup. |
| ☁️Multi-path backup storage | EaseUS follows the 3-2-1 backup rule to store your backup in different secure locations. |
| 🔐Secured password-protect backups | Your backups are protected using a password to prevent illegal access. |
Because of these unique features associated with EaseUS Todo Backup, you must try it out today. You can do that by downloading and installing a trial version of the software on your computer. Also, you can upgrade to the premium version to access more refined backup features.
Secure Download
Here is what you should follow to back up your system:
Step 1. Launch EaseUS Todo Backup and choose "Create Backup" on the home page, click "Select backup contents".

Step 2. Among the four available categories, click "OS" to start back up.

Step 3. The system partition will be automatically selected, you only need to select the location.

Step 4. Local Drive, Cloud, and NAS are available for you to save the backup file. You can also connect an external hard drive to preserve the system backup files.

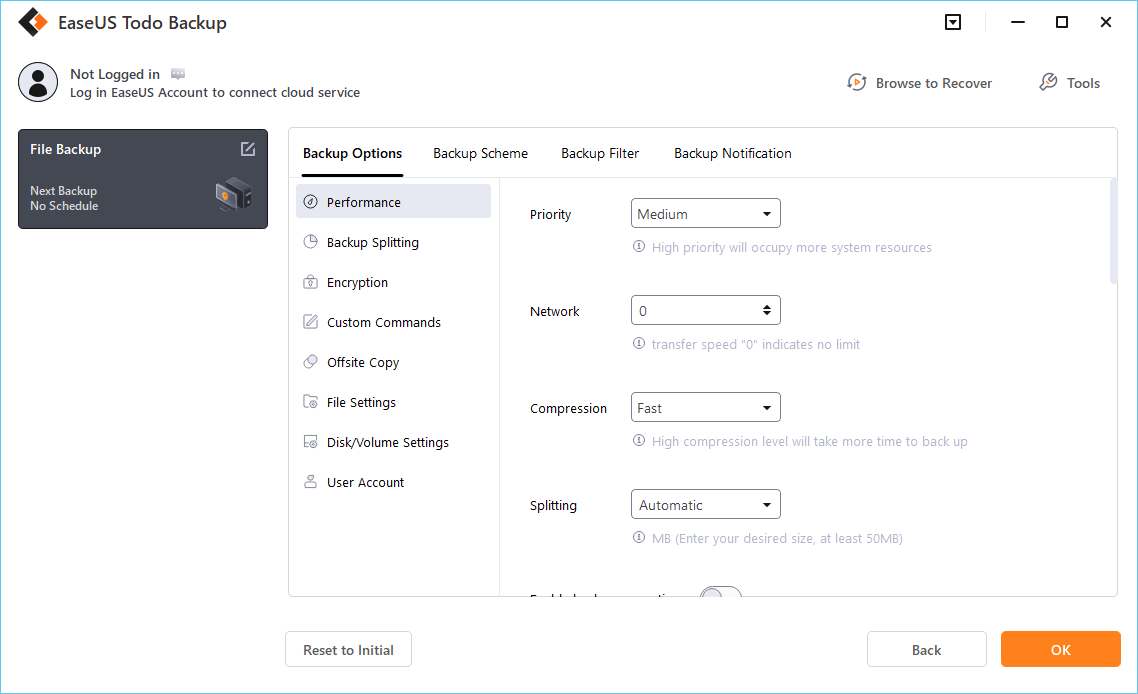
Step 5. You can customize the settings in "Options" at the left bottom. After that, click "Backup Now", and the process will begin.
*After finishing the backup process, you can check the backup status, recover, open, or delete the backup by right-clicking the backup task on the left.
Conclusion
This article has taught you how to perform system image recovery from Command Prompt Windows 10. You can recover your system image with CMD by entering Safe Mode or the Windows Recovery Environment. If these methods don't work, you can try out an easier backup and restore tool like EaseUS Todo Backup.
With this software, you can securely backup your recovery image and system restore Windows when needed. The tool allows you to perform bootable backup and recovery and also restore your operating system to dissimilar hardware. Ensure you download and install EaseUS Todo Backup today to start experiencing its unique features.
Secure Download
FAQS on How to Restore System Image From Command Prompt on Windows 10
Below are common questions about system image recovery from the Command Prompt on Windows 10:
1. How Do I Recover My System Image in Windows 10?
You can restore your System Image using a Command Prompt that allows you to enter the Windows recovery environment. Follow the steps below:
Step 1. Create a Windows 10 installation disc for your computer.
Step 2. Insert the disk, then go to BIOS settings once you've started your computer. Under your BIOS settings, click on the Boot menu and make CD-ROM drive the first option. Next, press F10 to save changes and exit.
Step 3. Click Next, then go to the Repair your computer option. Go to Troubleshoot>Advanced options, then select Command Prompt. When the Command Prompt window opens, type rstrui.exe, then hit Enter. This process will initiate the System Restore Wizard. Follow the on-screen instructions to start restoring your computer OS to a previous date.
2. How to Repair Windows Image with CMD?
You can use the SFC or DISM commands to repair the Windows system image with CMD. Here are the steps to repair the Windows image using the SFC command:
Step 1. Launch Command Prompt as an administrator.
Step 2. Type sfc /scannow on the Command Prompt window, then press Enter.
Step 3. SFC will start scanning your computer for corrupted system files. Stay patient until the process finishes.
3. Should I Run DISM or SFC First?
It's recommended to run the System File Checker (SFC) command first before going to DISM. This command will scan for and restore corrupted system files in your operating system. If SFC fails to fix your repair issues, you can now proceed to use the DISM command. The DISM command works where SFC has failed, and its function is to repair your Windows system image by updating the available files.
Was this page helpful? Your support is truly important to us!

EaseUS Todo Backup
EaseUS Todo Backup is a dependable and professional data backup solution capable of backing up files, folders, drives, APP data and creating a system image. It also makes it easy to clone HDD/SSD, transfer the system to different hardware, and create bootable WinPE bootable disks.
Secure Download
-
Updated by
![]()
Larissa
Larissa has rich experience in writing technical articles and is now a professional editor at EaseUS. She is good at writing articles about data recovery, disk cloning, disk partitioning, data backup, and other related knowledge. Her detailed and ultimate guides help users find effective solutions to their problems. She is fond of traveling, reading, and riding in her spare time.…Read full bio
Related Articles
![]() Robocopy Sync Folders One Way on Windows 11/10/8/7🔥
Robocopy Sync Folders One Way on Windows 11/10/8/7🔥![]() Powershell Move Files from One Folder to Another | Available for All🔥
Powershell Move Files from One Folder to Another | Available for All🔥![]() Boot Device Not Found Hard Disk 3F0 Error on HP [FIXED]
Boot Device Not Found Hard Disk 3F0 Error on HP [FIXED]![]() How Long Does It Take Google Drive to Process a Video
How Long Does It Take Google Drive to Process a Video![]() Top 8 Best Enterprise Backup Software in 2024
Top 8 Best Enterprise Backup Software in 2024![]() Windows 10 System Restore from Boot [Windows Tips]
Windows 10 System Restore from Boot [Windows Tips]


EaseUS Todo Backup

Smart backup tool for your files, disks, APPs and entire computer.
Topic Clusters


Interesting Topics