Featured Articles
The error 'Windows cannot Run Disk Checking on this Volume Because it is Write Protected' is caused when your volume/drive is damaged or attributed to Read Only. CHKDSK is a command-line utility in Windows that lets you search for bad sectors in your volume and verify the integrity of system files stored on your drive.
Depending on the reason why you receive "Windows cannot run disk checking on this volume because it is write protected", the solutions to the problem vary. Five Fixes for Chkdsk Write Protected:
| Workable Solutions | Step-by-step Troubleshooting |
|---|---|
| Case 1. Chkdsk Write Protected Because Hard Drive Is Write Protected |
Fix 1. Remove Write Protection with Software...Full steps Fix 2. Remove Write Protection via CMD...Full steps |
| Case 2. Chkdsk Write Protected Because File System Corrupted |
Fix 5. Recover Files from Corrupted Hard Drive...Full steps |
Causes of "Windows Cannot Run Disk Checking on This Volume Because It Is Write Protected" Error
"Tried to boot up my computer this morning and was given the message: 'Startup Repair cannot repair this computer automatically.' And it wouldn't let me boot into the Safe Mode. Having no system restore points, then I ran the chkdsk command. But it gave me the 'Windows cannot run disk checking on this volume because it is write protected' error message. Is there any way to fix the issue? I'm running Windows 10 Professional."
Chkdsk is a built-in Check Disk utility for Windows PC to help you fix disk errors or startup issues. But usually, when you run 'chkdsk /r' via a Command Prompt after getting the message: 'Startup Repair cannot repair this computer automatically', it will not work and at most times will give you the error message reads:
'The type of the file system is NTFS.
Cannot lock current drive.
Windows cannot run disk checking on this volume because it is write protected'.

Why did you receive this error message? Generally, there are two common causes:
- The disk volume attribute is set to read-only
- The file system of the partition is corrupted or damaged.
If you were caught in one of the two situations where you could not run CHKDSK to check and repair your disk, don't get frustrated. We will show you effective ways to cope with it.
To enable chkdsk running again, you need to remove write protection from your hard drive so to get rid of the "Windows cannot run disk checking on this volume because it is write protected" error.
Fix 1. Remove Write Protection with 1-Click Write Protection Removal Software
EaseUS Partition Master provides a free feature that users can efficiently apply to remove the write protection state and make their devices work normally again. This software gives you a direct solution to remove write protection from your write-protected USB, USB external disk or SD card in simple clicks. Here is how to do so:
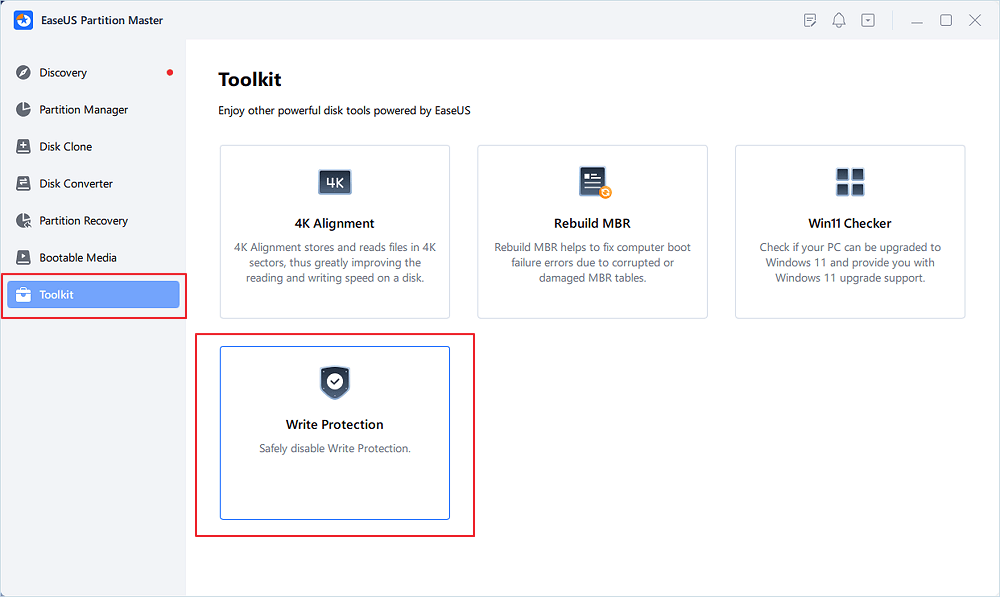
Step 1. Download and install EaseUS Partition Master, go to the Toolkit section, and click "Write Protection".
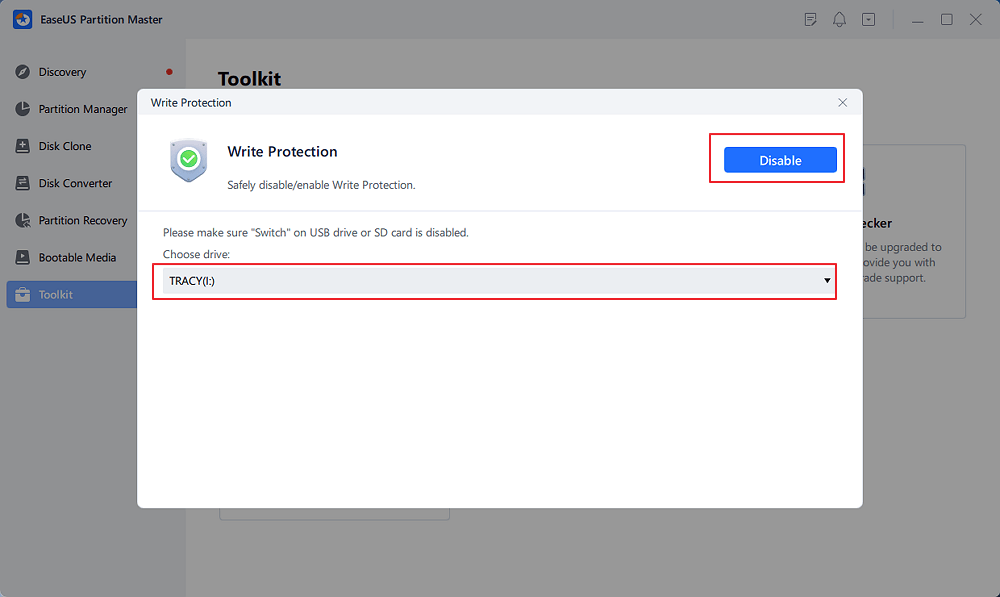
Step 2. Select your write protected USB, USB external disk or SD card, and click "Disable".
This tool can also fix errors like "CHKDSK cannot run because the volume is in use by another process."
Fix 2. Remove Write Protection via CMD
Step 1. Press "Windows + X" buttons to bring up the power users menu.
Step 2. In the power users menu, select the "Command Prompt (Admin)" option.
Step 3. Click "Yes" when you are presented with a UAC window requesting permission to launch the Command Prompt as Administrator.
Step 4. In the new Command Prompt window, type chkdsk E: /f /r /x and press "Enter". Here you should replace "E" with the drive letter of your PC hard drive, SD card or USB drive.
This command will unmount the disk, SD card or USB drive and remove any write protection status on the device. In this case, you can get CHKDSK working again and will no longer see 'Windows cannot run disk checking on this volume because it is write protected' error message.
If this tip won't work, no worry. There are other ways to remove write protection.
Fix 3. Remove Write Protection via Diskpart
Via diskpart, you can clean the read-only attribute on your hard drive.
Step 1. Run "Command Prompt" as an administrator.
Step 2. Enter diskpart and click "Yes" in the prompt asking for notification.
Step 3. Enter the following command in order:
list disk
select disk X (Replace "X" with the number of your write-protected hard drive.)
attributes disk clear readonly
Step 4. If you get the message "Disk attributes cleared successfully", enter exit and then go back to CMD to run the chkdsk command. This time, you will be able to check and fix your disk error easily.
If you are not a computing management professional and are unfamiliar with command lines, don't worry. EaseUS R&D team has promoted a fresh kit for helping you resolve the write-protection issue on your hard drive, external hard drive, USB or SD card, etc., devices. You can directly revert to Fix 1 and apply EaseUS Partition Master for help.
Fix 4. Clear Read-Only in Registry Editor
Method 2 still won't work? Don't get upset, here is another way worth trying.
Step 1. Press "Windows + R" simultaneously and enter regedit. In the window asking for permission, click "Yes".
Step 2. Go to HKEY_LOCAL_MACHINE\SYSTEM\CurrentControlSet\Control\StorageDevicePolicies.
Step 3. Find and right-click the "WriteProtect" key and set the value as "0".
Don't see "StorageDevicePolicies" in the specific path? No worry, follow the steps below to achieve the same goal.
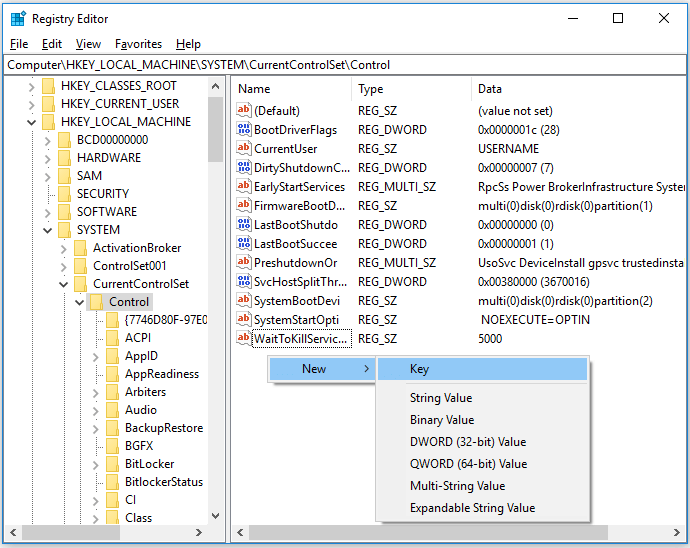
Step 1. In Registry Editor, go to HKEY_LOCAL_MACHINE\SYSTEM\CurrentControlSet\Control.
Step 2. On the right pane, right-click in the space and choose "New" > "Key". Name it as "StorageDevicePolicies".
Step 3. Make sure "StorageDevicePolicies" is selected. Go to the right pane, right-click and choose "DWORD (32-bit) Value".
Step 4. Input the name as "WriteProtect" and set its value as "0".
These are all the possible ways to remove write protection on a hard drive. In most of the cases, using one of the methods above could help to solve the issue "Windows cannot run disk checking on this volume because it is write protected". If the issue remains after trying the fixes, you should consider whether the chkdsk reports write protected due to file system errors or hard drive corruption.
Since the ways to repair corrupted hard drive have been provided, here you can only find the fixes for a hard drive with file system errors. When the file system of your hard drive is corrupted or damaged, you have no access to the data on it. It's likely that you will receive the message "Windows cannot run disk checking on this volume because it is write protected" in such a case. To make your hard drive work normally again, you need to assign a file system to the hard drive by formatting. However, since the formatting will erase all the existing files on your disk, you are recommended to recover files first.
Fix 5. Recover Files from Hard Drive
With the EaseUS Data Recovery Wizard - EaseUS Data Recovery Wizard, you are able to retrieve files from disk with file system errors like disk becoming RAW, file system missing, and more. This professional software can rescue almost all existing file types from a computer, external hard drive, USB, memory card, and more after deletion, formatting, file system becoming RAW, etc.
Fix 6. Format the Volume
As you may know, there are many ways to format a hard drive. The easiest one is:
Step 1. Go to "This PC".
Step 2. Find and right-click your problematic hard drive partition.
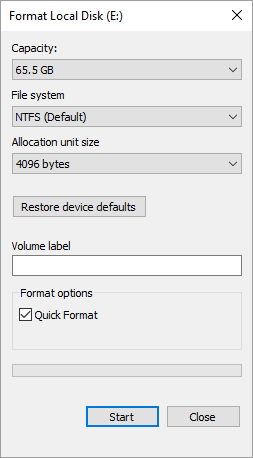
Step 3. Choose "Format".
Step 4. Set the new file system and other options, then click "Start".
Conclusion
The causes leading to "Windows cannot run disk checking on this volume because it is write protected" are relatively specific. Thus, the ways to fix the error are clear, either by removing write protection or fixing file system errors. Hope one of the methods above can help you fix your problematic hard drive perfectly.
FAQs About Windows Cannot Run Disk Checking On This Volume
If you have more questions about Windows Disk Checking or CHKDSK on a locked drive, check the following questions and you may find the answers to listed questions may interest you somehow.
1. How do you fix Windows Cannot run checking on this volume because it is write protected?
The basic cause of this error is that the Windows disk checking command is disallowed for executing as the target device is write-protected. So the best way to resolve this issue is to remove write protection from your device.
There are 5 ways that can help to unlock a write-protected drive or device. For a detailed guide, you may revert back to the detailed operations of 5 Fixes on this page for help.
2. How do I remove write protection from a hard drive from command prompt?
To remove the write protection of a hard drive from Command Prompt, you should be careful while executing the following steps:
Step 1. Open Command Prompt as Administrator.
Step 2. Type diskpart in Command Prompt and hit Enter.
Step 3. Click "Yes" to open DiskPart.
Step 4. Type list volume, select volume X, attributes disk clear readonly and hit Enter each time. (Replace X with the volume drive of your hard drive.)
3. How do I run chkdsk on a locked drive?
To run CHKDSK on a locked drive, you should first unlock the drive by using CMD command or a third-part write-protection removal tool. You may refer to Remove Write Protection on Windows 10/8/7 for a guide.
After this, you can follow the next steps to run CHKDSK:
Step 1. Open Command Prompt as Administrator.
Step 2. Type: chkdsk E: /f /r /x and press "Enter". (Replace "E" with the drive letter of your hard drive.)
Was This Page Helpful?
Sherly joined EaseUS in 2022 and she has always loved writing articles and enjoys the fun they bring. She receives professional training here, focusing on product performance and other relative knowledge. She has written over 200 articles to help people overcome computing issues.
Written by Tracy King
Tracy became a member of the EaseUS content team in 2013. Being a technical writer for over 10 years, she is enthusiastic about sharing tips to assist readers in resolving complex issues in disk management, file transfer, PC & Mac performance optimization, etc., like an expert.
Related Articles
-
Fixed Solutions: Can't Erase USB Drive on Mac [10 Ways]
![author icon]() Cici/Nov 09, 2025
Cici/Nov 09, 2025 -
How to Solve Bitlocker Keeps Asking For Recovery Key? [Full Guide]
![author icon]() Tracy King/Jul 10, 2025
Tracy King/Jul 10, 2025 -
[Too Slow!] How to Fix USB 3.0 Transfer Speed Pretty Slow
![author icon]() Brithny/Dec 12, 2025
Brithny/Dec 12, 2025 -
Silicon Power vs. Crucial SSD: Which SSD to Choose?
![author icon]() Larissa/Dec 01, 2025
Larissa/Dec 01, 2025