-
![]() How to Recover Files From SD Card After Power Outage [Easy]
How to Recover Files From SD Card After Power Outage [Easy] March 31,2026
 6 min read
 -
![]()
-
![]()
-
![]()
-
![]() SD Card Recovery Full Guide: Recover Lost Files from SD CardsApril 01,20266 min read
SD Card Recovery Full Guide: Recover Lost Files from SD CardsApril 01,20266 min read -
![]() Recover Deleted Photos from Olympus Digital Camera | Top Recovery MethodMarch 16,20266 min read
Recover Deleted Photos from Olympus Digital Camera | Top Recovery MethodMarch 16,20266 min read -
![]() [Solved] Cannot Connect to Camera Please Make Sure to Close Other AppsApril 01,20266 min read
[Solved] Cannot Connect to Camera Please Make Sure to Close Other AppsApril 01,20266 min read -
![]()
-
![]()
-
![]() How to Recover Deleted Dashcam Footage [Dashcam Recovery Guide]March 11,20266 min read
How to Recover Deleted Dashcam Footage [Dashcam Recovery Guide]March 11,20266 min read
Page Table of Contents
PAGE CONTENT:
Part 1. How to Unlock SD Card in 4 Proven Ways
If you are faced with the same situation that the SD card is locked or write-protected, we can help you solve this problem. Here are four effective ways. You can manually unlock your SD card, remove write protection in Windows & Mac, and unlock SD card with a password.
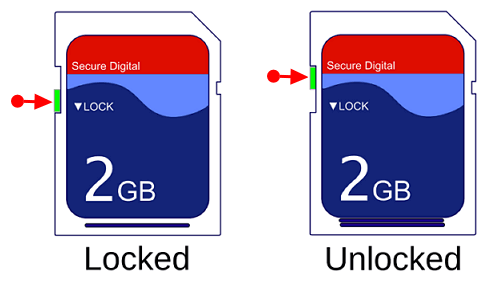
Method 1. Manually Unlock the SD Card
This method can help you remove the physical write protection. There is a Lock switch on the left side of the SD card. Make sure the Lock switch is slid up (unlock position). You will not be able to modify or delete the contents on the memory card if it is locked.
If the lock switch is loose and moves easily, it is likely the switch is sliding to the locked position as the card is placed in your host device. In this case, the card needs to be replaced.
Method 2. Remove Digital Write Protection in Windows 10/8/7
This method is aiming at removing the write protection using CMD to unlock the SD card. If you are not familiar with CMD, you can use the CMD alternative. Read on and follow the details below:
Step 1. Make sure that you're using an administrator account. And connect the SD card to your computer.
- If your computer has an SD card reader, the card should slide label-up and gold connectors-first into the reader.
- If your PC doesn't have a card reader, you'll need an SD card adapter to do this.
Step 2. Click the Windows logo in the bottom-left corner of the screen. Search "Command Prompt" and click "Run as Administrator".

Step 3. Type these commands one by one and press "Enter" after each:
diskpart
list disk
select disk #
attributes disk clear readonly
# is the number of the SD card with which you're getting the write-protected/ locked error.
You will see a line of text that reads "Disk attributes cleared successfully", signifying that your SD card is no longer write-protected.

Also read: The disk is write-protected in Windows 10/8/7.
CMD Alternative - Write-Protection Removal Tool
If you don't consider yourself a pro-computer user and you're not familiar with command-lines, don't worry. There are graphical-based solutions to help you remove write-protection from your hard drives, USB drives, and even SD cards.
EaseUS CleanGenius is one of these tools that helps you fix aforementioned issues on your drives without knowing a thing about command-line.
Here's an easy-to-follow guide on how to use this tool to get your issues sorted:
Step 1: DOWNLOAD and install EaseUS CleanGenius (free) on your computer.
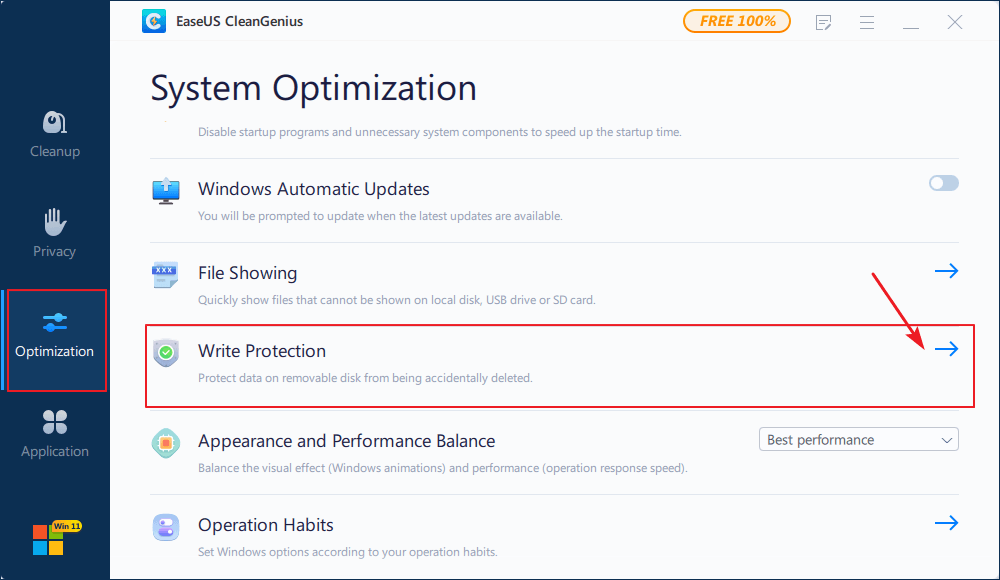
Step 2: Run EaseUS CleanGenius on your PC, select Optimization and choose the Write Protection mode.
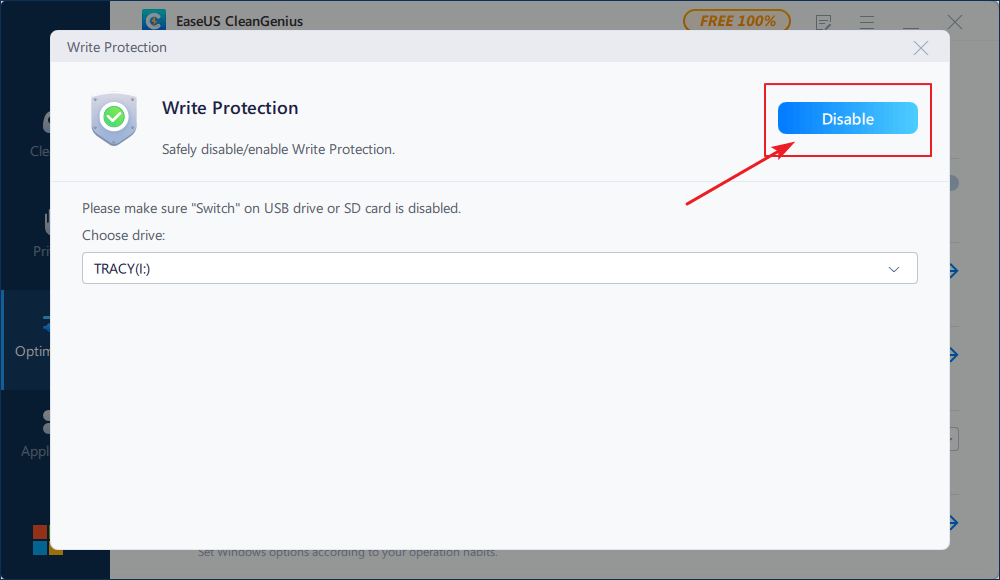
Step 3: Select the device that is write-protected and click Disable to remove the protection.
Method 3. Removing Digital Write Protection on a Mac Device
Sometimes it may happen that file you want to make changes has read-only properties because of which you aren’t able to write into it. For this, you can explicitly uncheck the read-only property. Here's the way to unlock the SD card on a Mac.
Step 1. Connect your SD card to your Mac device.
Step 2. Check and remove the write protection on the SD card.
Right-click a file on SD card to choose "Get Info", then under |Sharing & Permissions", you will find "Read only" under Privilege. Click the lock icon and enter your administrator password to unlock settings, and then click "Read only" to change it to "Read & Write".

If your SD card is locked down due to an error, the error will be fixed by First Aid.
Step 1. On the "Go" menu, click "Utilities". Start the Disk Utility program.

Step 2. Choose the SD card on your Mac. Then, click the "First Aid" tab.
Step 3. Click "Run" to repair the disk volume errors and permissions. When it finishes, click "Done".
Method 4. Unlock/Decrypt SD Card with Password
If your memory card or SD card is locked by a password, then this method is suitable. If you used a third-party encryption tool to encrypt the card, you can easily decrypt it using the tool with a password. If you used an Android phone to lock the SD card, the only way to access data on the SD card is to decrypt it. Here we'll take the Samsung phone as an example for decrypting the SD card with a password on the source phone:
- Tip
- You cannot decrypt the SD card on another phone. Different phones have different encryption algorithm and the ways of decryption are also different. Therefore, to access all saved data on the SD card, we advise you to decrypt the card on the source phone.
Step 1. Insert the SD card to the source Samsung phone, restart the phone. Go to "Settings" and tap on "Lock screen and security".

Step 2. Scroll to the bottom and tap on "Decrypt SD Card".

Step 3. Tap on "DECRYPT SD CARD" and enter your password. Wait for the decryption process to finish, keeping the device charged during the process.
Also read: How to decrypt files without the key
Part 2. How to Recover Lost Pictures/Files from SD Card
Since you have unlocked your SD card, you can recover lost files and pictures from your SD card easily. Here are three ways to recover lost SD card files using Windows computer, a Mac and an Android phone.
Solution 1. Recover SD Card Files Using a Windows Computer
To recover lost SD card data after removing or disable write protection on the SD in Windows 10/8/7, EaseUS Data Recovery Wizard is my recommendation. This powerful data recovery software is safe and clean. It provides you with lots of benefits:
- Recover deleted, formatted, and inaccessible data in different data loss situations.
- Recover photos, audio, music, and emails from any storage effectively, safely and completely.
- Recover data from the recycle bin, hard drive, memory card, flash drive, digital camera and, camcorder.
Follow the steps to recover files from your SD card:
🏆EaseUS SD card recovery leverages patented video fragment reconstruction technology to deeply repair video files lost due to accidental deletion, formatting, or corruption. Explicitly designed for cameras, action cameras, drones, and dashcams, it accurately restores complete and playable precious footage.
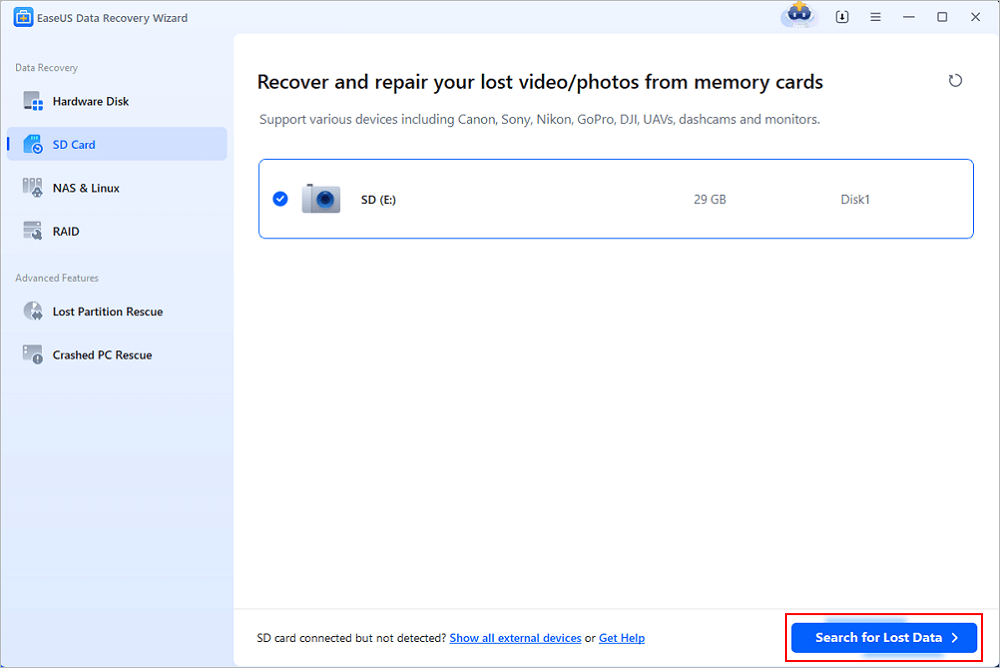
Step 1. Select the SD card to scan
- Download and install EaseUS Data Recovery Wizard on your Windows PC.
- Use the proper way to connect your SanDisk/Lexar/Transcend SD card to the computer.
- Open EaseUS SD card recovery software and choose SD Card Recovery on the left panel. All connected drives will display here. Select your SD card and click "Scan for lost data".
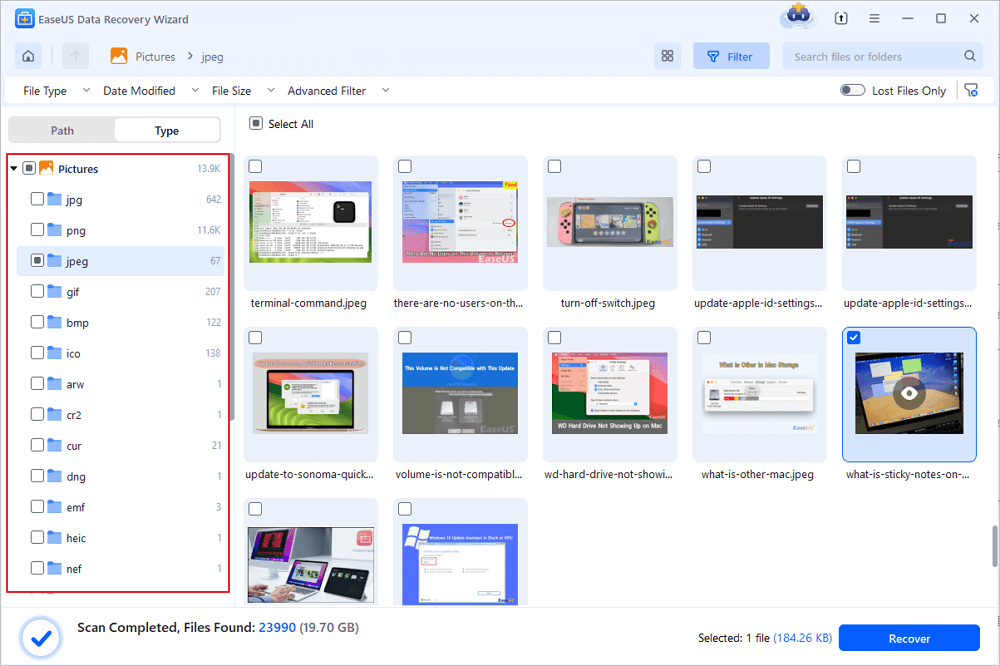
Step 2. Check for scan results
- Wait for the scanning process to complete.
- Specify one or several file types to show up, like Pictures or Videos.
- Click "Preview" to check if they are the wanted files.
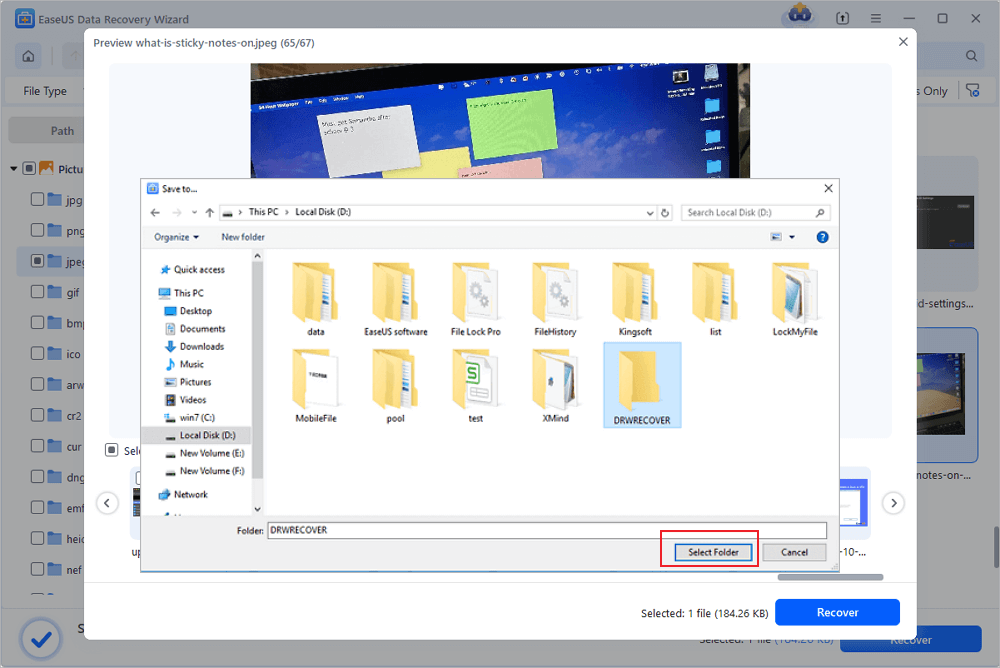
Step 3. Recover SD card data
- Preview the recovered files and click "Recover".
- Choose a different location to save the recovered files instead of the original SD card.
💡Want to know more about SD card data recovery? For example, what is the best SD card data recovery software? How to recover a damaged SD card? How to recover data from an unreadable SD card...Go for SD Card Data Recovery FAQs and restore your precious lost files.
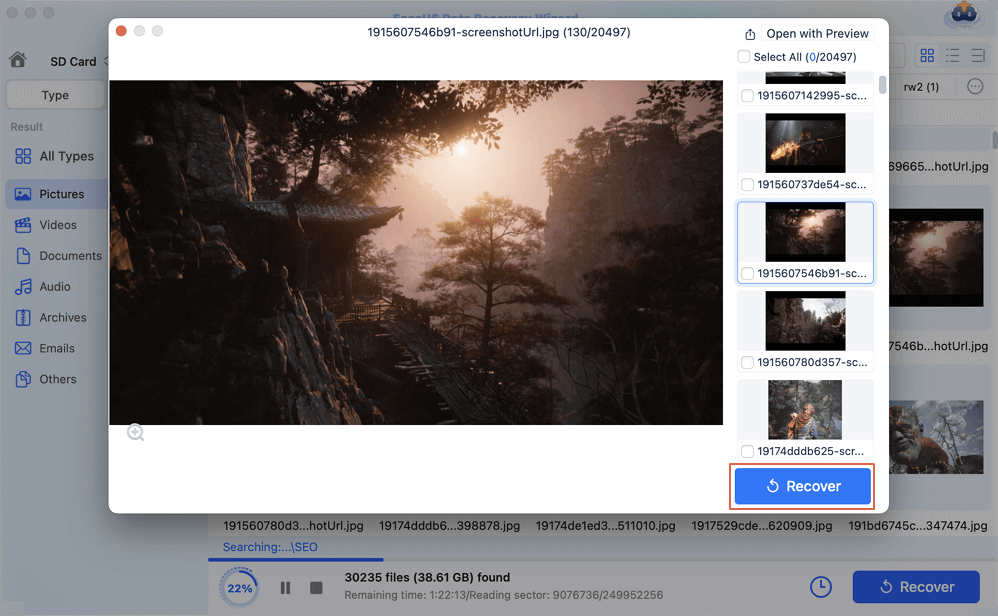
Solution 2. Recover SD Card Files With Mac
EaseUS Data Recovery Wizard for Mac has a reasonable price and provides professional data recovery methods to recover lost videos, music, documents, application, audio, etc. Besides, SD cards and other storage devices are all well supported by this software. You can activate this software by clicking the button to restore as many files as you want:
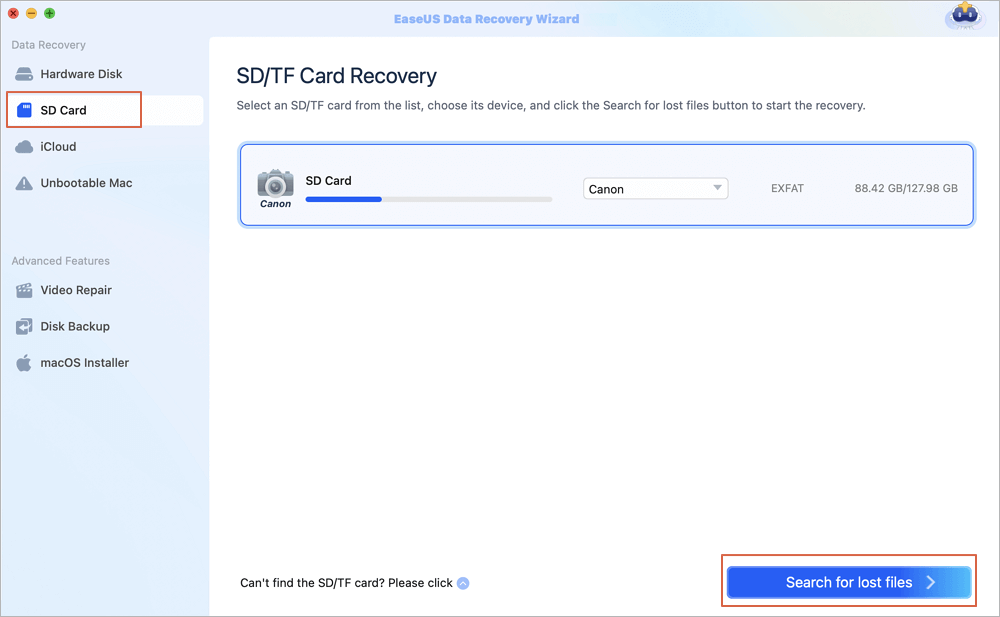
Step 1. Select the SD card
- Correctly connect your memory card to your Mac. Launch EaseUS Data Recovery Wizard for Mac.
- Go to "SD Card Recovery", find your Canon/Nikon/Go Pro/DJI/Sony SD card, and click "Search for lost files".
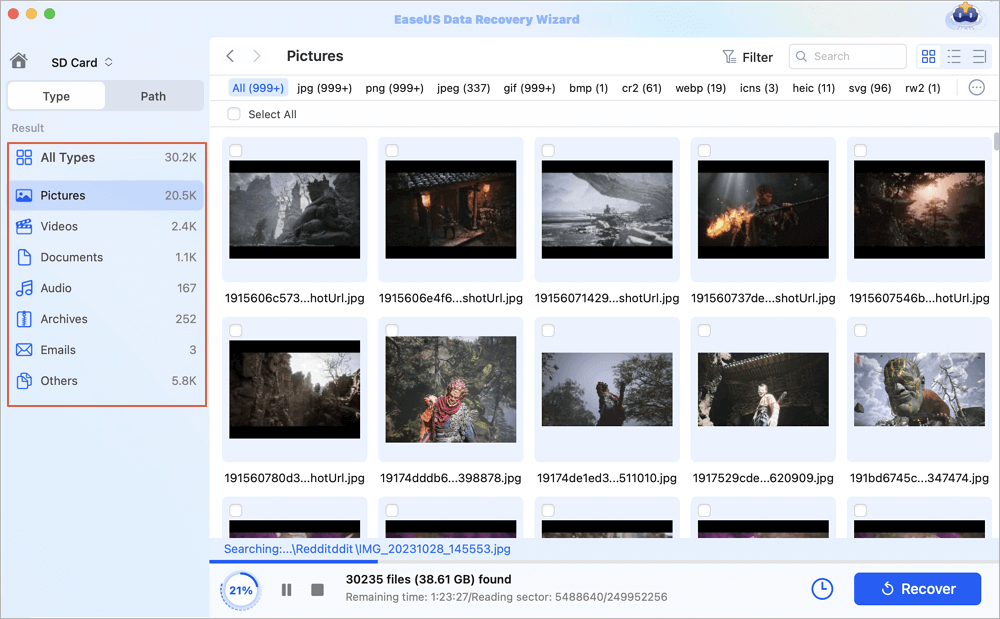
Step 2. Filter lost SD card data
After the scan, all files will be presented in the left panel in the scan results. Find wanted photos, videos, and other files.
Step 3. Preview and recover data
Preview the SD card data and select the wanted files. Then, click the "Recover" button. Don't save the recoverable files to the SD card itself in case of data overwriting.
Solution 3. Recover SD Card Files from Android Phone
If you lose pictures or other data from an Android phone, and you don't want to use the PC, you can still restore deleted data from the SD card with the help of EaseUS. If you accidentally deleted the items. Don't panic! Recover your data with the mobile version of EaseUS MobiSaver for Android. This application can restore deleted photos, videos, contacts, call logs, SMS, and WhatsApp messages from Android devices.
Step 1. Launch the app on your phone and select "SD card". Start scanning lost photos and videos by tapping the "START SCAN" button. Deleted photos and videos will appear on the screen.
Step 2. Tap on settings. You can set preferences to let the software scan and display some specific file sizes, file formats, etc.
Step 3. After the scan, select displayed files and tap on "Recover". Tap on the eye icon. All the recovered photos and videos are kept there.
The End
The most important thing is that unlock your SD card before you recovering data from it. The effective four methods will do you a favor. Then, you can use reliable data recovery software to get back wanted data. By the way, having a backup in advance will always help even you fail to unlock your SD card.
Was this page helpful?
-
Dany is an editor of EaseUS who lives and works in Chengdu, China. She focuses on writing articles about data recovery on Mac devices and PCs. She is devoted to improving her writing skills and enriching her professional knowledge. Dany also enjoys reading detective novels in her spare time. …
-
![]()
Approved by
Evan Galasso is a digital forensics and data recovery engineer with over 10 years of experience in the field. He presents opinions on the current state of storage media, reverse engineering of storage systems and firmware, and electro-mechanical systems of SSDs and HDDs.…


20+
Years of experience

160+
Countries and regions

72 Million+
Downloads

4.9 +
Trustpilot Score


Free Data
Recovery Software
Recover data up to 2GB for free!