-
Jane is an experienced editor for EaseUS focused on tech blog writing. Familiar with all kinds of video editing and screen recording software on the market, she specializes in composing posts about recording and editing videos. All the topics she chooses are aimed at providing more instructive information to users.…Read full bio
-
![]()
Melissa Lee
Melissa is a sophisticated editor for EaseUS in tech blog writing. She is proficient in writing articles related to screen recording, voice changing, and PDF file editing. She also wrote blogs about data recovery, disk partitioning, and data backup, etc.…Read full bio -
Jean has been working as a professional website editor for quite a long time. Her articles focus on topics of computer backup, data security tips, data recovery, and disk partitioning. Also, she writes many guides and tutorials on PC hardware & software troubleshooting. She keeps two lovely parrots and likes making vlogs of pets. With experience in video recording and video editing, she starts writing blogs on multimedia topics now.…Read full bio
-
![]()
Gloria
Gloria joined EaseUS in 2022. As a smartphone lover, she stays on top of Android unlocking skills and iOS troubleshooting tips. In addition, she also devotes herself to data recovery and transfer issues.…Read full bio -
![]()
Jerry
"Hi readers, I hope you can read my articles with happiness and enjoy your multimedia world!"…Read full bio -
Larissa has rich experience in writing technical articles and is now a professional editor at EaseUS. She is good at writing articles about multimedia, data recovery, disk cloning, disk partitioning, data backup, and other related knowledge. Her detailed and ultimate guides help users find effective solutions to their problems. She is fond of traveling, reading, and riding in her spare time.…Read full bio
-
![]()
Rel
Rel has always maintained a strong curiosity about the computer field and is committed to the research of the most efficient and practical computer problem solutions.…Read full bio -
Dawn Tang is a seasoned professional with a year-long record of crafting informative Backup & Recovery articles. Currently, she's channeling her expertise into the world of video editing software, embodying adaptability and a passion for mastering new digital domains.…Read full bio
-
![]()
Sasha
Sasha is a girl who enjoys researching various electronic products and is dedicated to helping readers solve a wide range of technology-related issues. On EaseUS, she excels at providing readers with concise solutions in audio and video editing.…Read full bio
Page Table of Contents
Melissa Lee
Updated on Apr 07, 2024
0 Views |
0 min read
A reaction video is a video of a person watching events and recording the reactions. This kind of video becomes very popular nowadays because it can share your thoughts by reviewing other people's videos in front of your online subscribers, which is part of a new trend.
If you also want to start sharing reaction videos online but don't know how to make a reaction video, then you have come to the right place. In this post, we will talk about the necessary things that you need to make a reaction video and how to make a reaction video on YouTube with some reaction video maker on Windows, Mac, iOS, and Android.
What You Need to Prepare for Making a Reaction Video
To put it simply, reaction videos are the kind of videos where you watch a trendy or a normal video and record your reaction or thoughts on camera. There is nothing too complicated about making a reaction video, but you need some essential things to make a reaction video that goes viral easily.
Recorder to Capture Source Video and Your Reaction
For Windows users, there is an all-in-one recording tool that can enable you to record the source video and capture your reaction through Webcam. This software is called EaseUS RecExperts.
Since you need to record your reactions and facial expressions, you need to connect an external camera to your computer or use a built-in camera. Then, play the source video and use "Record Screen" to record the appropriate area. You need to click the "Webcam" icon to choose the camera used to capture your reactions.
Mind Your Environment
1. Quiet: You need to make sure your video does not have any noise.
2. Sufficient lighting: Nobody wants to watch a reaction video with a blur effect. So when you decide to make a reaction video, you can choose a sunny day or use lightning equipment.
Best Camera Angle
1. Take a close-up shot to know your angle.
2. Check out your facial expression.
3. The chin slightly down, and your head turns about three-quarters to the side.
- Notice:
- All videos on YouTube are protected by Intellectual Property Law, which can not be used without the copyright owner's permission. Here are the four factors of fair use.
How to Make a Reaction Video on Windows
For Windows users, we will recommend using the best Windows 10 video editor, EaseUS Video Editor, which can also work as a reaction video maker. EaseUS Video Editor, as the most powerful video editing tool available on Windows, provides the most straightforward way to make YouTube reaction videos.
It's an easy-to-use and smart video editor that can help you spread your creative story through videos around the world. You can use this advanced video editing tool with an elegant interface and top-notch features without facing any complications. There are some other useful functions for a YouTube user. For example, you can use it as a YouTube video clipper or a YouTube thumbnail maker for PC.
Key Features of EaseUS Video Editor:
- Allow users to make picture in picture video in a few minutes
- Basic editing tools, including trimming, splitting, cutting, and rotating
- Add music tracks and mix them with your video
- Provide more than 50 visual and transition effects
- Extract subtitles from MP4
Download it and make your own reaction videos now!
Steps to Make a Reaction Video with EaseUS Video Editor:
Try to follow this guide now.
Step 1. Install and launch EaseUS Video Editor.

Step 2. Import reaction video and source video and then add or drag the video to the timeline. You can add the video you reacted to the first video track. And then drag the source video to the second video pip.

Step 3. Double-click the second video on the track to make a picture-to-picture effect. You can resize and locate the video, ensuring your sight angle is consistent with the source video.

Step 4. Export your reaction video to YouTube or other video platforms.

How to Make a Reaction Video on Mac
For Mac and iOS users, iMovie is a great reaction video maker compatible with iPhone, iPad, iMac. You can download this official Mac software for free and start using tons of video editing features available on this tool.
Though it's not a specific reaction video-making tool that enables you to take the source video, record your reaction video, and then edit them together to make a reaction video in total. This video editing tool also has some basic and advanced features that you can use to edit your videos.
How to Make a Reaction Video Using iMovie:
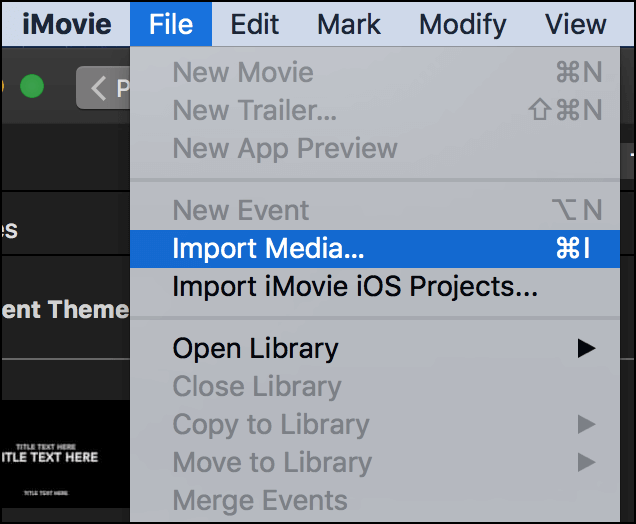
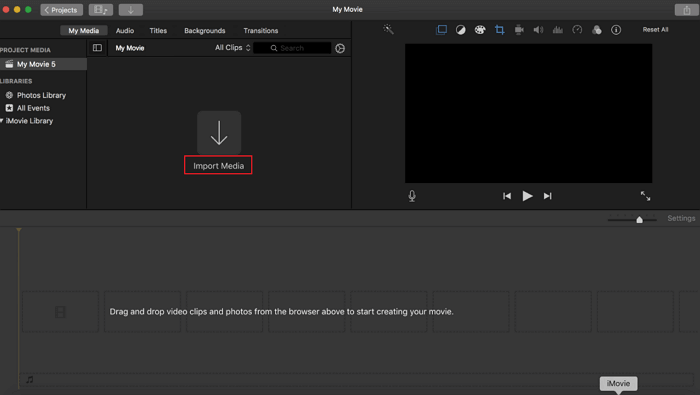
Step 1. First, you need to launch the program on your Mac, and you will get the homepage window at first. Click on the "Create New" button and select Movie. This way, you can import both your source and reaction video into the program window and then drag them into different timelines. You can also add images, music, or other media files if needed.

Step 2. Now you can check around the program's options and split the video or trim it, add transitional effects and other effects, add music, add title, etc., and more.

Step 3. Finally, you can export your project video on your Mac or directly upload it to YouTube or other platforms.
How to Make a Reaction Video on iPhone/Android
Actually, there are already enough tutorial videos on YouTube that teach you to make a reaction video on iPhone using iMovie. However, to make an excellent YouTube reaction video, we need to learn some other video editors that can offer us more editing tools. For example, we can choose to use ApowerREC and PowerDirector to react on iPhone and Android, respectively.

How to Make a Reaction Video on iPhone with ApowerREC
To make a reaction video on iPhone, we will use an app named ApowerREC. It's a decent video recorder for iPhone devices that you can use to make your reaction videos. Though it doesn't have so many options or advanced features, it works fine with its basic features.

Steps to Make a Reaction Video on iPhone:
Step 1. Download and install the app from Apple Store. Then launch the app, and you need to add the screen recording shortcut from under the Control Center.
Step 2. Next, you need to keep swipe up until you find the Control Center option, and then you need to long-press the screen recording shortcut. After that, you need to select the ApowerREC option. Now you need to press the Start Broadcast button to start the recording.
Step 3. Then you can play the source video, relaunch the Control Center, and press the Stop button. Now the recording will be saved on the tool's library.
Step 4. If you want to add your reaction, you need to open the video, and from the preview, you can tap on the Camera icon, and you will find another panel that appeared on the screen. In this panel, you can choose the camera placement while recording and then tap on the "Record" button to start recording your reaction.
Step 7. Finally, to produce your reaction video, you need to press Stop to stop the recording and check your final reaction video.
How to Make a Reaction Video on Android with PowerDirector
To make a reaction video on Android, you can use the PowerDirector app. It has a picture-in-picture option that you can use to overlay the reaction video over the source video. It's also a good video editing app, so you can use the other video editing features to make your video look good.

Steps to Make a Reaction Video on Android:
Step 1. First, download and install the app on your Android device. Then launch the app and click on New Project to give a name to your project, then you will find options to import your videos.
Step 2. Next, you need to import media files by selecting them from the file manager and tap the Plus icon to drop them down into the app timeline. You must make sure that the primary video is added to the project video timeline.
Step 3. After that, you can tap on the Layer icon from the left-hand side and choose the video. From there, you will be able to import the reaction video you recorded before. Now you need to hit the Back button to go back to the main video editing screen. There you'll see that your reaction video is added over the main video successfully.
Step 4. Finally, you can edit the reaction video as needed and then save the final reaction video file to your Android device or directly share it to your Facebook or YouTube.
How to Make a Reaction Video Online
Making a reaction video online is not that easy because there are not too many online video editors available with this kind of feature. We have researched a lot and found that Clipchamp is a good quality online video editor that you can use to make your reaction videos. It has a picture-in-picture feature that can be used to overlay your reaction video on top of the source video file.

Steps to Make a Reaction Video Online:
Step 1. Sign up and log in to your account at Clipchamp. Then import videos into the editor.
Step 2. Next, you need to click on the Create a video option from the left sidebar and import media files or videos into the program library.
Step 3. Then you need to drag and drop the source video and recorded reaction video into the program timeline.
Step 4. It would be best to keep the picture-in-picture effect by keeping the recorded reaction video at the first timeline. Then resize the video and adjust it as you need.
Step 5. Finally, you can review the final video and export it to your computer.
Website: https://clipchamp.com/en/features/picture-in-picture-video-editor/
Conclusion
Our final words for you are, use the video editing tool that can offer you more features with easy to handle interface. In that sense, you can use any of the methods or tools described in this article because all of them provide a great user experience in their respective fields. But the best one will always be EaseUS Video Editor.
Not only overlaying videos to make reaction videos but all the advanced features with so many effects and options, EaseUS Video Editor outmatches any tool available on the internet. So start using it from now on to get the best video editing experience.