
How to Take a Partial or Full Screenshot on Windows 10
As technology rapidly increases and the information age expands, more and more people get accustomed to work or study online. Traditionally, you can take notes on papers when something needs to be recorded, but what could you do when you want to record anything on your computer screen? It must be a great choice to capture the screen as a video or take a screenshot of it.
This post will focus on the tools and methods you can use to take screenshots on Windows PC. If you have no idea about how to do that, especially how to take a partial screenshot on Windows, there are solutions for you. Don't hesitate to follow the steps to take screenshots.
How to Take a Partial Screenshot on Windows 10
What if you want to capture only a part of the screen of your PC? There are mainly three methods you can use for partial screenshot Windows 10, and any of them are really helpful.
1. How to Take a Cropped Screenshot on Windows with EaseUS ScreenShot
EaseUS ScreenShot is a user-friendly screen capturing program on Windows PC. It supports taking a partial screenshot, whether it's dynamic or static. For instance, when you find a funny short video on the internet, you may want to capture part of it to share with your friends.
In addition to that, this software also allows you to select the capturing region freely. You can manually select any part of your screen as the screenshot area. And you can take a partial screenshot or full screenshot without effort.
Click on this button to download EaseUS ScreenShot to your computer for free.
How to Screenshot Part of Screen on Windows 10:
2. How to Selectively Screenshot on Windows with Snipping Tool
Many users may have found that there is a default screen capturing tool on Windows 10 computers. It's straightforward to find it as you only need to search for "Snipping Tool" on your device and click on the search result to launch it. One of its key features is taking a screenshot in different modes, and it allows you to capture the whole screen or take a rectangle snip/free-form snip.
What you captured using this tool can be saved as an image or in HTML format. And Snipping Tool offers you a built-in annotator that helps you draw on the screenshot freely, and you can also highlight the text in the screenshot if necessary. How to screenshot a portion of the screen with this program? This part will give you the solution.
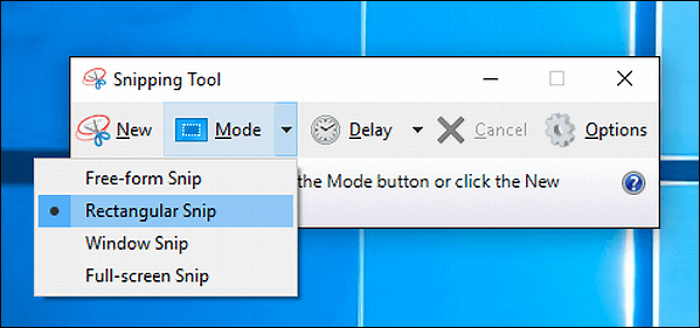
How to Take a Partial Screenshot on Windows 10 with Default Tool:
Step 1. Search for "Snipping Tool" in the Windows search box, and click on its icon to launch it.
Step 2. Click on the "Mode" option on the main interface and select "Rectangular Snip" to take a partial screenshot.
Step 3. When your mouse becomes a cross, drag it to select the area you want to capture.
Step 4. Then, the partial screenshot you take will be pasted to its built-in annotating tool, and you can use a pen and a highlighter to annotate it and save it in PNG format.
3. How to Take a Screenshot of a Portion of the Screen Using Hotkeys
Like taking a screenshot of the entire screen, there are also hotkey combinations available for capturing part of the screen. This method seems similar to using the Snipping Tool. However, as this method is simplified, you cannot use some of the advanced functions of the Snipping Tool, such as the free-form snip mode and the annotators.
Besides that, when you take the partial screenshots using hotkeys, there is no default editing window to paste the screenshot. To save the screenshots you captured, you have to paste them to MS Word or the Paint program on your PC. It's also challenging for some users to remember the key combination clearly.
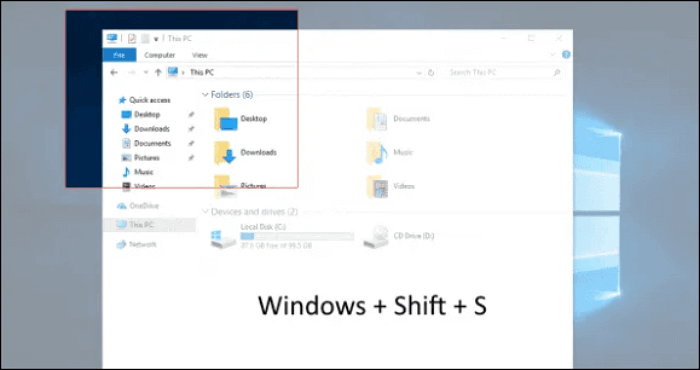
Steps to Take Selective Screenshot Windows 10 Using Hotkeys:
Step 1. Press Windows key + Shift key + S key on your keyboard simultaneously.
Step 2. Drag your mouse to select the capturing region.
Step 3. Launch Paint and press the Ctrl key + V key to paste the partial screenshot into it. Then, click on "File" > "Save" to save the screenshot to your computer.
How to Capture Full Screen on Windows 10
Taking a screenshot of the whole computer screen is not a difficult task as Windows OS offers users some built-in tools to do that. You can both use the hotkeys on a keyboard or launch Xbox Game Bar to get that done.
1. How to Save the Entire Screen by Pressing Hotkeys
You can easily capture the whole screen by pressing one or more hotkeys on the keyboard, and the screenshot will be saved to a default folder on your PC automatically. Nevertheless, this method is easy, but its disadvantage is also inevitable, i.e., you have to remember the keyboard combo to get the screenshot in different situations.
Generally speaking, you need Print Screen key, Windows key, and Alt Key, and different combinations have different effects. It's worth noting that the Print Screen keys sometimes are diverse on different keyboards, such as "PrtSc," "PrtScn," etc. And this post will take "PrtScn" as an example.

- PrtScn: When you only press this key, you will capture the full screen, and the screenshot will be saved to your clipboard. You need to paste it to other programs that support inserting images, like Paint or MS Word.
- Windows key + PrtScn: Press those two keys simultaneously, and your screen will become dim for a second. Then, the screenshot of the whole screen will be saved to your computer automatically. You can find it in the folder "Pictures" > "Screenshots."
- Alt key+ PrtScn: Press those two keys simultaneously, and you can capture the whole active window that you are working in. Paste the image to Paint or MS Word to save it.
2. How to Take a Screenshot Using Xbox Game Bar
If you usually play video games on Windows 10, you may know the Xbox Game Bar very well. Microsoft supplies this built-in screen recorder, and you can record the gameplay without downloading any other software. Besides its gameplay recording function, this program can also be used to take a screenshot of your Windows 10 device.

Steps to Capture a Whole Screen with Game Bar:
Step 1. Launch Xbox Game Bar by pressing the Windows key and "G" key on your keyboard.
Step 2. When the main interface appears, you can see a camera icon on it. Click the camera icon when you want to take a screenshot.
Step 3. You can find the screenshot of the whole screen in the folder "Video" > "Captures."
Conclusion
This post gives 5 solutions to the question "how to take a partial screenshot on Windows." For Windows 10 users, Xbox Game Bar is a good choice, but this tool is not available for people who are using old versions of Windows OS. It's also great to use key combinations or Snipping Tool to take the Windows 10 partial screenshot, but you have to remember the keys you need to press, and the formats of the screenshots are limited.
All in all, EaseUS ScreenShot integrates all the advantages of those tools and avoids their shortcomings. If you want to capture part of your screen, this software is what you can never miss.
Was This Page Helpful?