-
![]()
Daisy
Daisy is the Senior editor of the writing team for EaseUS. She has been working in EaseUS for over ten years, starting from a technical writer to a team leader of the content group. As a professional author for over 10 years, she writes a lot to help people overcome their tech troubles.…Read full bio -
Jane is an experienced editor for EaseUS focused on tech blog writing. Familiar with all kinds of video editing and screen recording software on the market, she specializes in composing posts about recording and editing videos. All the topics she chooses …Read full bio
-
![]()
Melissa Lee
Melissa is a sophisticated editor for EaseUS in tech blog writing. She is proficient in writing articles related to screen recording, video editing, and PDF file conversion. Also, she's starting to write blogs about data recovery, disk partitioning, data backup, etc.…Read full bio -
Jean is recognized as one of the most professional writers in EaseUS. She has kept improving her writing skills over the past 10 years and helped millions of her readers solve their tech problems on PC, Mac, and iOS devices.…Read full bio
-
![]()
Jerry
Jerry is a fan of science and technology, aiming to make readers' tech life easy and enjoyable. He loves exploring new technologies and writing technical how-to tips. All the topics he chooses aim to offer users more instructive information.…Read full bio -
Larissa has rich experience in writing technical articles. After joining EaseUS, she frantically learned about data recovery, disk partitioning, data backup, screen recorder, disk clone, and other related knowledge. Now she is able to master the relevant content proficiently and write effective step-by-step guides on various computer issues.…Read full bio
-
![]()
Rel
Rel has always maintained a strong curiosity about the computer field and is committed to the research of the most efficient and practical computer problem solutions.…Read full bio -
![]()
Gemma
Gemma is member of EaseUS team and has been committed to creating valuable content in fields about file recovery, partition management, and data backup etc. for many years. She loves to help users solve various types of computer related issues.…Read full bio
Page Table of Contents
Rel
Updated on Apr 19, 2024
0 Views |
0 min read
Recording a screen on an iPhone can be extremely helpful. Perhaps you're playing a game on your iPhone and would like to share your incredible performance with others. Maybe your device is doing something unusual, and you want to capture a video of this odd behavior to demonstrate to a tech expert. No matter what your scenario is, you're in the right place. In this post, we'll explain how to screen record on iPhones so you can save or share it.
PAGE CONTENT:
Screen Record iPhone with Built-in Recorder
If your iPhone is running with iOS 11 and later, then recording the screen on the device requires no additional tool. With the help of an in-built screen recorder for iOS 11 or above, you can easily record a screen with audio on your iPhone.
Here's how to enable screen recording on iPhone:
Step 1. On your iPhone, head to Settings > Control Centre > More Controls/Customize Controls.
Step 2. After that, click on the + button next to Screen Recording. Then, you can see the screen recorder in the Control Center.

How to screen record iPhone with sound:
Step 1. Open Control Centre. To do so, swipe up from the bottom of the screen. On iPhone X or above, swipe down from the top-right corner of the screen.
Step 2. Tap on the Screen Recording icon (a circle with a dot within it) > Tap Microphone > Start Recording to commence recording.
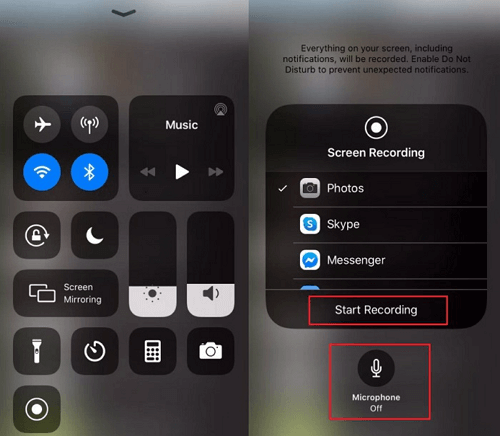
Step 3. Following a 3-second countdown, everything on your screen will be captured. Once finished, click on the red blob or bar at the top of the screen to stop recording. Or you can open the Control Centre and tap the record button again. Your screen recording video will be stored in Photos.
- Note:
- Though this method requires no installation of the additional tool, it works only for iPhones running with iOS 11 or above.
Record Screen on iPhone via Third-Party Tools
There are a lot of great apps available out there to record a screen or video on an iPhone. So, you can take advantage of them to make your recording screen/ video task hassle-free. We know that determining which app to select for recording screen or video on the iPhone is a challenging task. That's why we've done heavy lifting for you. Below, we have reviewed the top 4 screen recording apps for iPhone. So, have a look and see which one you find most apt for you.
1. Record Screen on iPhone with Record it!
Record it! is a game screen recorder iOS users can apply for recording tutorials, video demos, and training videos. The best part of the app is that it is capable of adding video reactions with audio commentary upon recording. The app even comes with an in-built video editor to enhance your recordings. It will even keep all of your recordings organized in one place so that you can easily access your recordings whenever you want to.
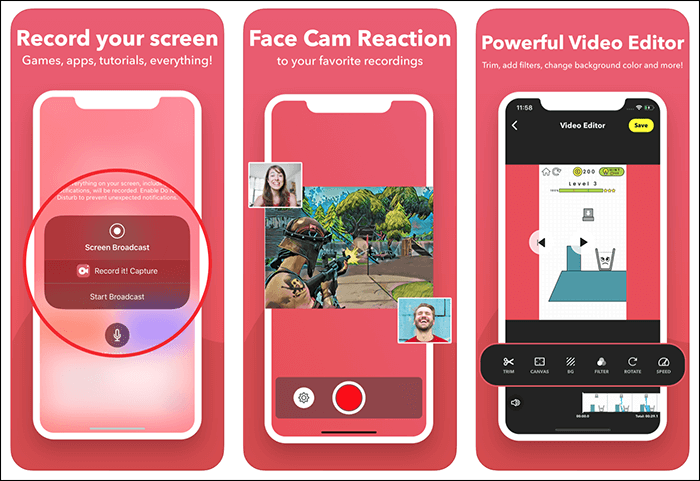
Steps to record screen on iPhone with Record it!:
Step 1. Open Record It! on your iPhone and tap the big red button at the center of the main interface.
Step 2. Select Record It! Capture from the pop-up window. You can also tap to enable or disable microphone recording on this page.
Step 3. Tap Start Broadcast to start recording. When you want to finish, tap Stop Broadcast.
2. Record iPhone Screen Using DU Recorder
DU Recorder is another app recommended for recording screens on iPhones. It is one of the most powerful screen recorders and stream creators. It is capable of live-streaming your screen on Facebook, YouTube, and Twitch. With the help of the app, you can capture anything happening on your iPhone's screen, such as live shows, sports, games, and more. The app's unique thing is that it comes with live tools such as live pause settings, custom watermarks, and more.
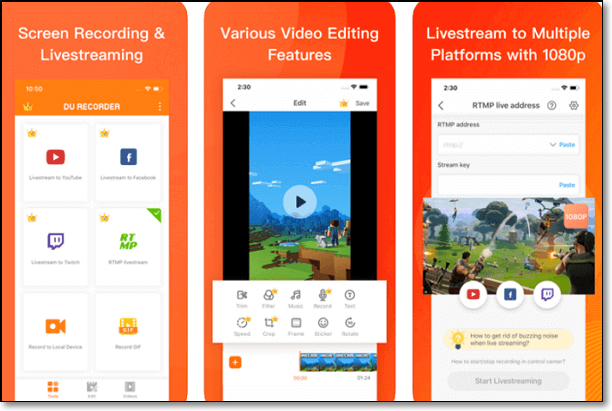
Steps to record screen on iPhone with DU Recorder:
Step 1. Add the Recording Option to Control Center and head into Settings > Control Center > Customize Controls on your iPhone. Then, tap the + sign next to Screen Recorder.
Step 2. Wipe up from the bottom of your iPhone's screen and select DU Recorder from the list for your screen recording.
Step 3. Tap the screen recording sign on the top to start your iPhone screen recording.
3. Record Screen on iPhone via TechSmith Capture
TechSmith Capture is one of the powerful screen recording apps that's part of Camtasia's collection of video apps. With its help, you can record your app demo and training videos on your iPhone with ease and speed. You can even send or share the recording with friends or to a computer in a seamless manner.
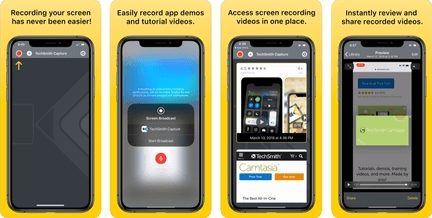
Steps to record screen on iPhone with TechSmith Capture:
Step 1. Go to Settings > Control Center > Customize Controls on your iPhone and tap Screen Recording.
Step 2. Swipe up from the bottom of your screen to open the Control Center. Then, tap the recording option and choose TechSmith Capture.
Step 3. Tap Start Broadcast to start recording your screen.
Bonus Tips: Record iPhone Screen on Mac
If you're looking for a helpful solution to record your Mac screen, look no further from EaseUS RecExperts for Mac. The tool can record any activity on your Mac's screen without a time limit.
The best part is that this easy-to-use screen recorder compresses the video before saving it. This way, the recordings won't take up too much storage space on your device. It can capture screen, gameplay, webcam, and record audio on a PC or Mac. Click the below button to get EaseUS RecExperts for Mac now.
Key Features:
- Record iPhone screen on Mac without a time limit
- Capture or record YouTube videos, zoom meetings, video tutorials, live streams, and more
- Take a screenshot of the Mac screen
- Schedule recording tasks to record automatically
- Compress the recorded video before saving it
How to Edit iPhone Screen Recording
It is normal that the recording may include unnecessary parts. In this case, you can edit the recorded videos on your iPhone. Just find the recordings in the Photos app and use the built-in editing tools and elements. Follow the steps below to start editing.
Step 1. Open the Camera Roll album in the Photos app and tap the video you want to edit.
Step 2. Tap Edit in the top right-hand corner of the screen. You can trim the video when you see a visual timeline. Just drag the arrows beside the Play button to trim it.
Step 3. Press the Play button to watch the new version. Then, tap Done > Save as New Clip to save the video's final version.
The Bottom Line
This guide shows you how to enable screen recording and how to record the screen of your iPhone. We hope you have found what you want. However, whatever tool you use on your iPhone, built-in or third-party, the recording will take up your phone's storage space.
Therefore, if you run out of storage space, you'd better record the iPhone screen on a Mac through EaseUS RecExperts. Download it on your Mac from the button below now!
EaseUS RecExperts

One-click to capture anything on screen!
No Time Limit, No watermark
Start Recording