-
![]()
Daisy
Daisy is the Senior editor of the writing team for EaseUS. She has been working in EaseUS for over ten years, starting from a technical writer to a team leader of the content group. As a professional author for over 10 years, she writes a lot to help people overcome their tech troubles.…Read full bio -
Jane is an experienced editor for EaseUS focused on tech blog writing. Familiar with all kinds of video editing and screen recording software on the market, she specializes in composing posts about recording and editing videos. All the topics she chooses …Read full bio
-
![]()
Melissa Lee
Melissa is a sophisticated editor for EaseUS in tech blog writing. She is proficient in writing articles related to screen recording, video editing, and PDF file conversion. Also, she's starting to write blogs about data recovery, disk partitioning, data backup, etc.…Read full bio -
Jean is recognized as one of the most professional writers in EaseUS. She has kept improving her writing skills over the past 10 years and helped millions of her readers solve their tech problems on PC, Mac, and iOS devices.…Read full bio
-
![]()
Jerry
Jerry is a fan of science and technology, aiming to make readers' tech life easy and enjoyable. He loves exploring new technologies and writing technical how-to tips. All the topics he chooses aim to offer users more instructive information.…Read full bio -
Larissa has rich experience in writing technical articles. After joining EaseUS, she frantically learned about data recovery, disk partitioning, data backup, screen recorder, disk clone, and other related knowledge. Now she is able to master the relevant content proficiently and write effective step-by-step guides on various computer issues.…Read full bio
-
![]()
Rel
Rel has always maintained a strong curiosity about the computer field and is committed to the research of the most efficient and practical computer problem solutions.…Read full bio -
![]()
Gemma
Gemma is member of EaseUS team and has been committed to creating valuable content in fields about file recovery, partition management, and data backup etc. for many years. She loves to help users solve various types of computer related issues.…Read full bio
Page Table of Contents
Jane Zhou
Updated on Feb 26, 2024
0 Views |
0 min read
"I was searching for a way to auto stop screen recording on my computer. I had no luck with that. Can anyone help me figure this out so that I can easily start/stop screen recording automatically from my computer?"
Maybe you need to record your screen for creating YouTube videos, or you need to record an important meeting or gameplay to post on social media; screen recording is helping a lot of people both personally and professionally. So auto stop recording is also an important term in this matter.
Many people want to learn how to auto-stop screen or audio recording on their computer. If you are reading this article, then you have come to the right place. We will discuss solid step-by-step guidelines for stop screen recording automatically at a specified time, duration, or file size. So don't panic and follow this article for your own good.
Stop Recording Automatically using EaseUS RecExperts on Win/Mac
The best way to record your screen with clear HD resolution and audio is EaseUS RecExperts. This is an amazing and powerful screen recorder with intuitive and simple functions. Though it can be handled by any newbie or expert user, it has amazing and advanced screen recording features that are rare.
The simple user interface can allow you to record the screen, system, or microphone sounds and automatically start, pause or stop recording whenever you want. All of these amazing features are combined into RecExperts, and everyone can enjoy its full potential.
EaseUS RecExperts
- Record system sounds and external microphone audio as well
- A free video recording software to capture live streaming videos
- Capture the entire screen, record part of screen, and webcam
- Edit the recorded video and audio into the program interface
- Export recordings in various formats
Step by step Tutorial to Auto Stop Screen Recording Using EaseUS RecExperts.
We have divided the steps into 2 parts for your better understanding. You need to follow the below steps to understand how easy it is to auto stop screen/audio recording:
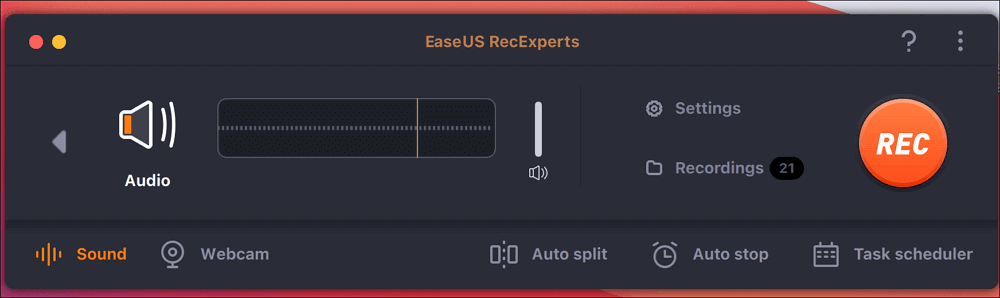
#1. Stop Recording After a Period of Time Automatically
Step 1. Download and launch RecExperts for Windows
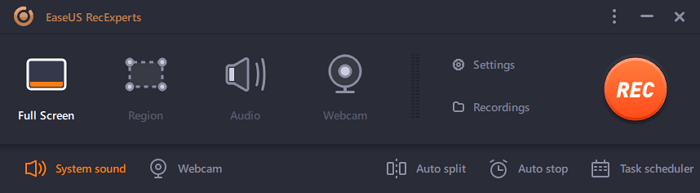
Download, install and launch the program on your computer. Click on the "Auto Stop" option.
Step 2. Configure Time Duration/File Size for Auto Stop Recording
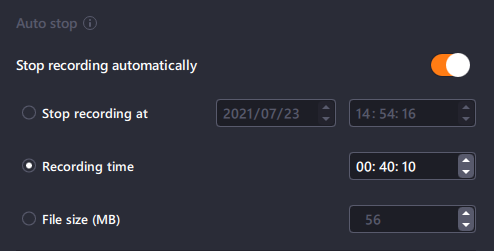
Next, you need to set the settings for auto-stop recording. Simply select all the settings and recording areas according to your choice. Then set the recording time duration on the option that says "When the recording time reached (Minutes)". Then click "OK".
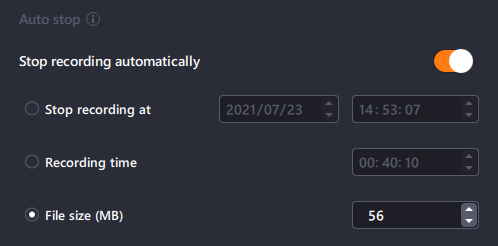
(Optional) If you want to stop the recording according to the file size, check the following settings. Simply select all the settings and recording area according to your choice. Then set the file size of the recording on the option that says "When the recording time reached (Minutes)". Then click on "OK" to proceed.
Step 3. Check the Scheduled Screen Recordings
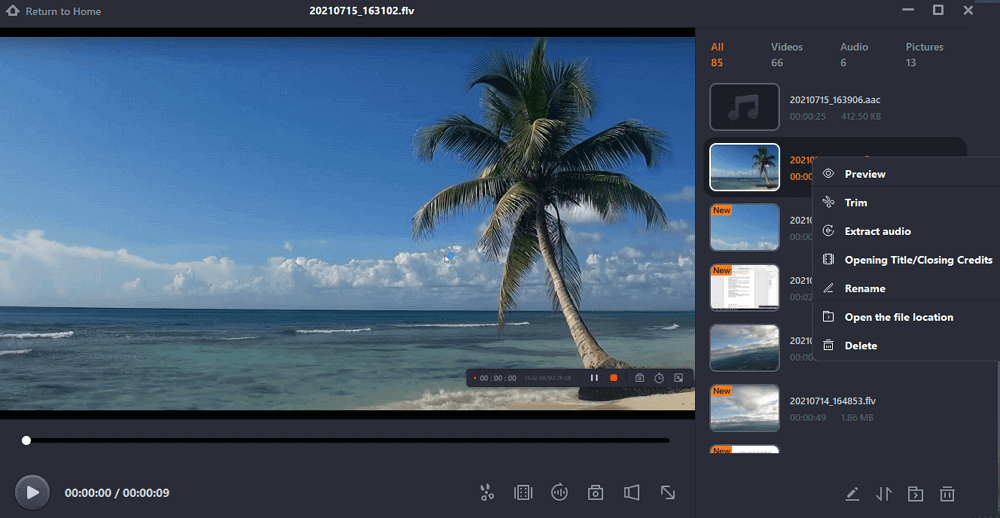
Once done, the program will automatically stop the recording and save the screen recorded video file. Click on the "Recordings" option of the software to access the recorded files.
#2. Start or Stop Recording at a Specific Time
Step 1. Create a Timed Recording Task
Download and launch the screen recorder on your computer. Then, click "Task Scheduler" at the bottom right of the main interface.

Then, select the "New Task" option to add a new schedule to the program.

Step 2. Configure the Scheduled Recording Task
On the following screen, you need to set a task name and define how your screen should be recorded.

- In the "Task time" tab, specify a start time and select an end time.
- In the "Recording setting" tab, select the recording area, choose the audio input, and specify other options. Then hit "OK".
Step 3. Edit or Delete a Scheduled Recording
If you change your mind and you would like to edit the scheduled recording time or other options, or if you would like to delete the schedule altogether, you can do so easily. Get back to the "Task Scheduler" screen and click on either the "Edit" or "Delete" icon.

Step 4. View Your Scheduled Screen Recordings
Once your scheduled time has passed, the software will capture and save your screen recording video file automatically. You can access this file by clicking on the "Recordings" option on the main interface. All of the recordings that you make using this tool are saved here.

Auto Stop Recording with OBS Studio
For Mac users, OBS Studio is a good helper for auto-stop your recording. Just to clear out the difference, you can set a time to stop recording, but you must start the recording by yourself. There is no schedule recording option available for OBS on Mac. Here is how to do this:
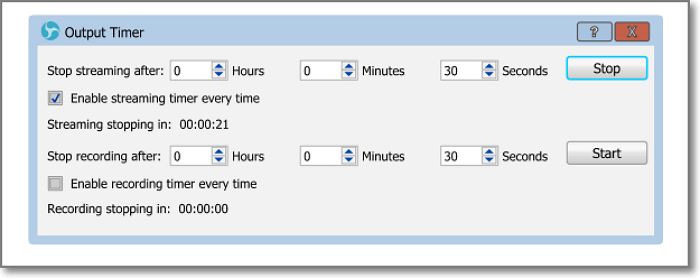
Step 1. First, launch the software from the "Applications" folder on Mac. When you get to the software homepage, go to the "Tools" option from the menu bar and select "Output Timer". You'll get an interface like below that will allow you to set the stop recording time.
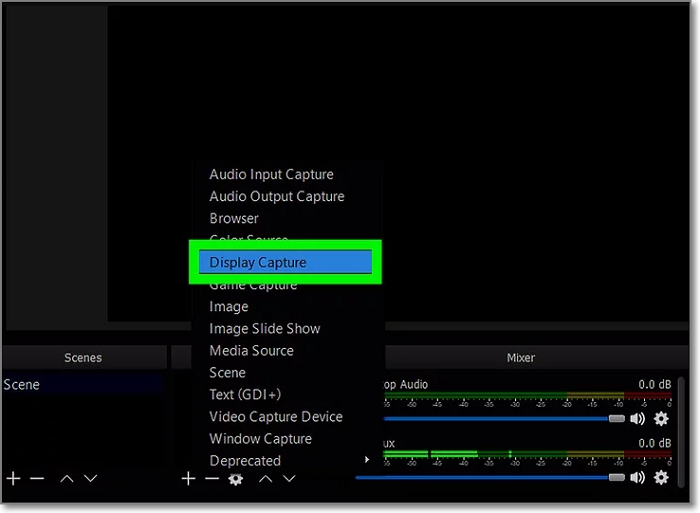
Step 2. Now click on the "+" icon under the "Sources" tab. Then select the "Display Capture" option from the list.
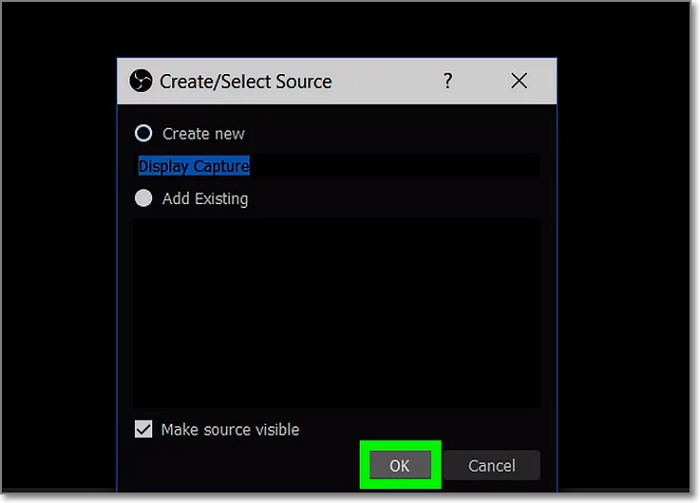
Step 3. Next, you need to select "Create New" and then click on "OK" from the "Create/Select Source" window.
Step 4. After that, you can choose the display that you want to record. If you only use one video card or monitor, you don't need to make any changes. If you want to record a different display, you can select it from the "Display" drop-down menu. Then click on "OK" to proceed.
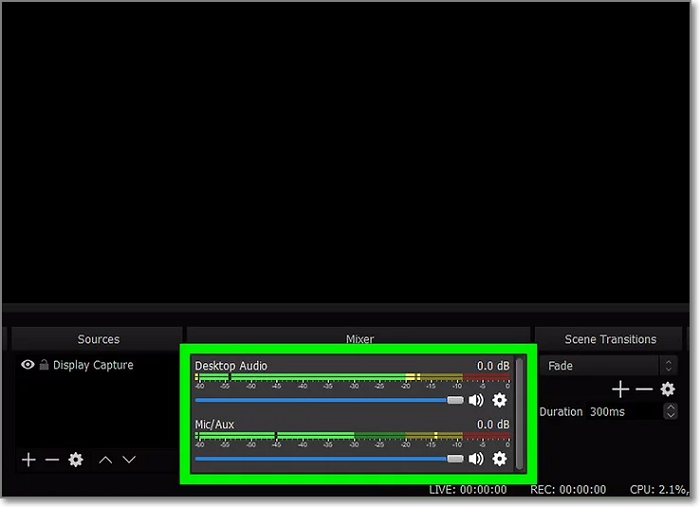
Step 5. Now you need to adjust the volume by using the two sliders from the "Mixer" tab.
Step 6. After setting up everything, click on the "Start Recording" button from the "Controls" tab of OBS.
Step 7. Finally, when the recording time is over, OBS will automatically stop the recording as you have already scheduled a time for stopping it. Or you can manually stop it using the "Stop Recording" button.
Conclusion
This article clearly states the step-by-step guideline for auto stop recording on EaseUS RecExperts. It's not too hard to use the "Scheduled Time Recording" or "Auto Stop" features of this amazing tool. These features make this software different from any other screen recorder on the market.
The interesting and amazing fact is, this program is now available for Mac too. So without having any second thoughts, follow the guideline from this article to learn auto stop screen or audio recording on Windows/Mac computer.
EaseUS RecExperts

One-click to capture anything on screen!
No Time Limit, No watermark
Start Recording