
[All You Need to Know] How to Screenshot in VLC
VLC Media Player is a well-known and open-source media player that can play various video and audio files. More than that, VLC also functions in screen and audio capture. While playing the video, you can choose to record audio with VLC or take a snapshot of your favorite scene. Once done, it will save the recorded files on your computer directly.
However, most of you may not know how it works, especially for screenshots in VLC.So this post comes in handy. Here we will show you how to take VLC screenshots in detail on both Windows and Mac.
How to a Screenshot on VLC Media Player
VLC Media Player allows you to screenshot a specific frame while playing, whether on Windows, macOS, or Linux computers. This section will show you three different solutions to help take snapshots with VLC Media Player.
Solution 1: Screenshot in VLC with Hotkeys
VLC Media Player offers shortcuts for taking screenshots. So the easiest way is to use the hotkeys. To do the task, you can quickly press the specific keys to take a snapshot in VLC.
- For Windows users: Press Shift + S to grab a certain frame
- For Mac users: Press Command + ALT + S
- For Linux users: Hit the Ctrl + ALT + S keys on the keyboard
Solution 2: Capture Video Frame in VLC with Menu
Step 1. Open the VLC Media Player, and play the videos you want to screenshot.
Step 2. When you see the scene you want to capture, click "Video" in the top toolbar and select "Snapshot" from the drop-down menu.
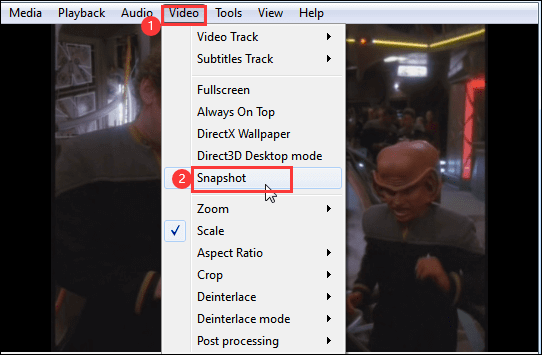
Step 3. Once done, the thumbnail and snapshot location will appear on the video.
Solution 3: Snapshot VLC with Advanced Controls
Step 1. While playing the video, you can click "View" > "Advanced Controls". Next, you will see advanced controls at the bottom.

Step 2. Click the Snapshot button with a camera icon at the bottom to screenshot the VLC frame.
![]()
How to Fix: VLC Snapshot Not Working
Sometimes, you may find it not working while taking snapshots with VLC Media Player on your computer. If you are bothered by this kind of problem, you can take a look at the following solutions:
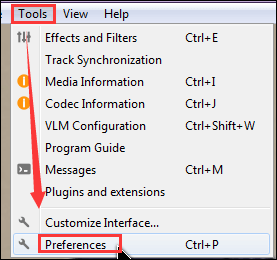
Step 1. On the main interface of VLC, click "Tools," then select "Preferences" from the drop-down menu.
Step 2. Choose the "Input / Codecs" option in the Simple Preference window. Next, you will see a line that says Hardware-accelerated decoding in the Codecs section, and choose the "Disable" option to disable hardware acceleration.
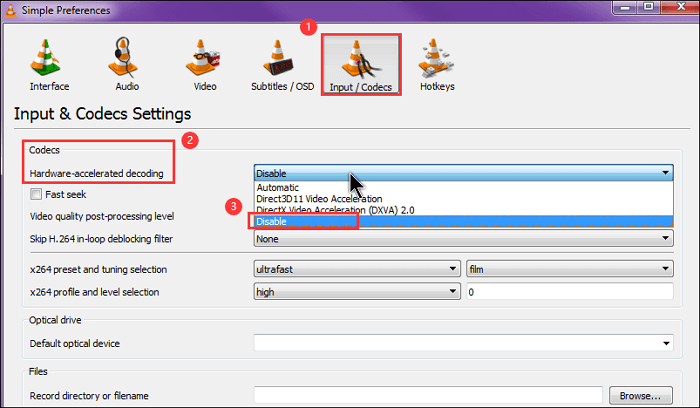
Step 3. Lastly, click the "Save" button in the lower right corner.
Best Alternative to VLC Screenshot
Sometimes, as we mentioned above, the VLC snapshot function is not working. Or there are some other problems with taking screenshots in VLC. At that time, why not select and choose a professional snapshot tool to take screenshots on any area of your screen?
Here we want to share a powerful screencast tool called EaseUS ScreenShot. With an intuitive workflow, it is easy to handle by all levels of users, especially novices. Whether taking screenshots of a full-screen or a partial screen, you always complete the task with hotkeys on your keyboard.
More stunning features of it:
- Capture screen in common image file formats
- One-click to capture screenshots from a video
- Take a long screenshot from your screen
- Easily take a screenshot in Minecraft
- Edit the screenshots with a list of tools
Just download this program and have a free trial.
In order to provide a great experience for you, we offer a detailed tutorial about making screencasts with ScreenShot below:
Step 1. Download and install EaseUS Screenshot on your PC, then launch it.
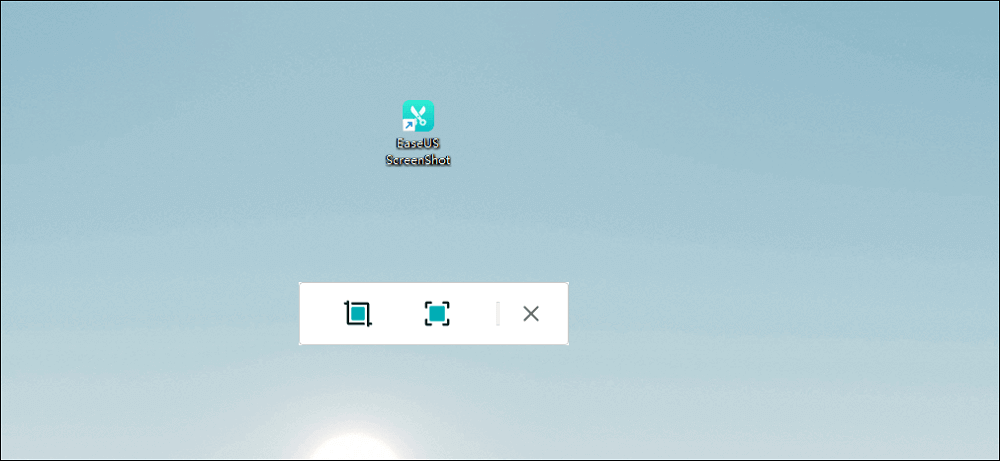
Step 2. You will see two options on the toolbar. The left one is for "Rectangular screenshot", and the right one is for "Full screenshot".
To take a partial screenshot, you just click on the left button (or double click the "Ctrl" key), then drag your mouse to select the area on your screen; To take a full screenshot, you can click the right button (or double click "Alt" on keyboard).

Step 3. When the screen is captured, you can see an editing toolbar below the screenshot. It provides a set of tools to modify the screenshot by drawing, adding text, mosaic, etc.
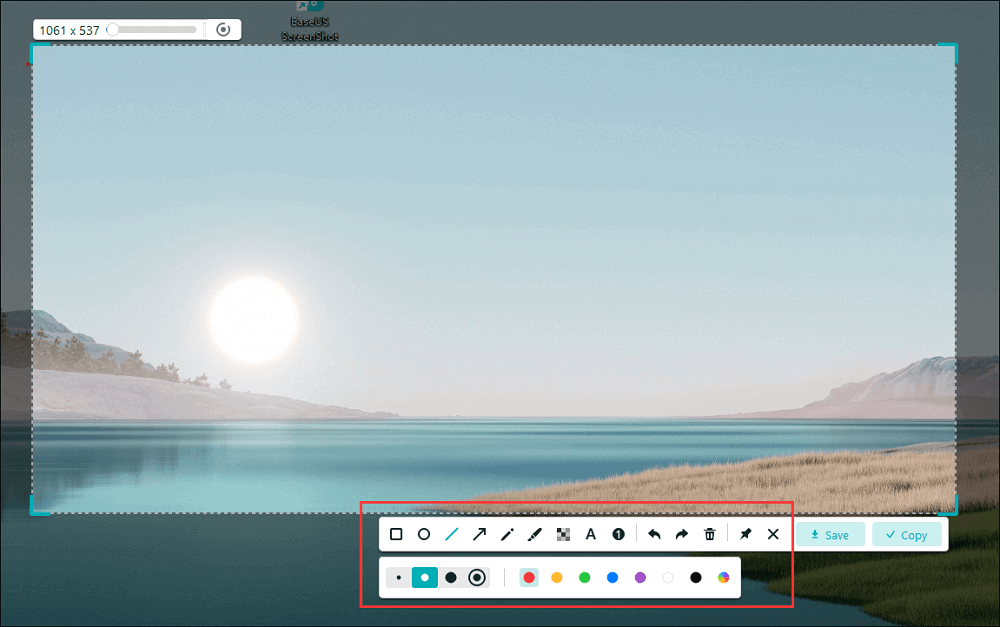
Step 4. Once done, click the "Save" button or press "Space" to save the screenshot. Or, you can click "Copy" or hit the "Enter" key to copy the screenshot to the clipboard.
FAQs About VLC Screenshot
1. Where are VLC screenshots saved?
The video snapshot will be saved to the default Picture folder in your Windows OS, or macOS.
If you are a Windows 10 PC and C disk is your system drive, you will find all the video screenshots from C:/users/username/pictures; Or you can input "%HOMEPATH%\Pictures\" in Windows search bar to view the screenshots.
If you use a Mac computer, you will find the images on your desktop.
2. How do I take a screenshot on Windows Movie Maker?
Actually, Windows Movie Maker does not support taking screenshots from the playing videos. So if you need to take snapshots, you can use some third-party screencast tools like EaseUS ScreenShot, ShareX, OBS Studio, etc.
3. Can VLC screen capture?
Yes, you can use VLC Media Player to capture your screen.
Step 1. Open VLC and click Media > Open Capture Device.
Step 2. Next, choose Desktop and the desired frame rate, then select "Stream" at the bottom.
Step 3. Browse the location to save your recordings and set a full name.
Step 4. Finally, click on "Stream," and the recording begins immediately.
Was This Page Helpful?