-
![]()
Daisy
Daisy is the Senior editor of the writing team for EaseUS. She has been working in EaseUS for over ten years, starting from a technical writer to a team leader of the content group. As a professional author for over 10 years, she writes a lot to help people overcome their tech troubles.…Read full bio -
Jane is an experienced editor for EaseUS focused on tech blog writing. Familiar with all kinds of video editing and screen recording software on the market, she specializes in composing posts about recording and editing videos. All the topics she chooses …Read full bio
-
![]()
Melissa Lee
Melissa is a sophisticated editor for EaseUS in tech blog writing. She is proficient in writing articles related to screen recording, video editing, and PDF file conversion. Also, she's starting to write blogs about data recovery, disk partitioning, data backup, etc.…Read full bio -
Jean is recognized as one of the most professional writers in EaseUS. She has kept improving her writing skills over the past 10 years and helped millions of her readers solve their tech problems on PC, Mac, and iOS devices.…Read full bio
-
![]()
Jerry
Jerry is a fan of science and technology, aiming to make readers' tech life easy and enjoyable. He loves exploring new technologies and writing technical how-to tips. All the topics he chooses aim to offer users more instructive information.…Read full bio -
Larissa has rich experience in writing technical articles. After joining EaseUS, she frantically learned about data recovery, disk partitioning, data backup, screen recorder, disk clone, and other related knowledge. Now she is able to master the relevant content proficiently and write effective step-by-step guides on various computer issues.…Read full bio
-
![]()
Rel
Rel has always maintained a strong curiosity about the computer field and is committed to the research of the most efficient and practical computer problem solutions.…Read full bio -
![]()
Gemma
Gemma is member of EaseUS team and has been committed to creating valuable content in fields about file recovery, partition management, and data backup etc. for many years. She loves to help users solve various types of computer related issues.…Read full bio
Page Table of Contents
Jane Zhou
Updated on Apr 15, 2024
0 Views |
0 min read
Fraps is an excellent Windows screen recorder accepted by most users worldwide. It enables you to record live streaming video, capture screen to create presentations, instructional videos, or product demos, and record games in high resolution. That's to say, almost all your desktop activities can be captured by this screen recording software, and then you can share the recordings with your friends as you want.
However, if you are new to Fraps screen recorder, you may want to find some tutorials, and that's why this post comes. Here we will show you everything about Fraps, including functions, advantages, guides, etc. Just stay here to learn more information!
Page Content
How to Record Desktop with Fraps on Windows 10
Fraps is a benchmarking, screen capture, and screen recording software for Windows users. It supports recording lots of PC games, DirectX and OpenGL games, and more.
With an extremely simple user interface, it is very easy to use. While capturing games, you will find a frame rate counter in the corner of your screen, which will help you keep a casual eye on second-to-second in-game performance. However, it is just free to use with limitations for video capture (30 second time limit, watermark, and a few formats for exporting)
※※ General tab: You can see the detail of Fraps, and change its states while launching Fraps.
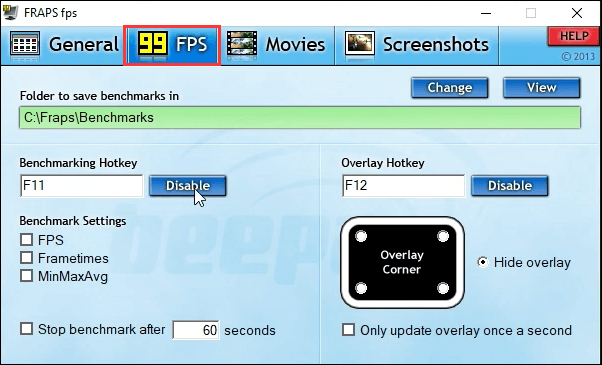
※※ FPS tab: Here you are allowed to check and test FPS that you are getting from your machine or set the hotkeys as you like while recording.
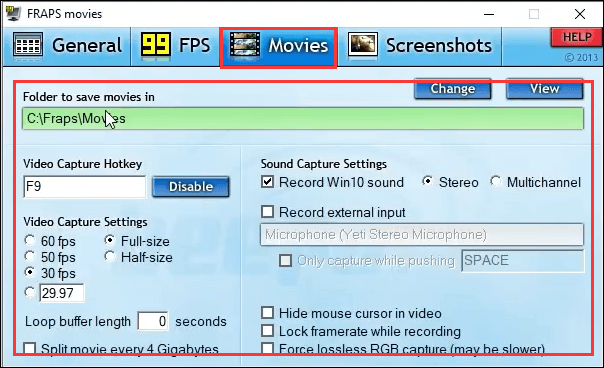
※※ Movies tab: It lets you change the location for saving recordings, shortcuts, fps based on your computer, sound sources, or any other settings for capturing your screen.
| Pros | Cons | |
|---|---|---|
| Fraps |
|
|
How to Use Fraps:
Step 1. Go to https://fraps.com/download.php to install this freeware on your computer.
Step 2. Launch Fraps, and click the first tab "General" to adjust some basic settings.
Step 3. Next, you can change the folder to save the recorded videos or screenshots flexibly in the "Movies" tab, and select the right fps according to your computer.
Besides, here you also are able to change hotkeys or select audio sources with a few clicks.
Step 4. Once done, hit the shortcut you set before to begin your screen recording. If the numbers in the right side corner on your screen turn red, it means the recording is in the process.
How to Record Screen with Fraps Alternative
Although Fraps performs well in game recording, it still has some weaknesses like limited recording time, few output formats, etc. Given that, we find some software that is better than Fraps and will help you complete more recording tasks in the way you like.
#1. EaseUS RecExperts
EaseUS RecExperts is one of the best alternatives to Fraps. Like Fraps, it lets you capture screen and gameplay with a few clicks. But compared to Fraps, this software has many more advantages.
Firstly, RecExperts has an easy yet fashionable user interface, which not only assists you in starting recording easily but also offers a better experience. Secondly, this program enables you to record any area on your screen, for example, you are able to record part of screen or full screen without any hassle. Also, this versatile screen recording software enables you to capture GIFs, record webcam, audio (system sound or mic), take screenshots, etc.
Last but not least, it offers some basic and useful editing tools that will help you make your recording stand out by trimming or adding opening credits. By the way, it is compatible with both Windows and Mac!
EaseUS RecExperts
- Run perfectly on both Windows and macOS
- Allow capturing webcam, audio, screen separately or simultaneously
- The schedule recording feature is available
- Change output formats freely
- Inbuilt trimmer helps cut recordings for sharing
Now, let's take a look at how to screen record with this versatile screen capture software.
Step 1. Launch EaseUS RecExperts. There are two modes for screen recording. Choose "Full Screen", this tool will capture the whole screen; choose "Region", you will need to select the recording area manually.

Step 2. After that, you can choose to record the webcam, system sound, or microphone as you like. Of course, you can turn them off if you only need to record the silent screen.

Step 3. Then, you can click the red "REC" button to start recording. Now you will see a menu bar on your screen. If you want to pause the recording, click on the white "Pause" button; to end the recording, click on the red "Stop" button.
Step 4. After recording, you will be led to the recording list interface. Here you can view or edit your recordings easily.

#2. OBS Studio
OBS Studio is also one of the most popular open source screen recorder software worldwide. It is completely free to download and use.
This freeware functions in screen recording. It lets you capture any video or gameplay and save them as high-quality videos. Plus, this program makes it possible to capture two or more monitors at the same time. And while recording, you also are allowed to add webcam overlay to your recorded files in one click.
Beyond that, it is also one of the best free live streaming software that lets you live streams to YouTube, Twitch, and other social platforms.
Key features:
- Complete free and cross-platform
- Record multiple screens simultaneously
- Live stream to various platforms
- Support unlimited numbers of scenes
How to screen record with OBS Studio:
Step 1. Launch OBS Studio on your computer. Then click the plus icon in the Scenes box and choose on the "Display capture".
Step 2. Next, you will see the "Display capture window" on the screen and click OK to create a new source.
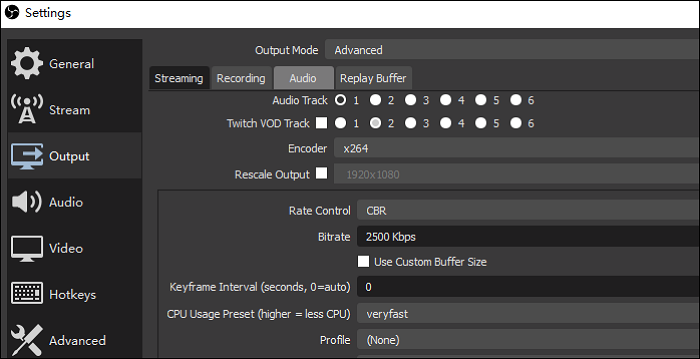
Step 3. Click Settings in the right bottom to adjust your recording settings, like formats, recording path, etc.
Step 4. Back to the main interface and hit the "Start Recording" button to start your recording task.
The Bottom Line
How to screen record with Fraps? This post gives a detailed tutorial on this issue. Even you are new to this program, you still can operate it without effort.
Moreover, this post also covers two alternatives to Fraps to help capture screen for those who want more recording features at last. Come what way, we hope you can benefit from this article.
EaseUS RecExperts

One-click to capture anything on screen!
No Time Limit, No watermark
Start Recording