-
![]()
Daisy
Daisy is the Senior editor of the writing team for EaseUS. She has been working in EaseUS for over ten years, starting from a technical writer to a team leader of the content group. As a professional author for over 10 years, she writes a lot to help people overcome their tech troubles.…Read full bio -
Jane is an experienced editor for EaseUS focused on tech blog writing. Familiar with all kinds of video editing and screen recording software on the market, she specializes in composing posts about recording and editing videos. All the topics she chooses …Read full bio
-
![]()
Melissa Lee
Melissa is a sophisticated editor for EaseUS in tech blog writing. She is proficient in writing articles related to screen recording, video editing, and PDF file conversion. Also, she's starting to write blogs about data recovery, disk partitioning, data backup, etc.…Read full bio -
Jean is recognized as one of the most professional writers in EaseUS. She has kept improving her writing skills over the past 10 years and helped millions of her readers solve their tech problems on PC, Mac, and iOS devices.…Read full bio
-
![]()
Jerry
Jerry is a fan of science and technology, aiming to make readers' tech life easy and enjoyable. He loves exploring new technologies and writing technical how-to tips. All the topics he chooses aim to offer users more instructive information.…Read full bio -
Larissa has rich experience in writing technical articles. After joining EaseUS, she frantically learned about data recovery, disk partitioning, data backup, screen recorder, disk clone, and other related knowledge. Now she is able to master the relevant content proficiently and write effective step-by-step guides on various computer issues.…Read full bio
-
![]()
Rel
Rel has always maintained a strong curiosity about the computer field and is committed to the research of the most efficient and practical computer problem solutions.…Read full bio -
![]()
Gemma
Gemma is member of EaseUS team and has been committed to creating valuable content in fields about file recovery, partition management, and data backup etc. for many years. She loves to help users solve various types of computer related issues.…Read full bio
Page Table of Contents
Melissa Lee
Updated on Apr 15, 2024
0 Views |
0 min read
During playing video games, are there some moments that you want to share with others? Streaming on platforms like Twitch or YouTube is an excellent choice as it can help find more people with similar interests to you, and it allows you to interact with the audience in real-time.
When it comes to having a live stream, OBS Studio, also known as Open Broadcaster Software, is the go-to tool you should have. But not many people know how to use it due to its complex interface and professional features.
As the first step, configuring the best OBS settings for streaming is what you have to do to ensure the video quality of your live stream. This post will tell you the best OBS stream settings, how to set them up, and offer you the method of streaming with OBS on Twitch.
Open Broadcaster Software Best Settings for Output
Before starting a live stream, you should check this OBS setting guide to select the optimal video/audio bitrate and adjust other settings. It's not difficult to navigate to the settings window as you can directly choose the "Settings" option under the "Controls" tab, or you can click on the "File" button on the top toolbar and select the "Settings" option to open that window.
There are many tabs on your left side, and you should pay attention to one of them: "Output." Let's check the settings in this tab one by one.
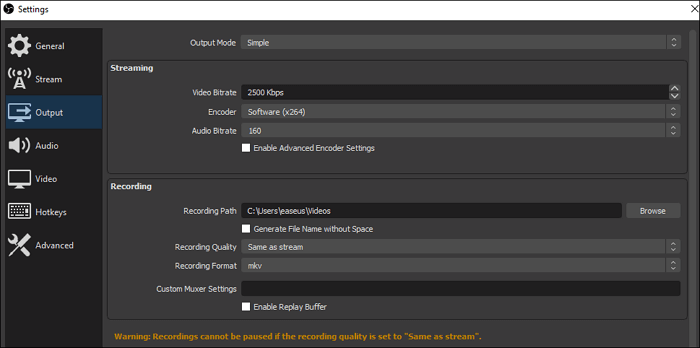
#1. Video Bitrate
As many people know, the video bitrate influences the video quality in many ways. Generally speaking, the higher video bitrate leads to better video quality. However, it's advisable to choose the video bitrate according to your upload speed, and an excessive video bitrate is merely a waste of bandwidth.
OBS Recommended Settings for Video Bitrate:
| Quality | Resolution | Video Bitrate |
|---|---|---|
| Ultra-High Definition | 4K | 8000 |
| High Definition | 1920x1080 (1080P) | 3000/3500 |
| High Definition | 1280 x 720 (720P) | 1800/2500 |
| Medium | 640 x 360 (360P) | 600/800 |
This table about video bitrate OBS can help you select the most suitable one for you. For instance, the best OBS streaming settings for 4K videos should be 8000, while the OBS bitrate for 1080P is 3000 or 5000.
#2. Audio Bitrate
Similarly, the audio bitrate decides the audio quality in the live stream, and the higher audio bitrate can result in better audio quality. The audio is so vital in a live stream as it marks up 80% of the content. You can choose optimal OBS mic settings for streaming. And the recommended audio bitrate are listed in the table below.
OBS Recommended Settings for Audio Bitrate:
| Quality | Audio Bitrate |
|---|---|
| High Quality | 320 |
| High Quality | 256 |
| Medium | 128 |
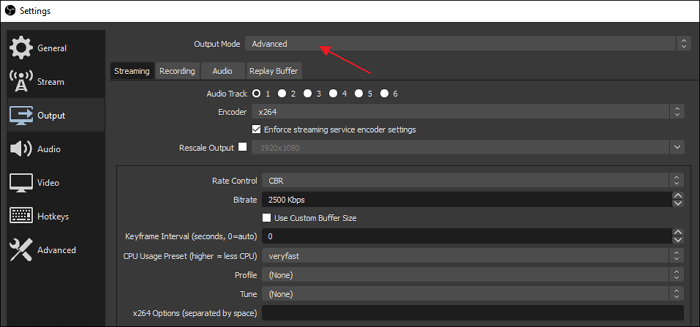
#3. Advanced Settings
For professional users, OBS also offers you a more sophisticated output mode, and you can activate it by selecting "Advanced" from the dropdown menu after "Output Mode." The options in this mode allow you to stream with multiple audio tracks, and you can even adjust the bitrate of each track precisely. Although most users may not need those options, they are beneficial for those who want a perfect live stream.
Whether you configure the settings in simple mode or advanced mode, the best settings for OBS streaming fit your PC's device performance and network speed. So, make the choices according to your situation.
How to Stream with Best OBS Settings for Twitch
How to stream with OBS after setting up those options for the output quality? To stream on Twitch with OBS Studio, you need to connect them in two ways: directly connecting your Twitch account to OBS or using the stream key.
OBS is probably the best choice for those who want an advanced and totally free streaming tool. This part will guide you through streaming with OBS on Twitch step by step, and you should pay attention to the OBS optimal settings that will be mentioned.
How to Stream with OBS Optimal Settings for Twitch:
Step 1. First, you need to launch OBS Studio, click on the "File" button on the top toolbar, and select the "Stream" tab. It allows you to directly choose "Twitch" from the dropdown menu of "Service."
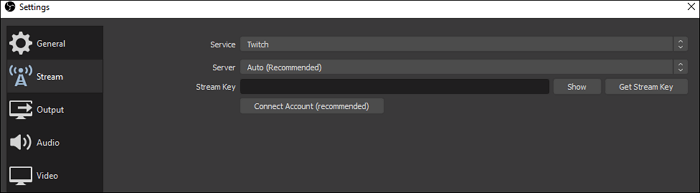
Step 2. There is a "Connect Account (recommended)" button. Click it and log in to your Twitch account. Binding an account is the most straightforward method to connect Twitch with OBS, but it's also possible to click on the "Use Stream Key" button and fill in the stream key offered by Twitch.
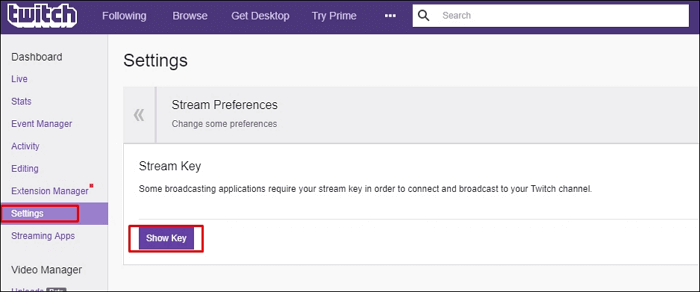
If you don't have one, click on "Get Stream Key," and it will turn to a page on which you can get the key.
Step 3. Now, you come into the second stage to adjust OBS Studio best settings for streaming. Back to the main interface of OBS, and hit the "+" icon in the "Source" section, and then select the video source for streaming.
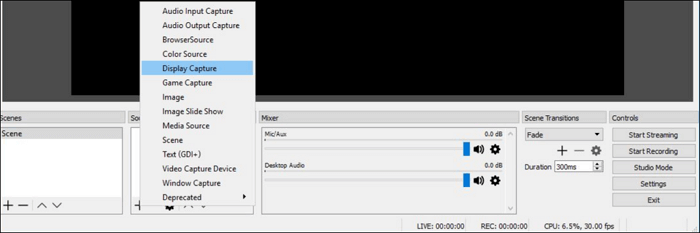
Each option in this menu fit a different streaming situation:
- Display Capture: Capture the whole display except for a game in the full-screen mode.
- Game Capture: Capture a video game in full-screen mode.
- Window Capture: Capture the active window of the application that is running.
Step 4. After selecting the appropriate video source for streaming, click on "Start Streaming" to have a live stream on Twitch.

How to Record Streaming with OBS and EaseUS RecExperts
What would you do if you wanted to record your live streams on Twitch? Two powerful applications are available, the first one is OBS Studio, and the other is EaseUS RecExperts.
1. Record Live Stream on Twitch with OBS Studio
We mentioned above that OBS Studio is probably the best free streaming tool. It is also a popular screen recorder. Recording your screen is also one of the critical features of OBS Studio. The screen recorder supports high-quality video and audio capturing in real-time, and the customized hotkeys enable you to switch from many different scenes.
Despite the complex audio sources, the powerful built-in intuitive audio mixer can make them sound harmonious. Nevertheless, you can only select from one of the two, and this software doesn't allow you to utilize those two functions simultaneously.
- 📝What to prepare
- A Windows or Mac computer
- OBS Studio installed on PC
- A capture card
2. Record Live Stream on Twitch with EaseUS RecExperts
As mentioned above, one of the shortcomings of OBS is its complex interface and confusing options, and all those features make it not so appropriate for beginners. What if you want to record a live stream on Twitch, but you don't have professional skills in using the screen recorder? The best solution is to get a more intuitive and user-friendly screen recording software, such as EaseUS RecExperts.
This versatile recorder supports recording streaming video and audio on your Windows PC and MacBook with simple clicks. One of its merits is the ability to select the recording region freely, and it enables you to capture the whole screen or merely a part of it. What's more, it allows you to set scheduled recording tasks to start the recording automatically.
Features:
- A streaming video recorder on Windows and Mac
- Record video, audio, and webcam simultaneously
- Support more than ten output formats
- Offer default editing tools for recordings
This software requires no registration. Click on the button below for free download now.
- 📝What to prepare
- A Windows or Mac computer
- EaseUS RecExperts installed on PC
- A capture card
How to Record Live Stream on Twitch with EaseUS RecExperts:
Follow those steps to record whatever is on your screen now.
Step 1. Launch EaseUS RecExperts on your computer. Before recording, you can choose from two recording modes. To record the whole screen, choose the "Full Screen" mode; to record a part of the screen, select "Region".

Step 2. You can also choose to record the screen with your webcam, system sound, microphone. Just click to select them. You can also set auto split, auto recording with various functions on the interface.

Step 3. Then, click on the red "REC" button to start recording. To pause the recording, click on the white double vertical bar; to end the recording, click on the red square sign. They are located on the menu bar appearing on your screen.
Step 4. After recording, you will be led to the recording list. Here you can view, split, extract audio, take screenshots, delete, and manage your recordings, etc. To start a new recording with previous settings, click on the "REC" button on the top of the window.

FAQs about Best OBS Settings for Streaming
Check the frequently asked questions related to this topic below.
1. How do I improve stream quality on OBS?
One of the best way to increase your video recording quality is to increase the bitrate. In the "Advanced" section of the OBS settings, there is a "Network" area. Here you can select "Dynamically change the bitrate to manage congestion" in order to reduce dropped frames. Then, the stream quality will be inproved.
2. How do I make my OBS stream smoother?
Some of the ways to make your OBS stream smoother are as follows.
- 1. Downscale the output resolution.
- 2. Lower the frame rate.
- 3. Change your x264 preset.
- 4. Upgrade hardware.
3. What is the best resolution for OBS streaming?
4000 Kbps is maybe the optimal video bitrate for live streaming in Full HD (1080p) at 30 FPS.
Conclusion
This post answered the question: what are the best OBS settings for streaming. In addition to that, it offered you detailed steps to stream with the best OBS settings for Twitch.
In the end, this post even teaches you how to record the streams on Twitch with two great recorders: OBS and EaseUS RecExperts. If you are a professional user, the OBS Studio can be an excellent choice for you as it can configure the settings flexibly. If you are a beginner, EaseUS RecExperts is the most easy-to-use recorder for you.
EaseUS RecExperts

One-click to capture anything on screen!
No Time Limit, No watermark
Start Recording