Photo transfer between two devices is needed in many situations. You may want to enrich the entire photo library on the target device, make a backup of your precious pictures somewhere else, or share images between two of your devices.
That's why many of you want to transfer photos from iPhone to iPhone, copy photos from PC to iPhone, import photos from Mac to iPhone, and more. Since the ways for the former two situations are detailed already, here I'd like to show you how to transfer photos from Mac to iPhone.
| 🔍Fix for Photo Transfer |
💻Effectiveness |
🧿Difficulty |
| 1️⃣EaseUS MobiMover |
🔹Very High: transfer all the photos between Mac/Windows to iPhone within a few minutes. |
Easy |
| 2️⃣iTunes/Finder |
🔹High: Select iTunes or Finder to transfer files according to the system version. |
Medium |
| 3️⃣AirDrop |
🔹Medium: a good option to import some photos from Mac to iPhone. |
Easy |
| 4️⃣Google Photos |
🔹Medium: a cloud-based service to transfer files with 15 GB offered free. |
Medium |
| 5️⃣iCloud |
🔹High: With the iCloud Photo Library turned on, you can use Apple's cloud service to transfer files with 5 GB offered free. |
Easy |
Part 1. How to Transfer Photos from Mac to iPhone Without iCloud [4 Methods]
Although iCloud does help you sync photos from your Mac to your iPhone, you may not want to use it for many reasons. For example, it doesn't allow you to move only wanted photos selectively. Then, "How to transfer pictures from Mac computer to iPhone without iCloud?" you may ask. Aside from iCloud, there are many other ways to move photos (and videos) or photos library from your Mac to your iPhone without iCloud, including using professional iOS data transfer software, iTunes, AirDrop, and Google Photos.
Even if you prefer to transfer photos from Mac to iPhone without iTunes, you can still find other alternative ways. (Of course, you can apply the same ways to transfer photos from Mac to iPad.)
Method 1. Transfer Photos from Mac to iPhone Without iCloud or iTunes
The commonest solution to import photos from a Mac computer (or Windows PC) to an iPhone without iCloud or iTunes is to use an iPhone data transfer tool like EaseUS MobiMover. With EaseUS MobiMover (no ads and plugins) installed on your computer, you can easily:
- Transfer files from computer to iPhone/iPad and vice versa
- Transfer data from one iPhone/iPad to another
- Manage iOS device content by deleting, editing, and adding items
What's more, EaseUS MobiMover also works as a WhatsApp manager, with which you can back up WhatsApp to your computer or transfer WhatsApp messages to a new iPhone.
To transfer photos from Mac to iPhone via a USB cable, please first download EaseUS MobiMover using the following button:
Simple steps to transfer photos from Mac to iPhone with EaseUS MobiMover
- Download and launch EaseUS MobiMover on your Mac.
- Connect your iPhone to the Mac with a compatible USB cable and tap on "Trust This Computer."
- Choose the "Mac to Phone" mode from its homepage.
- Click "Select Files" and choose the data type you want to transfer.
- Click "Transfer" to transfer all the photos to your iPhone and wait for the transfer process to finish.
![mobimover mac to iphone transfer]()
You can also copy photos and other types of content, including videos, music, ringtones, voice memos, books, and more, from Mac to your iPhone/iPad or get files from Windows PC to your devices using EaseUS MobiMover. If you need to transfer data to or from your iDevice often, software like EaseUS MobiMover is an essential tool for you. Don't hesitate to give it a try.
Method 2. Import Photos from Mac to iPhone Using iTunes/Finder
If you want to remove the existing music, photos library, movies, TV shows, books, and tones from your device, sync it with iTunes. You will learn how to do it in this part. It's worth noting that starting from macOS Catalina, iTunes is replaced by Finder, and all functions of iTunes will be delivered to Finder. So, you can use iTunes in macOS Mojave and earlier versions or Finder in macOS Catalina and later.
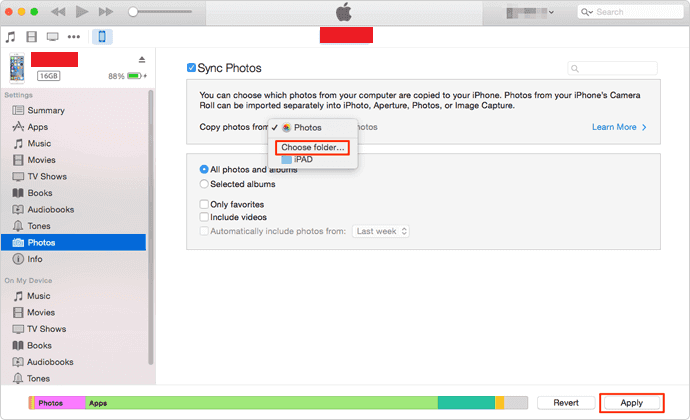
To import photos from Mac to iPhone with iTunes:
Step 1. Connect your iPhone to your computer.
Step 2. After iTunes runs automatically, click the device icon and choose the "Photos" tab.
Step 3. Check "Sync Photos" and select the pictures you will copy from the option "Copy photos from."
Step 4. Click "Apply" to start syncing photos from your Mac to your iPhone via iTunes.
![Transfer photos from Mac to iPhone using iTunes]()
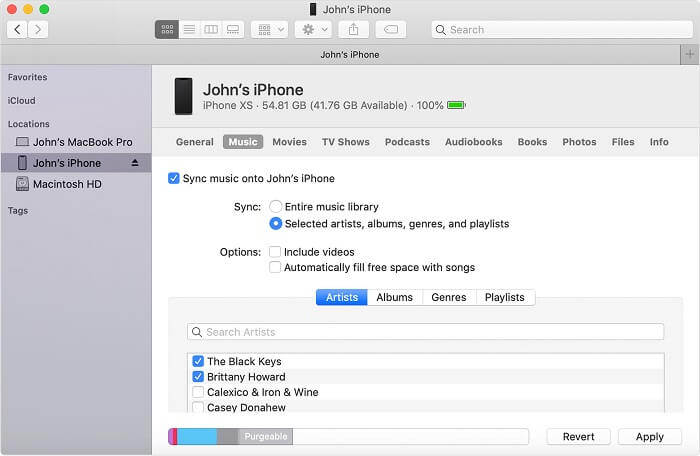
To sync photos from Mac to iPhone via Finder
Step 1. Open Finder and connect your iPhone to the computer.
Step 2. Unlock your mobile device and trust the Mac.
Step 3. In Finder, click the iPhone icon and select the category you want to share. Click the Photos tab.
Step 4. Check the "Sync [category]" option and select the specific items you want to share.
Step 5. Click "Apply" to start transferring photos or files from Mac to your device.
Step 6. When it's done, go to the Photos app on your iPhone to check the items.
![Sync photos from Mac to iPhone via Finder]()
Method 3. Copy Photos from Mac to iPhone via AirDrop
AirDrop is another wireless option to move photos from Mac to iPhone. With AirDrop enabled, you can share photos, videos, contacts, and other content between two Apple devices. (You can check the official guide from Apple to learn what AirDrop is on Mac and how to AirDrop on Mac.) To use AirDrop, here are some preparations you need to do.
- Ensure your WiFi and Bluetooth are enabled on both your iPhone and Mac.
- Make sure any Personal Hotspots have been turned off.
- Ensure your AirDrop settings should be set to Contacts Only or Everyone instead of Receiving Off.
- Place your iPhone and Mac within 9 meters (30 feet) of each other.
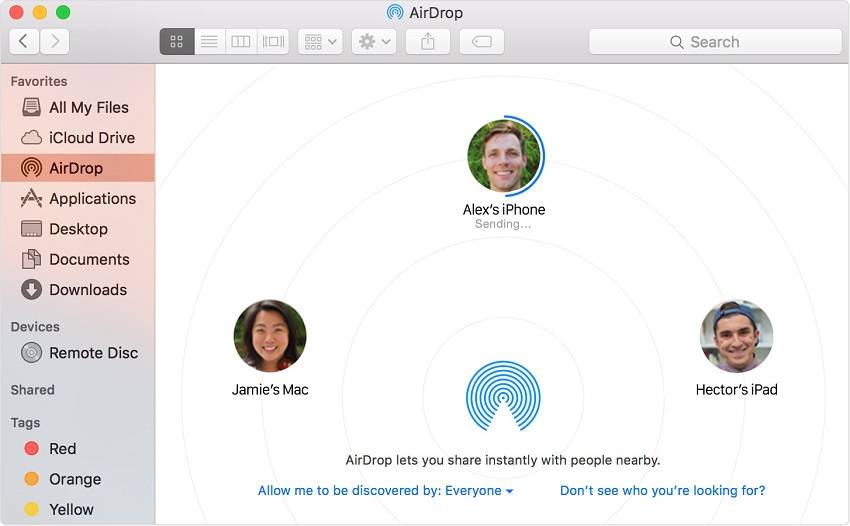
How to transfer photos from Mac to iPhone via AirDrop:
Step 1. Turn on AirDrop on your Mac. Learn how to fix the AirDrop not working issue in case of need.
- Go to "Finder" > "Go" > "AirDrop" and switch on "Bluetooth" and "WiFi" to turn on AirDrop on your Mac.
- Set the option "Allow to be discovered by" as "Everyone" or "Contacts Only."
Step 2. Turn on AirDrop on your iPhone.
- Swipe up from the top/bottom of your device screen to open "Control Center."
- Tap on AirDrop and set your iPhone to be discovered by "Contacts Only" or "Everyone."
Step 3. Once the Mac and the iPhone are connected. You can send photos from Mac to iPhone using AirDrop freely. There are two ways to transfer photos from Mac to iPhone without iTunes using AirDrop.
- Drag the photos you want to send from Mac to iPhone to the recipient's image and click "Send."
- Or you can click the "Share" button in an App, choose "AirDrop," choose the recipient, and then click "Done."
Step 4. Check the transferred items in the Photos app on your iOS device.
![How to transfer photos from Mac to iPhone via AirDrop]()
Method 4. Move Photos from Mac to iPhone with Google Photos
Using AirDrop is not the only solution to transfer photos from your Mac to your iPhone wirelessly. Cloud-based photo-sharing services like Google Photos allow you to share photos across your devices. To use cloud storage services to sync files across your devices, you need to make sure:
- You are using the same account on both your Mac and iOS devices.
- There is enough iCloud storage space for you to store the files.
Ensure the requirements are met and follow the steps below to transfer photos from Mac to iPhone.
Step 1. Upload photos from Mac to Google Photos.
- If you have installed Google Photos for Mac, upload photos from the app directly.
- If not, go to Google Photos, sign in, and click the "Upload" button to send photos from Mac.
Step 2. Download and install the Google Photos app on your iPhone.
Step 3. Sign in with the account you used to upload the photos.
Step 4. Then, all your photos imported from your Mac will be displayed. You can select and download photos you want to your iPhone.
![How to transfer photos from Mac to iPhone with Google Photos]()
These four proven ways to transfer photos from Mac to iPhone without iTunes. Among them, using EaseUS MobiMover and iTunes allows you to share photos from Mac to iPhone via a USB cable, while the other two help you to send photos wirelessly. If you prefer to import pictures from Mac to iPhone without iCloud, apply one of them to get things done within minutes.
Part 2. Sync Photos from Mac to iPhone with iCloud
By enabling iCloud Photos or iCloud Photo Library on the Mac, your photos will be automatically uploaded to your iCloud account and eventually sync with all your Apple devices using the same Apple ID. To use iCloud, you'll need to:
- Make sure there is enough iCloud storage available.
- Install the Photos app on your Mac (macOS Yosemite and later) if you don't.
- Create a folder to house the photos you wish to export on your Mac.
If you've prepared well, you can follow the steps below to transfer photos from Mac to iPhone. Note that iCloud offers two options for users to manage files: one is via the iCloud Control Panel, and the other is via the iCloud website. You can apply the one you prefer.
Option 1. Use the iCloud Photos app
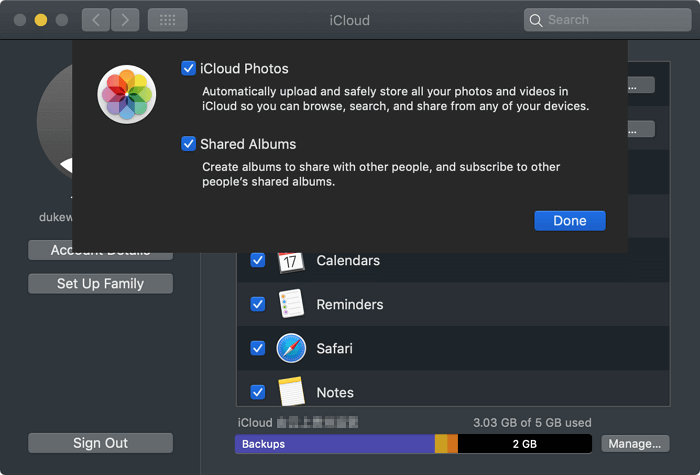
Step 1. On your iPhone, go to the "Settings" app and choose [your name] > "iCloud" > "Photos."
Step 2. Ensure you have enabled "iCloud Photos." (Turn on "iCloud Photo Library" in earlier iOS versions.)
Step 3. On your Mac, go to the Apple menu and choose "System Preferences."
Step 4. Choose "iCloud" and sign in.
Step 5. Click "Options" next to "Photos" and switch on the "iCloud Photos" option. Click "Done."
Step 6. After the syncing process, you can go to the Photos app on your iPhone to check the images.
![How to transfer photos from Mac to iPhone wirelessly using iCloud]()
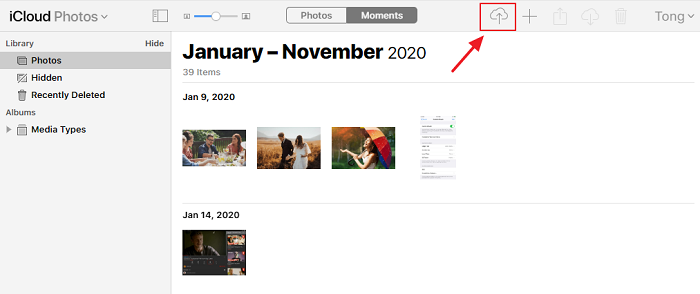
Option 2. Use the iCloud Website
Step 1. Likewise, make sure your iCloud Photos/iCloud Photo Library has been enabled on your iPhone.
Step 2. Open icloud.com on a new web browser and sign in to your Apple ID.
Step 3. From the iCloud page, choose "Photos."
Step 4. Click "Upload" (It looks like a cloud) at the top of this page.
Step 5. Choose the images from the folder on your Mac that you want to upload.
Step 6. Click "Choose."
Step 7. Then, all your photos will be uploaded to iCloud Photos.
![Upload Pictures from Mac to iPhone]()
Part 3. Bonus Tip on How to Transfer Photos from PC to iPhone
Learning about tips on how to transfer photos from a PC to an iPhone is important if you're planning to switch your Mac to a PC one day. As shown in our previous guide, you have six options to transfer photos from a PC to an iPhone, which is to use an iPhone data transfer tool, iTunes, iCloud, Google Photos, the Dropbox app, and OneDrive. The steps are much like the steps we introduced above, so we won't detail them here. For more details, you can navigate to our previous guide on how to transfer photos from a PC to an iPhone.
Did You Get All the Methods for Data Transfer Between a Mac and an iPhone?
Now you know how to put photos on an iPhone from a Mac using different ways. If you also need to add other types of content to your iPhone or iPad from a Mac, refer to the guide on how to transfer files from Mac to iPhone/iPad to learn more details. Whether you prefer to use iCloud or not, you can try the methods in this article to effectively transfer photos from Mac to iPhone. It is most recommended to take advantage of EaseUS MobiMover to help you transfer photos from Mac to iPhone or vice versa with one click. This professional data transfer software works well on transferring everything from iPhone to iOS devices, Android devices, or computers. Just have a try!
Frequently Asked Questions on How to Transfer Photos from Mac to iPhone
Do you want to learn more about data transfer between a Mac and an iPhone? If you do, here are some frequently asked questions related to this topic for you to refer to.
1. Can I drag and drop photos from iPhone to Mac?
You can't directly drag and drop photos from your iPhone to your Mac, but you can transfer iPhone photos to your Mac using AirDrop and then change the location of your photos using drag and drop. To do this, you will need to airdrop iPhone photos to Mac by following the steps introduced in this guide. Then, open Finder on your Mac, and click "Downloads" in the left-hand sidebar. Next, you can drag and drop your iPhone photos into a new folder you created.
2. Why can't I sync photos from Mac to iPhone?
The "can't sync photos from Mac to iPhone" issue can be caused by many factors, some of which include:
- You didn't activate iCloud Photos.
- You haven't signed into the same Apple ID on your Mac and iPhone.
- There's something wrong with your iCloud Photos on the server side.
- Your Mac is running out of storage.
- Your Mac's operating system is outdated.
3. How do I automatically sync photos from iPhone to Mac?
You can sync photos from iPhone to Mac automatically with iCloud Photo. Before doing that, ensure you've had the latest iOS and macOS installed on your iPhone and Mac. Also, ensure both devices are connected to a stable Wi-Fi network. Then, you can follow these steps to sync photos from iPhone to Mac.
Step 1. On your iPhone, go to Settings > [your name] > iCloud > Photos, and then turn on the iCloud Photo Library.
Step 2. On your Mac, go to System Preferences > iCloud > Options next to Photos and then toggle on the iCloud Photo Library.
If you have any further queries or worries concerning this guide, you're welcome to get in touch with me on Twitter. Share this post with your friends if you find it helpful!
 NEW
NEW HOT
HOT