Applies to: USB flash drive, external hard drive, or other external storage devices
Transferring photos from iPhone to a flash drive or external hard drive on Mac could satisfy your needs of backing up your precious photos and saving your device space.
Since both iPhone and Mac are Apple devices, it's quite straightforward for you to import photos from iPhone to an external hard drive or flash drive using Mac. That's because there are pre-installed apps on Mac that work well to import photos from iPhone to an external storage device directly.
Notes: If you want to know how to transfer photos from iPhone to flash drive on a PC, go to the related guide for more details.
Transfer Photos from iPhone to Flash Drive on Mac with Photos
The photo-related app that you feel most familiar with is probably Photos, no matter whether you are using a Mac or PC. As the default photo management app on Mac, Photos enables you to import photos from iPhone or an external device, including iPhone. Thus, you can also use this app to transfer photos from iPhone to Mac.
Via the Photos app, you will be able to import photos from your iPhone to a flash drive or external hard drive on Mac directly. All you need is to change the destination folder before you start.
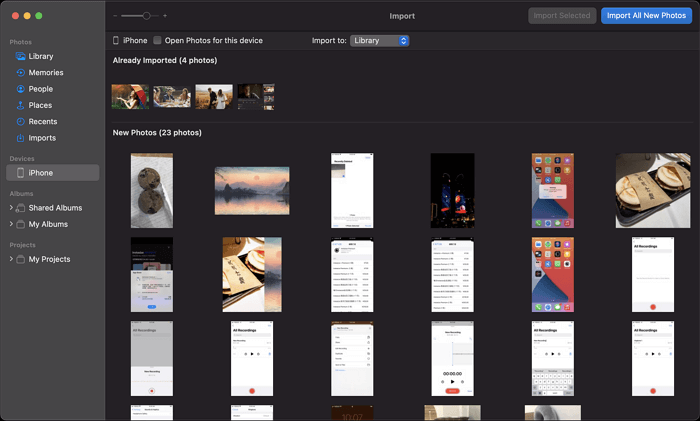
To transfer photos from iPhone to an external hard drive or flash drive on Mac:
Step 1. Connect both the iPhone and the external storage device to the Mac.
Step 2. Unlock iPhone and click "Trust" in the prompt to trust the computer.
Step 3. Open Photos on Mac, go to the "Devices" section and click your iPhone.
Step 4. Choose the flash drive or external hard drive as the target storage folder next to "Import To."
Step 5. Click "Import All New Photos" or select the items and choose "Import [number] Selected" to transfer photos from iPhone to the external storage device.
![Import photos with the Photos app on Mac]()
This built-in app on Mac also allows you to transfer photos from iPhone to SanDisk hard drives or USB drives. All you need is to connect the storage device to your Mac.
Transfer Photos from iPhone to External Hard Drive on Mac with Image Capture
When it comes to importing photos from iPhone to an external hard drive on Mac, Image Capture also performs well to get things done. It serves the function of a photo transfer tool that enables you to import photos from a camera or a device that has a camera to your Mac. Thus, you can also transfer photos from iPhone to a flash drive or external hard drive on Mac with the help of it.
Undoubtedly, you can also transfer videos from iPhone to Mac or an external device connected to Mac using Image Capture.
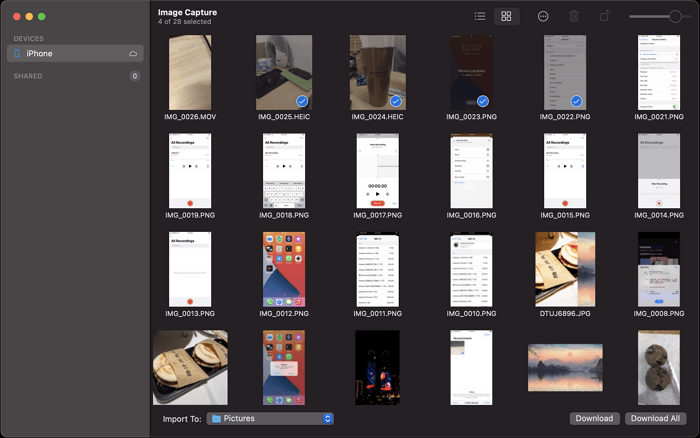
To import photos from iPhone to an external hard drive or flash drive on Mac with Image Capture:
Step 1. Connect the iPhone and external storage device to the Mac.
Step 2. Unlock the iPhone and trust the computer.
Step 3. Open Image Capture and select the iOS device.
Step 4. Click the drop-down menu next to "Import To" to choose your USB or external drive as the storage path.
Step 5. Choose the pictures you want to transfer and click "Download" to save them to the external storage device.
![Import photos with Image Capture on Mac]()
If photos are not importing from iPhone to Mac, you should check on the USB cable you use or follow the troubleshooting guide to fix the issue.
Import Photos from iPhone to External Hard Drive on Mac with EaseUS MobiMover
It's really unnecessary for you to use a third-party tool if you only want to transfer photos from iPhone to a flash drive on Mac. However, if you also need to transfer photos from a flash drive or external hard drive to iPhone, or transfer files between iPhone and Mac, it's advisable to use the reliable iPhone data transfer tool - EaseUS MobiMover.
It is an ideal tool for you to transfer files between iPhone and Mac. In addition to Photos, EaseUS MobiMover also supports videos, music, ringtones, books, contacts, and more. You can either transfer specific items or all content at once.
Other than the data transfer, there are times when you need to back up your iPhone. That's when EaseUS MobiMover will provide flexible choices for you. Unlike iTunes or Finder which saves your iPhone backup in a default folder. This tool allows you to customize the destination folder. That means you can backup iphone directly to external drive if you prefer.
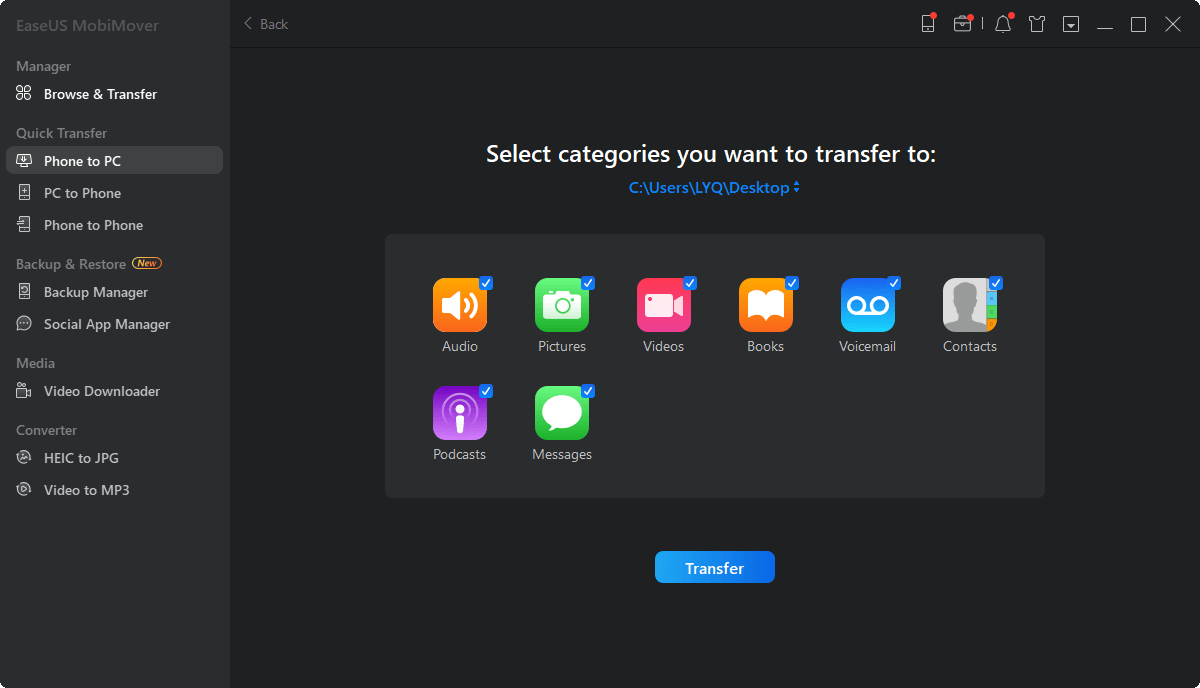
To import photos from iPhone to an external hard drive or flash drive on Mac:
Step 1. Connect your flash drive and iPhone to your computer at the beginning. Start EaseUS MobiMover and choose "Phone to PC" at the left side panel. Then, click the "Next" button to the following step.
Step 2. Keep the genres you'd like to transfer. Except for photos, you can also copy videos, audio, books, podcasts, and more from iPhone to the flash drive as a backup. And, click "Custom Path" to set your flash drive as the destination.
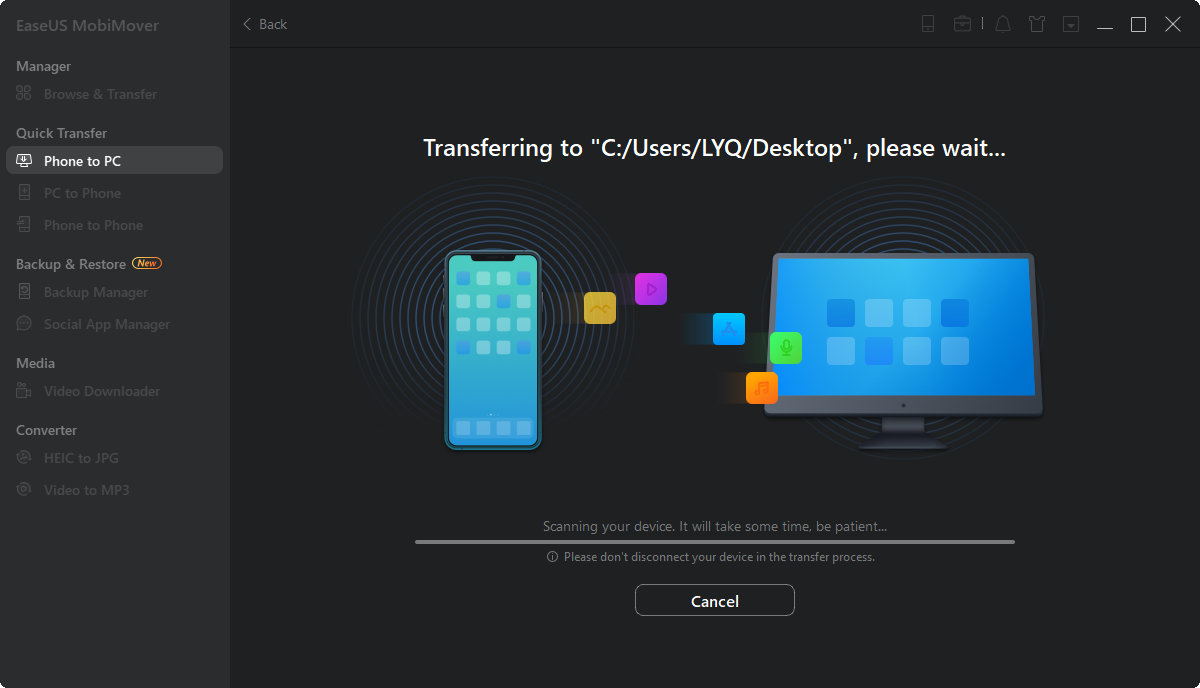
Step 3. Click the "Transfer" button to start transferring photos from your iPhone to your flash drive. When it has completed, you can go to your flash drive to check the items.
These steps also help to transfer photos from iPhone to external hard drive when you need to. Since data transfer from an external storage device to an iDevice is also supported, you can transfer photos from USB to iPhone to move photos back to your phone if necessary.
Transfer Photos from iPhone to USB on Mac via AirDrop
The ways above import photos from iPhone directly to an external hard drive or USB on Mac. While AirDrop is an indirect but still convenient way for you. AirDrop requires no USB connection and no software installation. Thus, you can move photos from your iPhone to an external hard drive or USB flash drive wirelessly.
AirDrop is one of the ways to transfer photos from iPhone to Mac wirelessly. If you need to transfer photos or other types of files like videos, websites, locations, and more without a USB cable, using AirDrop is advisable. If AirDrop is not working on your device, fix it first and then continue.
To copy photos from iPhone to USB or external hard drive on Mac:
Step 1. Go to the Control Center to enable AirDrop on your iPhone.
Step 2. On the Mac, open Finder and go to "Go" > "AirDrop".
Step 3. Turn on Wi-Fi to enable AirDrop if necessary. (Make sure your devices can find each other by setting your devices to be discovered by "Contacts Only" or "Everyone.")
Step 4. Go to Photos on your iPhone, select the pictures you want to transfer, and tap the "Share" button.
Step 5. Choose "AirDrop" and tap the name of the Mac.
Step 6. In the AirDrop window on your Mac, click "Accept" to receive these pictures.
Step 7. Afterward, go to the "Downloads" folder to copy these images to the connected external storage device.
![Send photos from iPhone to Mac with AirDrop]()
3 Frequently Asked Questions
When you transfer photos from iPhone to a flash drive on Mac, here are the problems you may have in mind.
How do I transfer photos from iPhone to USB on Mac?
There are many tools to help. You can either use the built-in apps on Mac like Photos and Image Capture or use a professional iPhone data transfer tool like EaseUS MobiMover. All of them will help you to transfer photos from iPhone to a USB on Mac.
Can you transfer photos directly from iPhone to a flash drive?
Yes, you can. If you use a specially-designed flash drive for iPhone and iPad, you can connect the flash drive to your iPhone directly and complete the photo transfer.
How do I transfer photos from my iPhone to a flash drive without a computer?
As long as you have a USB flash drive for your iPhone, you can connect it to your iPhone directly and complete data transfer without a computer.
The Bottom Line
After you transfer photos from your iPhone to a flash drive or external hard drive, you can delete photos from your iPhone to save space on your iOS device. The ways above are also applicable to transfer videos from iPhone to an external storage device.
 NEW
NEW HOT
HOT