What Is AirDrop
AirDrop is the built-in file-sharing service on Apple devices that allows you to transfer videos, photos, contacts, locations, and more between two AirDrop-supported devices, including iPhone, iPad, iPod Touch, and Mac. It runs on WiFi and Bluetooth and thus enables you to share data wirelessly.
Whether you want to transfer photos from iPhone to iPhone or send videos from iPhone to Mac, AirDrop works well to get it done. You can use AirDrop to transfer files between Apple devices. How do I turn on AirDrop? Below we will discuss how to turn AirDrop on step by step.
How to Turn on AirDrop on iPhone
How to turn AirDrop on? It's actually quite easy to enable AirDrop on iPhone. But the steps to turn on AirDrop slightly varies, depending on the iPhone model you are using. Specify your iPhone model and follow the corresponding guide to turn AirDrop on within seconds.
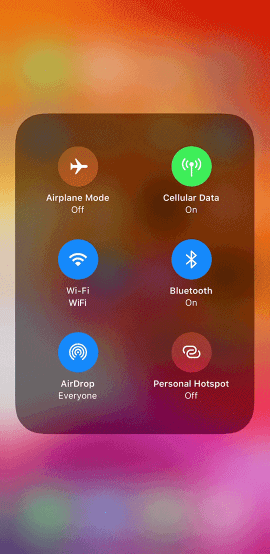
Here's how to turn on AirDrop on iPhone X or Later for everyone:
Step 1. Swipe down from the upper-right corner of your iPhone screen to open "Control Center".
Step 2. Press and hold the network settings card.
Step 3. Tap to turn on both Wi-Fi and Bluetooth. Afterward, touch and hold the AirDrop icon and choose "Contacts Only" > "Everyone". ("Contacts Only" means only your contacts can see your device. "Everyone" means all nearby Apple devices using AirDrop can see your device.)
Turn on AirDrop on iPhone 8 or Earlier:
Step 1. Swipe up from the bottom of your iPhone screen to open "Control Center".
Step 2. Press the network settings card.
Step 3. Tap to enable Wi-Fi and Bluetooth. Then press and hold the AirDrop button. Choose "Contacts Only" or "Everyone" according to your needs.
![How to turn on AirDrop on iPhone from Control Center]()
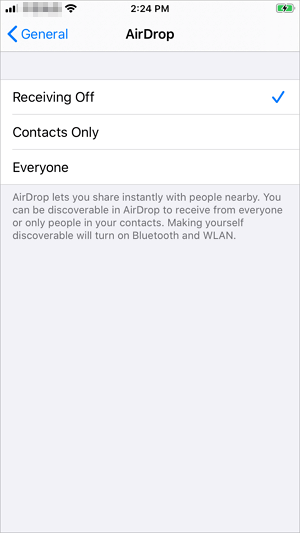
Other than Control Center, you can also enable or disable AirDrop from the Settings app on iPhone 13, iPhone 14, or iPhone 15:
Step 1. Go to "Settings" and tap "General".
Step 2. Tap "AirDrop" and choose "Contacts Only" or "Everyone".
![How to turn on AirDrop on iPhone via Settings]()
If you want to turn off AirDrop on your Apple device, choose "Receive Off" among the options. That's all the steps on how to turn on AirDrop for everyone on iPhone.
How to Use AirDrop on iPhone
After you turn on AirDrop on both the source device and target device, you can now use it to AirDrop photos from iPhone to iPhone or share files between Apple devices. (Make sure the person you are sending to is nearby and within Bluetooth and Wi-Fi range.)
Step 1. On the source device, open the app that contains the item you'd like to share.
Step 2. Select the file or files and then tap the "Share" button.
Step 3. Choose "AirDrop" and tap the AirDrop user you want to share files with.
Step 4. On the target device, click "Accept" in the prompt to start receiving the files.
![How to use AirDrop on iPhone]()
That's how you AirDrop files on iPhone. If AirDrop is not working on your iPhone, go to the related article to see how can you fix it yourself.
Related reading: iOS 17 AirDrop Not Working - How to Fix
How to Turn on AirDrop on Mac
Since Mac also supports AirDrop, you can turn on AirDrop on Mac to share files between your iPhone/iPad/iPod Touch and Mac.
To turn on and use AirDrop on Mac:
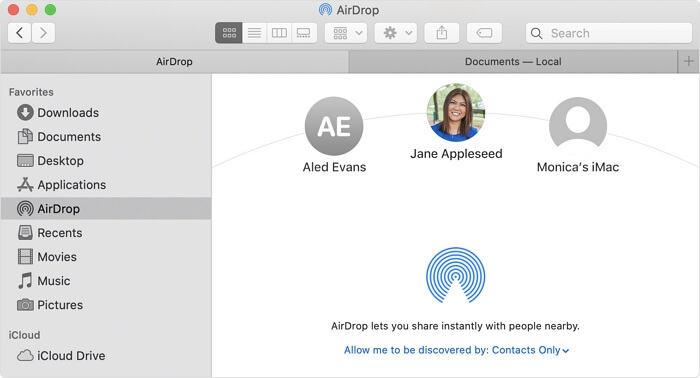
Step 1. Open "Finder" and choose "AirDrop".
Step 2. In the AirDrop window, set the option "Allow me to be discovered by" as "Contacts Only" or "Everyone".
Step 3. To AirDrop from your Mac, you can click the "Share" button in an app, choose "AirDrop" and select the recipient, or drop the files you want to transfer to the recipient shown in the AirDrop window.
![How to turn on AirDrop on Mac]()
Bonus Tip: How to Transfer Files Without AirDrop
It's true that using AirDrop is quite convenient to share files between two Apple devices wirelessly. But it's also undeniable that it has some drawbacks. For example, it doesn't allow you to send music files or share multiple contacts at once. Given that, I'd like to recommend the iPhone transfer software - EaseUS MobiMover for you.
Like AirDrop, EaseUS MobiMover also supports the data transfer between two iDevices or between an iPhone/iPad/iPod and a Mac. But it can do more than that. In addition to Mac, this iOS data transfer tool is also compatible with PC. Besides, this tool transfers photos, videos, music, ringtones, voice memos, contacts, books, and more.
Other than being an iPhone transfer tool, EaseUS MobiMover also serves the function of a video & audio downloader that enables you to download online video and audio files to your computer or iPhone/iPad using URL.
Let me show you how to transfer files from iPhone to iPhone using EaseUS MobiMover:
Step 1. Connect the two iPhones to your computer with compatible USB cables and tap on "Trust This Computer" on the devices by requirement. Launch EaseUS MobiMover and select the "Phone to Phone" mode on the main screen. Switch to the direction you wish to transfer data, and click "Next".
Step 2. MobiMover enables you to transfer the whole or specific iPhone data files directly without using iTunes. You can check the boxes to sync whatever data you need with ease. Click "Transfer" to initiate the process.
Step 3. Now it begins to transfer data from iPhone A to iPhone B without the intervention of iTunes. Don't disconnect your devices until the process finished. When it has done, go to open the corresponding applications to check the synced items.
The Bottom Line
Learning how to turn on and use AirDrop on your iPhone is necessary if you need to share files using your device. But the issue "AirDrop not working" occurs quite frequently due to various reasons. That's why it's also advisable to find an alternative way to transfer files to or from your iPhone, like using an iOS data transfer software tool.
FAQs on How to Turn on AirDrop for Everyone
Below are some commonly asked questions about how to use AirDrop on iPhone for data transfer. Let's check them quickly.
1. How to AirDrop from iPhone to iPhone?
Once you turn on AirDrop on your iPhone, just head to the file that you want to transfer using AirDrop. Then tap Share > AirDrop and follow the on-screen instructions.
2. Can I AirDrop from iPhone to Android?
No, unfortunately, AirDrop is a feature exclusive to Apple devices and is not compatible with Android devices. However, there are alternative methods to transfer files between an iPhone and an Android device, such as using third-party apps like EaseUS MobiMover, Google Drive, Dropbox, or sending files via email or messaging apps.
3. What files can I transfer with AirDrop?
You can AirDrop various types of files and content from one iPhone to another, including photos and videos, contacts, documents, websites, map locations, passbook passes, notes, and voice memos, etc.
4. Why is my AirDrop not working on iPhone?
Here are some troubleshooting steps you can try:
-
Check the AirDrop settings by going to Settings > General > AirDrop on your iPhone and make sure it is set to "Contacts Only" or "Everyone" depending on your preference.
-
Restart both devices by turning them off and then back on.
-
Disable and re-enable AirDrop on both devices.
-
Check for iOS updates by going to Settings > General > Software Update.
-
Check if there are any restrictions set on AirDrop. Go to Settings > Screen Time > Content & Privacy Restrictions > Allowed Apps and make sure AirDrop is allowed.
-
Reset network settings on your iPhone by going to Settings > General > Reset > Reset Network Settings.
 NEW
NEW HOT
HOT