Applies To: iPhone, iPad, or iPod running iOS 8 and later
Photos are the files transferred most frequently between an iPhone and a computer, be it a Mac or a PC. Therefore, it's necessary to know how to transfer photos from PC to iPhone or vice versa so that you can share pictures between your devices freely.
Given that, here we provide SIX proven ways to copy photos from computer to iPhone. Whether you want to transfer photos from PC to iPhone with or without iTunes, you will find a way to do it. Some of the ways are also useful to transfer photos from a computer to iPhone without iTunes.
| Method |
Tool |
Effectiveness |
| Transfer with USB |
EaseUS MobiMover |
It is a good option to transfer photos from PC to iPhone with USB while avoiding iTunes synchronization. |
| iTunes |
The default way to copy pictures from a PC to an iPhone. (folders only) |
| Transfer without USB |
iCloud |
It lets you sync photos across your devices, such as your laptop, Windows computer, and Mac, with the same Apple ID. |
| Google Photos |
Similar to iCloud, it enables you to transfer photos from computer to iPhone automatically. |
| Dropbox |
With Dropbox, you can send photos from PC to iPhone easily without a USB cable to connect your devices. |
| OneDrive |
It is the built-in file synchronization service on Windows and is also available for iOS, thus making photo transfer from PC easier. |
| iPhone to PC |
Windows File Explorer |
You can use Windows File Explorer to import photos to PC from iPhone without downloading any software. |
Part 1. How to Transfer Photos from PC to iPhone With USB
There are two options to transfer photos from PC to iPhone with USB. One is to use iTunes, and another is to use an iPhone data transfer tool - EaseUS MobiMover. Compared with the two options, the EaseUS MobiMover is way better in aspects of the interface, supported file types, data management ability, and compatibility. More specifically, EaseUS MobiMover offers superior features like:
- 🌟Intuitive interface. It displays all of its functionality in a clear and organized way, letting you know where to find the suitable feature without wasting time discovering hidden features.
- 💎Various kinds of files are supported. You can quickly transfer contacts, messages, videos, audio, photos, and more from your iPhone/iPad/iPod to your computer and vice versa.
- 🏅Excellent data management ability. It offers the ability to transfer various files between iOS devices or between an iOS device and a computer.
- 👍Good compatibility. It supports all models of iOS devices and works well with Windows and macOS.
All in all, EaseUS MobiMover is a good choice if you have a lot of files to transfer or want to get rid of iTunes' synchronization. We will show you how to transfer photos from a PC to an iPhone with EaseUS MobiMover and iTunes. Both of them also work to transfer files from iPhone to PC.
Method 1. One Click to Transfer Photos from PC to iPhone with USB
Compatible with: PC running Windows 7 or later, Mac running OS X 10.7 and later
EaseUS MobiMover is a reliable iOS data transfer software tool that has helped many iPhone/iPad/iPod users to transfer files between iPhone and Mac/PC or between two iOS devices. Unlike iTunes, it won't cause data loss on the target iPhone, iPad, or iPod. Thus, if you want to copy photos to your iPhone without data loss, you are recommended to use this iOS content manager instead of iTunes.
Other features of EaseUS MobiMover:
- iPhone Backup & Restore - Back up and restore iPhone without iTunes or iCloud
- WhatsApp Backup & Restore - Back up WhatsApp messages and attachments and restore WhatsApp data to another iPhone
- Video Download - Download videos from YouTube and many other sites to a computer or iPhone/iPad
To import photos (and videos) from PC to iPhone:
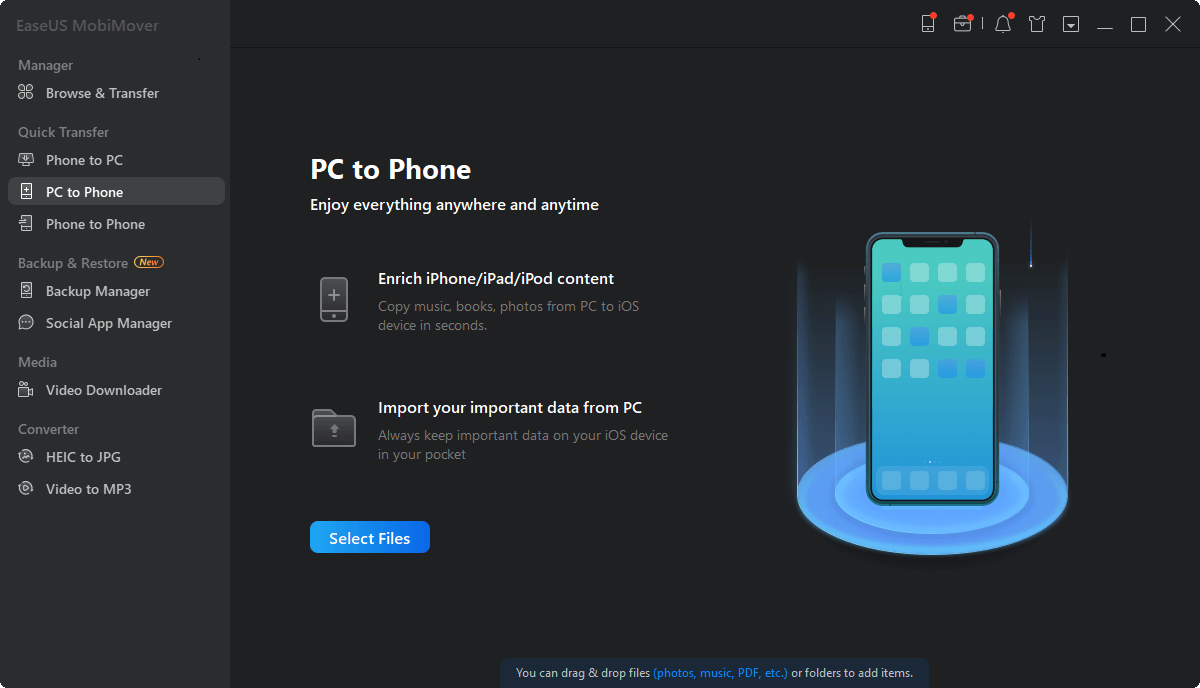
Step 1. Connect your iPhone to your PC running Windows 7 or later. Launch EaseUS MobiMover and select "PC to Phone" on the main interface. Then, choose "Select Files" to continue.
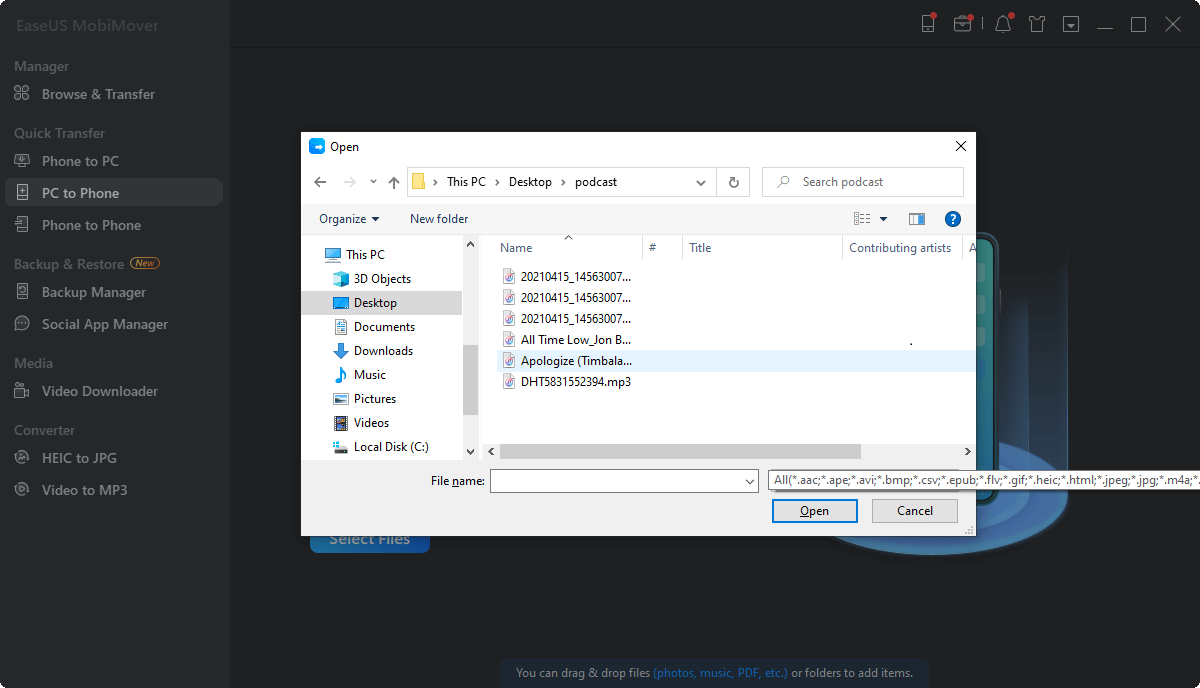
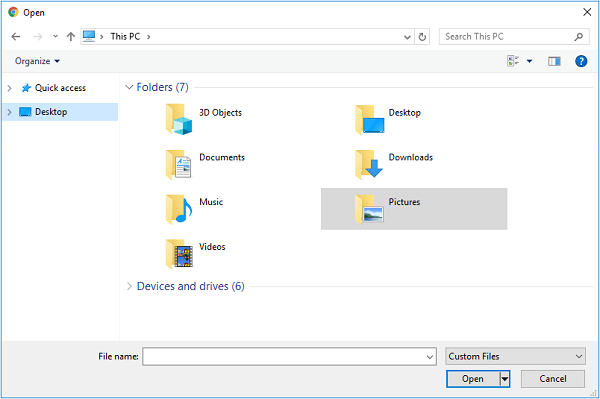
Step 2. With MobiMover, you can choose to transfer photos from PC to your iPhone as well as many other data types. Then, click the "Open" button to load the files.
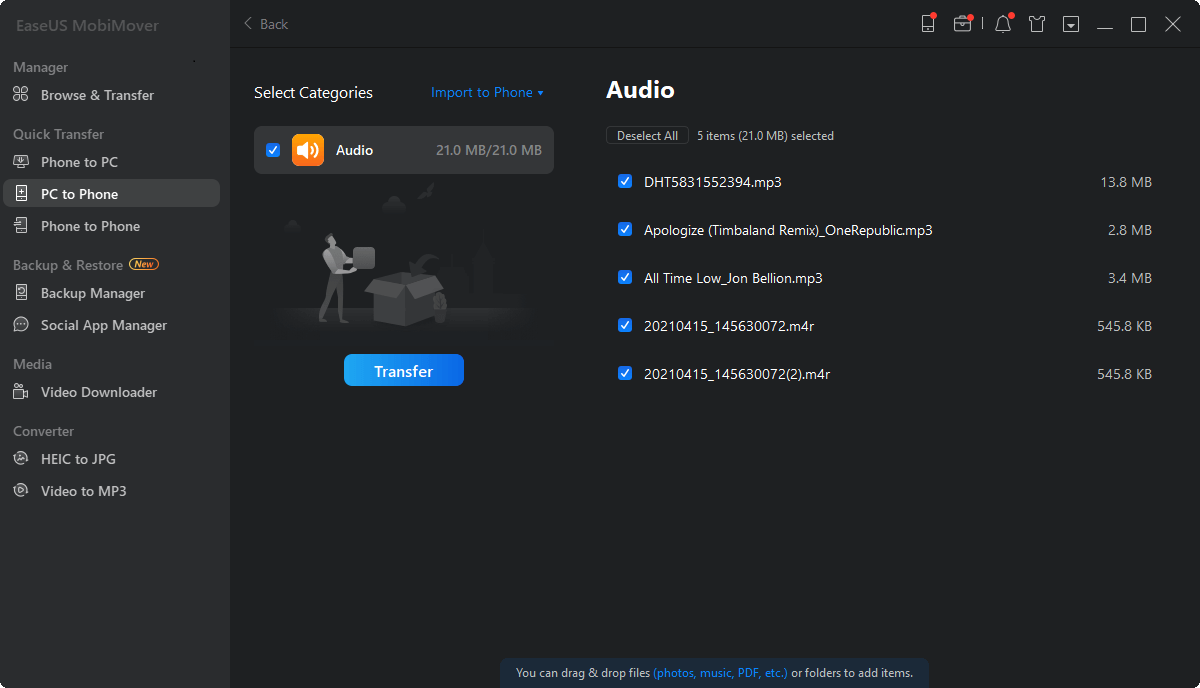
Step 3. MobiMover will show the files you've selected on the screen. If you've missed an item, you can click "Add Contents" to import more files. Next, click the "Transfer" button to start the transfer process.
Afterward, you can check the photos on your iPhone in the Photos app.
This tool supports transferring various file types on your iOS device, including photos, videos (TV shows, movies, or more), audio files (music, ringtones, audiobooks...), contacts, messages, etc. Besides, it also helps to transfer files from PC to iPad. Other than the data transfer feature, you can also use the file management features to access your iPhone or iPad content from the computer, delete files on your iPhone or iPad on a PC in bulk, or add new items to your device.
Whenever you want to transfer photos from iPhone to iPhone without iCloud or iTunes, you can try this tool.
Besides, data transfer between an iPhone and a storage device connected to your computer is also practical using EaseUS MobiMover. That means you can transfer photos from Canon to iPhone or transfer photos from iPhone to flash drive using this tool.
Download and install EaseUS MobiMover to gain more control over your iPhone, iPad, and iPod.
Method 2. Move Photos from PC to iPhone Using iTunes
Transferring photos from a computer to iPhone using iTunes is considered the default way to copy pictures to an iOS device from a PC. Instead of moving specific photos, iTunes only supports transferring folders. Moreover, you'll need to have iCloud Photos disabled before using this approach. Here's how to do it: Go to Settings > [your profile] > iCloud > iCloud Photos, and disable this option. Using iTunes is also a proven way to transfer songs from Windows to iPhone.
How to transfer photos from PC to iPhone with iTunes:
Step 1. Connect your iPhone to your PC with a USB cable. Run iTunes if it doesn't open automatically.
Step 2. Click the "Device" tab and select "Photos."
Step 3. Check "Sync Photos," then click the box next to "Copy photos from."
Step 4. Click "Choose folder..." and then select a folder that contains the photos you wish to transfer.
Step 5. Click "Apply" to start syncing photos to your iPhone or iPad from the computer.
![How to transfer photos from PC to iPhone with iTunes]()
Now you know how to copy photos from PC to iPhone with iTunes. One more thing you should know is that this method won't work if iCloud Photos is enabled on your iPhone. Thus, to transfer photos from PC to iPhone using iTunes, you should turn off iCloud Photos on your iOS device.
Part 2. How to Transfer Photos from PC to iPhone Wirelessly
If you prefer a wireless way to transfer photos from PC to iPhone, you can consider using iCloud or third-party cloud services like Google Photos, Dropbox, or OneDrive.
Method 1. Transfer Pictures from Computer to iPhone Using iCloud
If you prefer to wirelessly transfer photos from PC to iPhone, using iCloud is a good choice. iCloud enables you to sync files across your devices that use the same Apple ID. Thus, you can also use iCloud to transfer files from PC to iPad, sync music from Mac to iPod, transfer apps from iPhone to iPhone, and more.
iCloud offers two sync options, depending on whether you've had iCloud for Windows installed on your computer. While transferring photos with iCloud, you may encounter the issue - photos didn't transfer to your new iPhone. If you do, check the proven fixes in the troubleshooting guide.
If you have installed iCloud for Windows on your computer, you can move photos from your PC to your iPhone by turning on the iCloud Photo Library. With this option on, you can upload pictures from your PC to iCloud, and the photos in iCloud will be synced to your iPhone when connected to WiFi.
Here are the detailed steps for how to transfer photos from Windows to iPhone:
Step 1. Go to "Settings" > [your name] > "iCloud" on your iPhone.
Step 2. Scroll down to choose "Photos" and toggle on "iCloud Photo Library."
Step 3. Open iCloud for Windows on your computer.
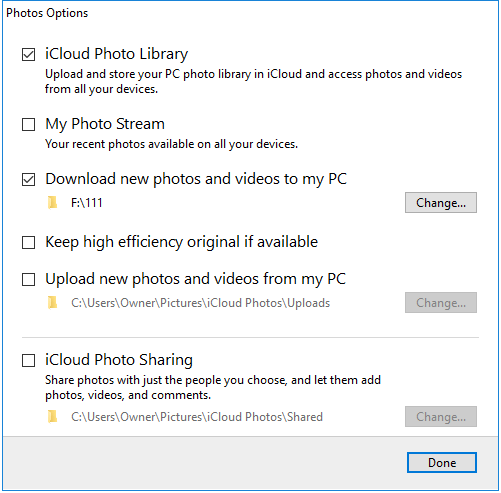
Step 4. Click "Options" next to Photos and enable "iCloud Photo Library."
Step 5. Ensure "Upload new photos and videos from my PC" is turned on. Tap on "Change" under this option to choose the folder with the photos you want to transfer from your PC to your iPhone.
![How to transfer photos from PC to iPhone with iCloud]()
If you don't have iCloud installed on your computer, you can upload the pictures on your PC to iCloud via iCloud.com. Similarly, by enabling iCloud Photo Library on your iPhone, these images will be synced to your device when connected to WiFi.
Step 1. Go to "Settings" > [your name] > "iCloud" > "Photos" and switch on "iCloud Photo Library."
Step 2. Visit iCloud.com from your computer and enter your Apple ID and password.
Step 3. Choose "Photos" and click the "Upload photos" button in the top-right corner of the screen.
Step 4. Select the pictures you want to copy to your iPhone from your PC and click "Open."
Step 5. Wait for the photos to be uploaded to iCloud.
![How to transfer photos from PC to iPhone via iCloud Photos]()
These steps also help to transfer photos from iCloud to iPhone. iCloud has the advantage of allowing you to transfer photos from the computer to the iPhone wirelessly. But you need to know that iCloud provides limited free space (5GB). The free iCloud storage may not be enough for you. In that case, you need to pay for the extra storage monthly.
Method 2. Import Photos from PC to iPhone via Google Photos
In addition to iCloud, other cloud storage services enable you to sync photos from your computer to your iOS device automatically, like Google Photos, Dropbox, and OneDrive. Whether you want to transfer MP3 to iPhone or, as in this case, import photos from PC to iPhone, a cloud-based service will help.
How to transfer photos from computer to iPhone:
Step 1. Go to visit Google Photos and log in with your account.
Step 2. You can create a new album to store the images you'd like to copy for your convenience. Click "Create" > "Album" and add a title to the album. (You can also select "Upload" > "Computer" to upload photos directly.)
Step 3. Afterward, click "Add photos" > "Select from computer" to add new photos to Google Photos from the folders on the computer.
Step 4. Go to the App Store and download Google Photos on your iPhone or iPad.
Step 5. Sign in with the account you use on Google Photos on your computer.
Step 6. Select and download the photos to your iPhone or iPad.
![How to transfer photos from PC to iPhone with Google Photos]()
Method 3. Copy Photos from PC to iPhone via Dropbox
Dropbox also allows you to store and access files on all of your devices that use the same Dropbox account. Compared with Google Photos, Dropbox supports more types of content. It helps to transfer photos, audio files, documents, and more data from PC to iPhone. Thus, if you don't know how to transfer music from PC to iPhone without iTunes, using Dropbox could be one of the answers.
To send photos from PC to iPhone with Dropbox:
Step 1. Download and install Dropbox on your PC and iPhone. Then sign in with the same account.
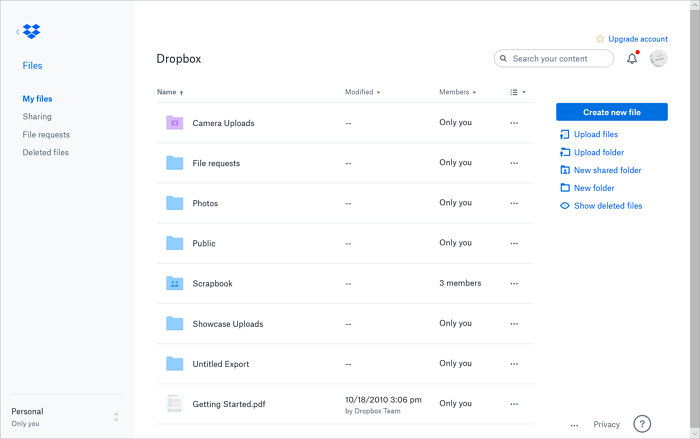
Step 2. Open Dropbox and go to "Files" > "My files" > "Upload files" to upload pictures from the PC to Dropbox.
Step 3. After syncing, go to the Dropbox app on the iOS device to access the photos from your computer.
![How to transfer photos from PC to iPhone via Dropbox]()
Method 4. Get Photos from PC to iPhone using OneDrive
OneDrive is the built-in file synchronization service on Windows and is also available for iOS. There's no doubt that you can use this service to add photos to your iPhone from a PC. In addition, when you are looking to transfer photos from iPhone to an HP laptop, using OneDrive is also an advisable choice.
To transfer photos from PC to iPhone with OneDrive:
Step 1. Set up OneDrive on your PC.
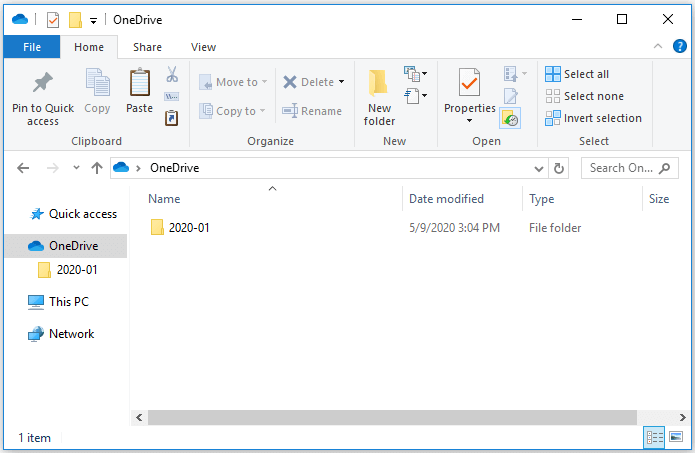
Step 2. Copy the photos you want to transfer to your iPhone to the OneDrive folder on your PC.
Step 3. Download and install the OneDrive app on your iPhone and sign in with the account you use on your PC.
Step 4. Wait for the process to complete, and then go to the OneDrive app to check the pictures from the PC.
![How to transfer photos from PC to iPhone using OneDrive]()
Similar to iCloud, other cloud storage services also have limited space. If you have GBs of images to transfer, syncing photos may take a long time.
The methods above will help you transfer photos from PC to iPhone without iTunes. The first one requires you to connect your iPhone to a computer with a USB cable, while the last four ways require a WiFi connection. Choose the one you prefer to apply.
If you find these fixes helpful, please share this full-of-solutions article with your colleagues and friends.
Part 3. How to Transfer Photos from iPhone to PC
In addition to using iTunes, all the methods detailed above also apply to transferring photos from iPhone to PC. Apart from these tips, you can also use Windows File Explorer to import photos from iPhone to PC.
To transfer photos from iPhone to PC:
Step 1. Connect the iPhone to the PC with a USB cable and trust the computer.
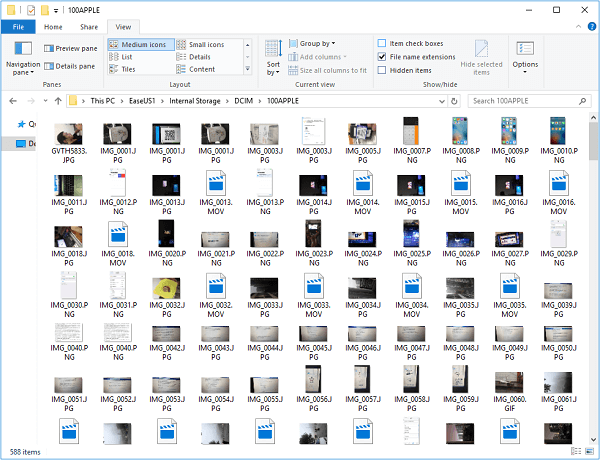
Step 2. After your iPhone is recognized by the computer, go to "This PC" > [your iPhone name] > "Internal Storage" > "DCIM" > "100APPLE".
Step 3. You will see all the photos and videos on your iPhone camera roll. Copy the items you want to transfer and paste them to a folder on your PC.
![How to transfer photos from iPhone to PC]()
The Bottom Line: Transfer Photos from PC to iPhone Now
The ways to transfer photos from a computer to iPhone (or iPad) include using iPhone data transfer software, iCloud, Google Photos, Dropbox, OneDrive, and iTunes. For your information, here is a brief conclusion:
- EaseUS MobiMover: Put photos to iPhone without data loss.
- iTunes: Transfer photos from a computer to iPhone or iPad and may cause data loss.
- Cloud storage services: Transfer photos from PC to iOS devices via WiFi.
Whether you want to transfer photos from laptop to iPhone or import photos from PC to iPhone 12, iPhone 11, or earlier iPhones, you can apply one of the methods above to get things done. Just carry out the one best suited to your needs.
If you are a Mac user, you can also use one of the tips above to transfer photos from Mac to iPhone or iPad. What's more, there is a different way for Mac users to use AirDrop. For more details, go to the guide on transferring photos from Mac to iPhone.
Frequently Asked Questions About Photos Transfer Between a PC and an iPhone
Knowing more about transferring photos from a PC to an iPhone can help you solve many problems, like the following questions.
1. Why can't I transfer photos from my PC to my iPhone?
Many factors may make it difficult to transfer photos from your PC to your iPhone, some of which might be:
- Your iOS system is out of data. Regularly updating your iOS system can help you fix many common errors with your device, so we recommend you update your iPhone if it is not running the latest version of iOS.
- Copy too many photos to your iPhone at one time. Sometimes, errors might occur when you copy too many photos at one time. You can try sending photos to your iPhone in small batches.
- There is no iTunes on your computer. iTunes can help to recognize your iPhone. Hence, ensure you have installed one on your computer.
- Your drivers are out of date. Therefore, you need to update your driver, which can be down automatically or manually. If you don't know how to do it, you can use a dedicated tool to help.
- You didn't allow your iPhone to trust your computer. Whenever we connect our device to the computer to handle a task, a window will pop up on our iPhones, asking us to trust the computer. The computer will fail to recognize your device if you refuse to trust it.
- There is no sufficient storage space on your iPhone. If needed, clear unwanted data or delete some apps.
If none of the solutions discussed above fix the problem, you can consider using a third-party tool - EaseUS MobiMover- to help you quickly transfer photos to your iPhone.
2. Can I transfer photos from a PC to an iPhone via Bluetooth?
The answer is YES. But first of all, you'll need to ensure your computer is Bluetooth-supported. Besides, using Bluetooth to transfer files is insecure and slow. So you might need to wait patiently for the process to complete if you have many files to transfer. Now, follow these steps to transfer photos over Bluetooth.
Step 1. Enable Bluetooth on your iPhone. You can do this either via the Control Panel or Settings.
Step 2. Place your iPhone near your computer, open its Start menu, and click on the gear icon.
Step 3. Find Devices > Bluetooth and Other Devices. Ensure the Bluetooth is enabled.
Step 4. Once Bluetooth is enabled, you can let it discover the nearby device.
Step 5. Select your device from the list of available devices on your PC and authenticate the connection by inputting a one-time generated code.
Step 6. Once two devices are connected successfully, you can start transferring files.
3. How do you transfer live photos from a PC to an iPhone?
You can't directly transfer live photos to your iPhone from a PC, but you can do this using some services and third-party transfer tools. You can easily find such tools from Google using some keywords like "transfer live photos from PC to iPhone."
 NEW
NEW HOT
HOT