Five ways how to put movies on iPad and one way how to download a movie to iPad directly.
An iPad has a bigger screen than an iPhone and has better portability than a computer. That's why so many of you prefer to watch videos with an iPad. To enjoy your favorite movies or TV shows on the tablet, you will need to put the videos onto your iPad first. Given that, here I will show you five ways to add movies to your iPad. Whether you are using a PC or Mac or want to use iTunes or not, you will find the way that fits your needs.
Part 1. How to Put Movies on iPad with iTunes
Applies to: PC and Mac running macOS Mojave or earlier
If the movies you want to add to your iPad are purchased from iTunes, or the movie file is in your iTunes library, the most straightforward way to put movies to your iPad is to sync movies to your device using iTunes.
Before you start, you should know that if you use iTunes syncing, the existing files like movies, TV shows, and books on your tablet will be replaced by the newly added movies. That means you will lose the files currently on your iPad. If that's unwanted, go to part 2 to learn how to put movies on iPad without iTunes.
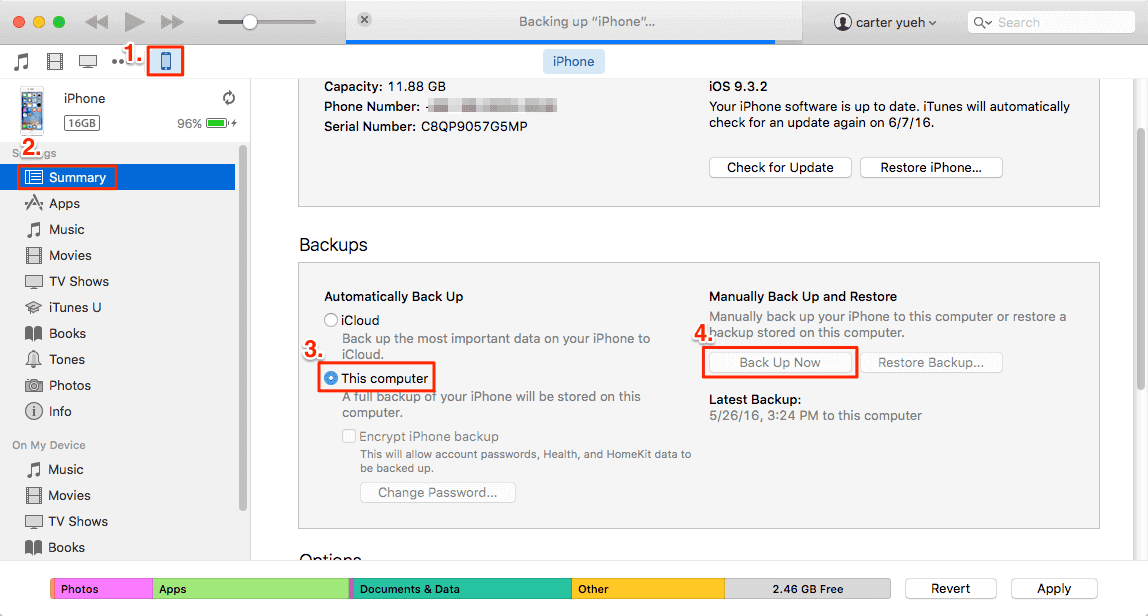
To put movies on iPad with iTunes:
Step 1. Connect your iPad to the computer with a USB cable. (Then iTunes will run automatically.)
Step 2. Unlock your iPad and trust the computer.
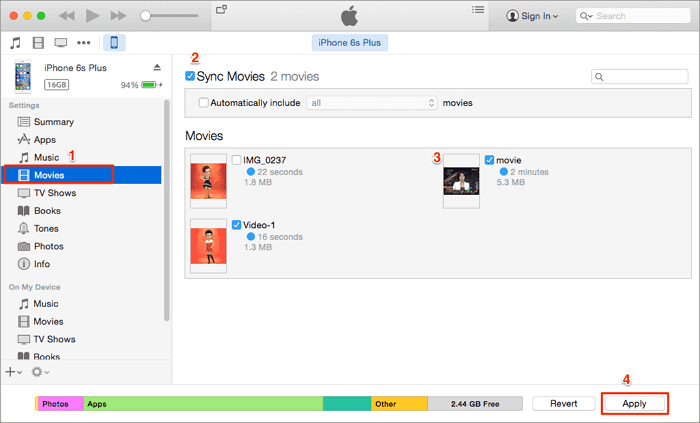
Step 3. In iTunes, click the device icon and choose "Movies."
Step 4. Select "Sync Movies" and choose the items you want to copy to your device.
Step 5. Click "Apply" to start adding movies to your iPad.
![How to put movies on iPad with iTunes]()
Since macOS Catalina, iTunes is no longer available. That's why you need to find an alternative way to get movies on your iPad from the computer. Read on to learn how to add movies to your iPad without iTunes.
Part 2. How to Put Movies on iPad Without iTunes
iTunes is not your only choice to copy movies to iPad. Except for using iTunes, there are four more ways for you to transfer videos to an iPad, including using the iOS data transfer tool, VLC media player, iCloud Drive, and Finder.
| Method |
Effectiveness |
Difficulty |
| EaseUS MobiMover |
If the video files are downloaded on your computer, you can use MobiMover to transfer without losing data. |
Easy
●○○○
|
| VLC |
With the Wi-Fi sharing feature in the VLC app for iOS, you can download movies to your iPad wirelessly over Wi-Fi. |
Moderate
●●●○
|
| iCloud Drive |
You can store types of files in iCloud Drive as long as they don't exceed your iCloud storage limit. |
Moderate
●●○○
|
| Finder |
With Finder, a feature used for data syncing and device backups, you don't have to download any third-party software. |
Moderate
●●○○
|
Method 1. Put Movies on iPad with EaseUS MobiMover
Applies to: PC running Windows 7 or later and Mac running Mac OS X 10.8 or later
If you have downloaded movies on your computer and want to transfer the movies to your iPad safely without data loss, you will like the iOS data transfer software - EaseUS MobiMover.
In addition to putting downloaded movies to your iPad, it also allows you to download videos from YouTube, Twitter, Facebook, and many other sites to your computer or iPhone/iPad using the URL. Videos in MP4, MOV, M4V, WMV, RM, MKV, FLV, and AVI are all supported.
To transfer movies to iPad (or iPhone) without iTunes:
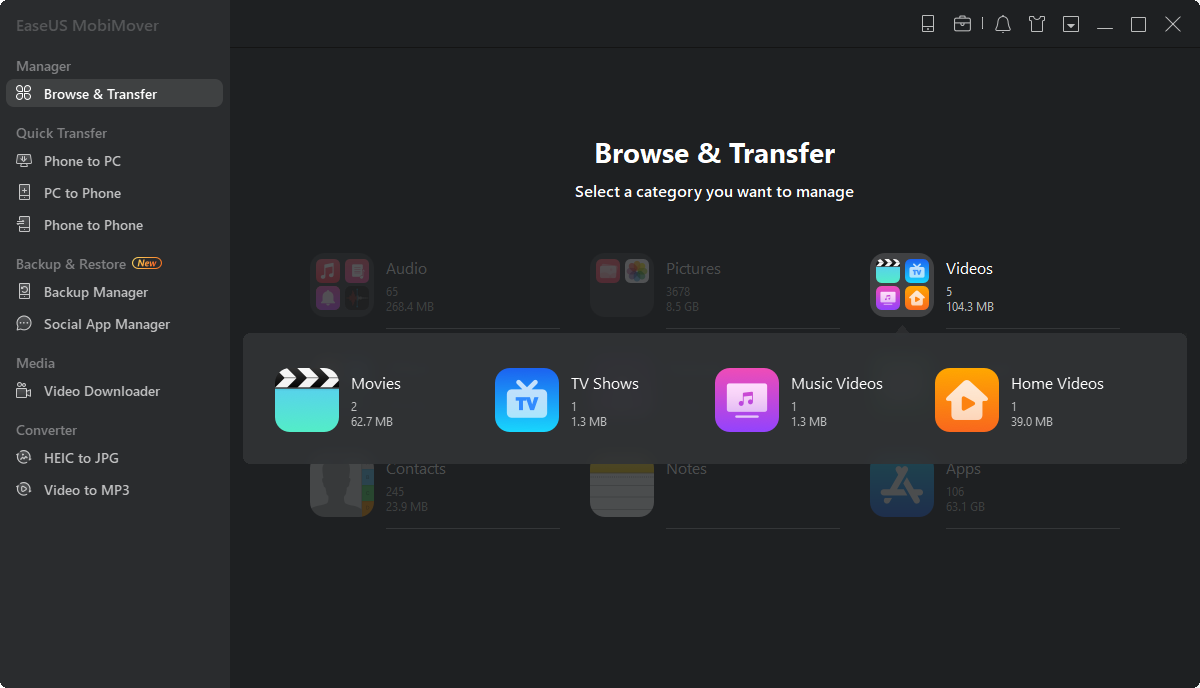
Step 1. Connect your iPhone/iPad to your computer and launch EaseUS MobiMover. On your iDevice, click "Trust" to trust your computer. Then go to "Content Management" > "Videos" > "Movie."
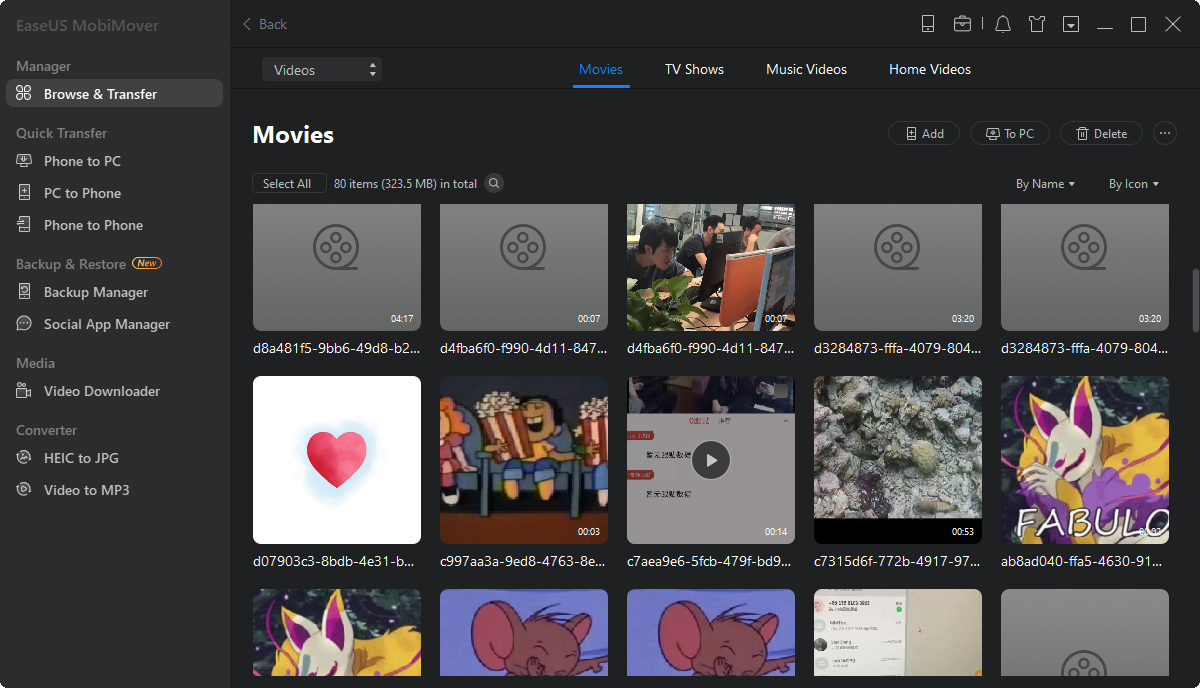
Step 2. To transfer videos from PC to iPhone or iPad, choose "Add Contents."
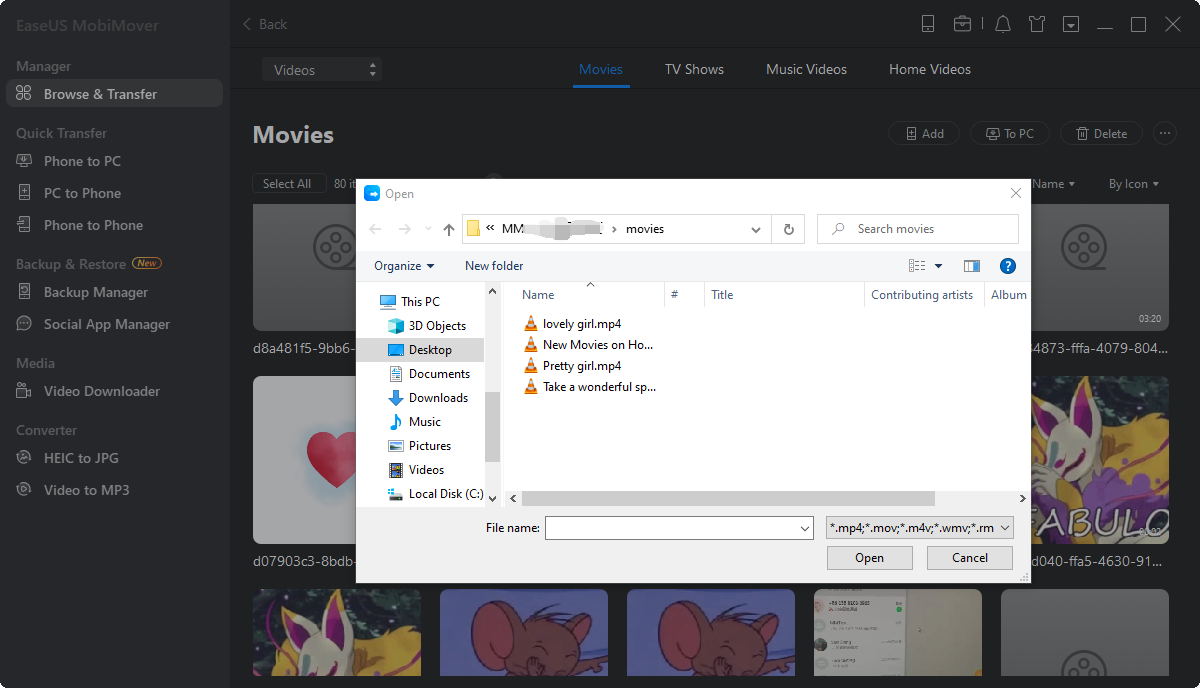
Step 3. Select the movies you want and click "Open" to transfer from computer to your iPhone/iPad. You can transfer videos in MP4, MOV, M4V, WMV, RM, MKV, AVI, and FLV format. (If your video format is not supported by EaseUS MobiMover, it will be converted to MP4 automatically during the transfer process.)
This tool supports data transfer between an iPhone/iPad and a computer or between two iDevices. Except for videos, it also transfers photos, music, ringtones, books, and more. Get it now and take full control over your iPad content.
Method 2. Add Movies to iPad with VLC
Applies To: PC and Mac
We have shown you that it's workable to transfer videos from PC to iPad using the VLC media player. That's no exception when it comes to adding a movie to iPad.
With the Wi-Fi sharing feature provided in the VLC app for iOS, you are able to download movies to your iPhone or iPad wirelessly over Wi-Fi from the computer, as long as your devices are under the same network connection. Download and install the VLC app on your iPad from the App Store. Afterward, follow the steps below to learn how to save movies to iPad from a computer.
To put movies on iPad via VLC:
Step 1. Open the VLC app and click the VLC icon in the top left corner.
Step 2. Turn on "Sharing via WiFi" and remember the IP address underneath.
Step 3. On your computer, open a browser and enter the IP address (the numbers).
Step 4. To transfer movies to your iPad, you can either add the videos by drag-and-drop or click the plus icon. Then you will see the movies being transferred to your iPhone wirelessly and automatically.
Step 5. The transferred items will be saved in the VLC app by default. When the transfer process is over, go to the VLC app to check the movies.
![How to add movies to iPad via VLC]()
Method 3. How to Sync Movies to iPad by Using iCloud Drive
Applies To: PC and Mac
You may know that you can transfer videos to iPad using iCloud Photos. But that's not the same while transferring movies to iPad because Apple limits the clip length to five minutes in iCloud photos, which is obviously not the length of a movie file.
To transfer large files to your iPad, you should use iCloud Drive. You can store any type of file in iCloud Drive as long as it's less than 50GB and doesn't exceed your iCloud storage limit.
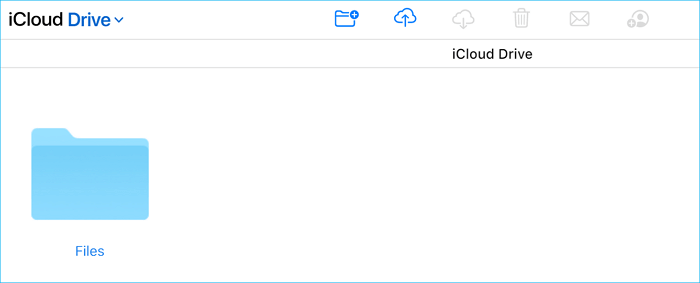
To download movies to iPad using iCloud Drive:
Step 1. Enable iCloud Drive on your iPad by going to "Settings" > [your name] > "iCloud" > "iCloud Drive."
Step 2. On your computer, go to iCloud.com, sign in with the Apple ID you use on your iPad, and choose "iCloud Drive."
Step 3. Upload the videos to iCloud Drive and wait for the syncing process to finish.
Step 4. When it has been done, go to the Files app on your iPad to check the videos. You can either access the videos from iCloud directly to save your device storage or download the items to your iPad so you can watch them offline.
![How to put movies on iPad without iTunes using iCloud]()
Other than iCloud, there are other cloud storage services for you to share movies across your devices, like Dropbox, Google Drive, and more.
Read on to this place, which means you have already learned four solutions to put your desired movies on your iPad. If you find any of these helps, please share this article filled with detailed fixes with your friends and colleagues.
Method 4. Put Movies on iPad via Finder
Applies To: Mac running macOS Catalina and later
As mentioned above, iTunes has been officially discontinued since macOS Catalina. That's when Finder starts to take responsibility for data syncing and device backups.
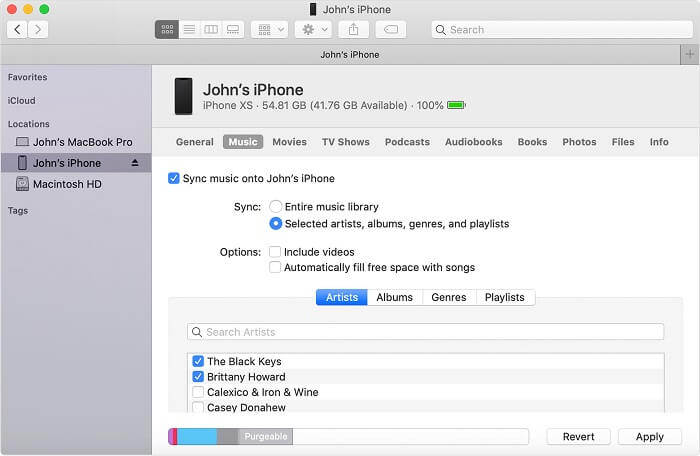
To sync movies to iPad via Finder:
Step 1. Open Finder and connect your iPad to the computer via a USB cable.
Step 2. Unlock your iDevice and trust the computer. If asked, enter your iPad passcode to continue.
Step 3. In Finder, choose your iPad and select "Movies."
Step 4. Check the "Sync movies onto [your iPad name]" option and select the files you want to transfer.
Step 5. Click "Apply" to start putting movies on your iPad.
![How to put movies on iPad via Finder on macOS Catalina]()
Bonus Tip: How to Download Movies to iPad Directly
Instead of transferring movies to your iDevice, you can also choose to download movies on your iPhone or iPad directly. With the Apple TV app, you can buy movies and TV shows, download them to your device for offline viewing, stream them, and watch them anywhere with the Apple TV app.
To download movies on iPad:
Step 1. Open the Apple TV app and tap on "Watch Now" > "Movies."
Step 2. Find and tap the movie you like, click the price, and choose "Purchase."
Step 3. After the purchase, you can play the movie as you like. If you want to, tap the download icon to download the movie to your device. By doing so, you can enjoy the video even when there is no Internet connection.
Step 4. If you need to find the video next time, go to the "Library" tab in the app.
The Bottom Line
Now you know how to put movies on iPad in different ways, either with or without iTunes, using a PC or Mac. Carry out the way you like best to add movies to your iPad within minutes.
How to Put Movies on iPad FAQs
1. Where are the movies stored on iPad?
If you have downloaded a file from the Internet, you can find it in the Files app.
- Open the Files app. You can easily open it by swiping down from the center of your Home screen and searching it.
- Tap the Browse tab > iCloud Drive > Downloads folder.
If you have downloaded a file from Safari:
- Go to the Page Settings next to the search box in Safari.
- Click on the Downloads button, and then you can see all your downloads.
2. How do I download movies from Netflix to my iPad?
Before you download movies, ensure your iPad is running iOS 9.0 or later, and you have to install the latest version of the Netflix app.
- Launch Netflix on your iPad, and tap Movies in the menu bar to limit your search results to movies only.
- Tap on the Download arrow below your selected movie. If you can't see the Download downward arrow, this means the movie can't be downloaded.
- Then, it starts to download to your iPad. When it is finished, click the Downloads button at the bottom of the screen, and then you can tap Play to watch it.
 NEW
NEW HOT
HOT