"I have an iPhone 6 and just upgraded to iOS 11 but I can't send iMessage now and I keep getting this activation error message on my phone. How can I fix iMessage not working in iOS 11? This is one of the highly reported problems of iOS 11 just like the flashlight not working in iOS 11, alarm and airdrop not working in iOS 11 troubling users seriously.
The reason for iOS 11 iMessage not working is difficult to pinpoint, it may be the poor internet connection, the carrier won't support the message you are sending or wrong configured settings. You can try following simple tips one by one to figure out the issue.
10 tips to fix iOS 11 iMessage not working on iPhone and iPad
iOS 11 iMessage not working may shows as the effects not working, bubble effects not appearing, screen effects not appearing or handwriting feature not working. No matter what the problem is, try to use following simple tips to troubleshoot.
1. Check the Apple's iMessage server is down or not
Although this rarely happens, the possibility does exist. If the iMessage server is down, no one can use the iMessage feature. You can go to the Apple official site to check the information.
2. Connect iPhone/iPad to a network
iMessage needs a data connection to the network, therefore, you need to make sure your iPhone has connected to a Wi-Fi (Wi-Fi not working in iOS 11?) or cellular network before you activate iMessage. Go to Settings > turn on WLAN or Cellular.
3. Reset iPhone/iPad network
If the network has been already on but you can't connect to the internet, you can fix this by resetting network. Go to Settings > General > Reset > Reset Network Setting.
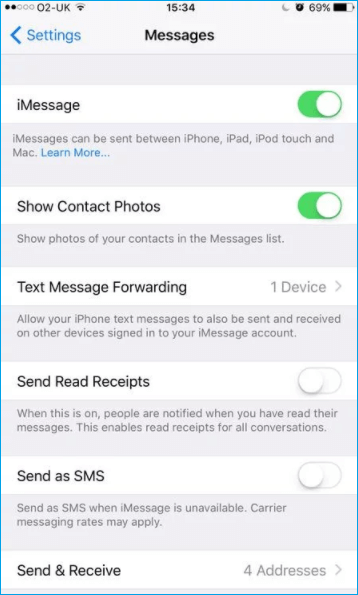
4. Make sure iMessage is set up and on
If you haven't turned on iMessage yet, you can't use it in any way. Go to Settings > Messages and checking that iMessage is turned on. Also, check that your phone is set up correctly to receive iMessages: go to Settings > Messages again and check the addresses and mobile number you have listed in Send & Receive.
![set up iMessage]()
5. Turn off/on iMessage and restart Messages
If the Message application is stuck, the iMessage will not be working. You can double-pressing the Home button and swipe up on the Message app to shut it down. After a few seconds, relaunch it to check the iMessage is OK or not.
6. Delete some messages
Too many messages will run out of iPhone space and make the system and application slow, which will cause iMessage not working. You can free up iPhone by deleting some useless messages or transfer messages from iPhone to PC by using a free iPhone data transfer software if you don't want to delete them directly by checking following download button.
If you want to delete messages: open your iPhone/iPad > turn on Messages > find the messages you want to remove > swipe left and choose Delete.
7. Update iPhone to the latest iOS version
iOS 11 as the first version of a new breakthrough, there are some small bugs along with inevitably, including iMessage not working issue. You can update your device to the latest iOS 11.0.3 now, which must provide the effective fixes for these bugs.
Go to Settings > General > Software Update to check if there is a new version available. And then download and install it on your iPhone.
8. Set Time Zone to Automatically
This tip does help some users with iMessage not working issue, it's worth trying. Go to Settings > General > Date & Time > turn on Set Automatically.
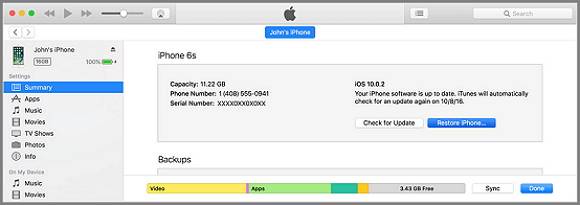
9. Reset and restore your iPhone/iPad
If fixes above can't fix the iOS 11 iMessage not working problem, you can consider resetting and restoring your device to the factory settings. Note: iPhone restoring will cause data loss, you'd better make a backup to the computer and then restore your device.
Go to Settings > General > Reset > Reset All Content and Settings.
![restore iPhone]()
10. Downgrade iOS 11 to iOS 10/10.3.3
Downgrading iOS 11 to iOS 10 is the final way if your device is out of date and can't work well with the latest iOS version. You can use EaseUS MobiXpert to help you download iOS to a lower version that Apple supports and enables the validation for that version.
Note that Apple has turned off the validation for some iOS versions for most of the relatively new models. And you can click here: IPSW Validation to see if your iPhone model is supported to downgrade to a lower version.
Step 1. Launch EaseUS MobiXpert on your computer. And select "System Repair" from the homepage.
![MobiXpert hompage]()
Step 2. Tap "iOS Upgrade/Downgrade" from the new interface.
![iOS Upgrade/Downgrade]()
Step 3. And then select the "iOS/iPadOS Downgrade" option.
![select iOS/iPadOS Downgrade]()
Step 4. Then you will be guided to connect your iPhone to the computer via a USB cable.
![Connect iPhone to computer]()
Step 5. Confirm your device model and then click "Next" to download the firmware for a downgrade.
![Download firmware]()
Step 6. When the firmware is verified, click "Upgrade Now" to start.
![Verify firmware]()
Step 7. Wait for the downgrade process to complete and click "Done" to close it. Then your iPhone will be downgraded.
![Downgrade completed]()
 NEW
NEW HOT
HOT