Are you frustrated with the "macOS could not be installed on your computer" error? Well, you are not the only one! Several users have reported this issue in Mac and seek to resolve it immediately.
| Workable Solutions | Step-by-step Troubleshooting |
|---|---|
| Fix 1. Verify and Repair Disk Issues | One of the best ways to resolve the installation error is to verify and repair disk issues...Full steps |
| Fix 2. Create a New macOS Installer | Another method is to re-download and create a new macOS installer...Full steps |
| Fix 3. Free Up Disk Space | The simplest solution to resolve the macOS Could Not Be Installed on Your Computer...Full steps |
| Fix 4. Check for Software Compatibility | Checking the compatibility between the device and the operating system is necessary...Full steps |
| More Fixes | The other 4 fixes are available here for you to follow, and fix macOS couldn't be installed...Full steps |
It is vital to understand that macOS updates take significant time. However, there are instances where the process cannot be completed, and the installation is halted midway. It doesn't mean that the installation has failed permanently. It is a temporary issue; users can resolve it by applying various methods.
In this article, we will talk about the different ways to resolve the "macOS could not be installed on your computer" error and the causes that lead to this issue.
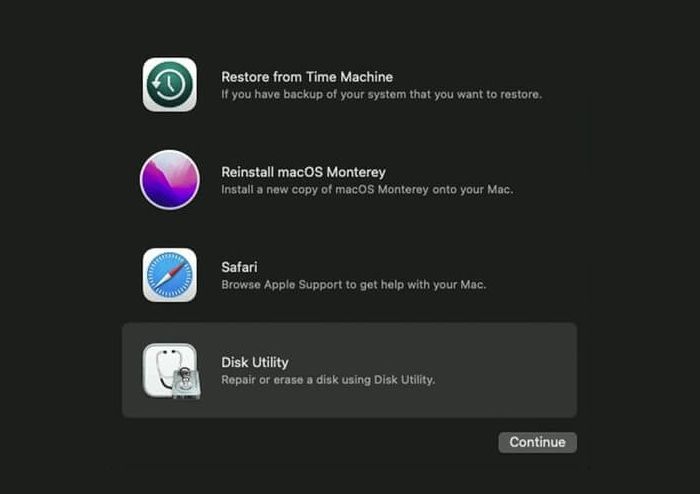
Method 1. Verify and Repair Disk Issues Using Disk Utility
One of the best ways to resolve the installation error is to verify and repair disk issues. For that, you can use the Disk Utility. Check out the steps here -
1. Accessing Disk Utility from macOS Recovery mode
To access Disk Utility from macOS Recovery mode, follow these steps –
Step 1. Shut down the system.
Step 2. Turn it on.
Step 3. Press the Command and R keys and hold them. Release these keys when you see the Apple logo. (For Intel-based Macs)
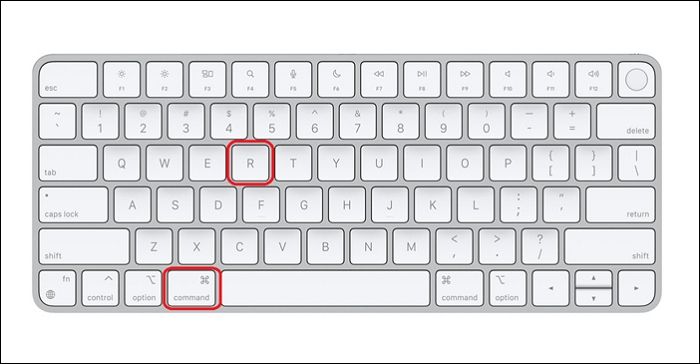
Press the power button and hold it. Release it when you come across the startup options window. Select Options and Continue. (For Silicon-based Macs)

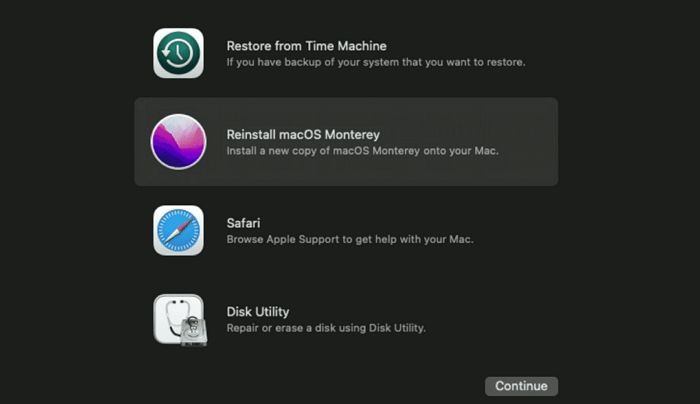
Step 3. On the macOS Utilities window, choose the Disk Utility option.
2. Checking and repairing disk errors
Now, you can check and repair disk errors. Here are the steps –
Step 1. Select "View".
Step 2. Choose "Show All Devices".
Step 3. You will see a list of Mac disks in the sidebar.
Step 4. Choose the disk you want to repair.
Step 5. Select the "First Aid" option.
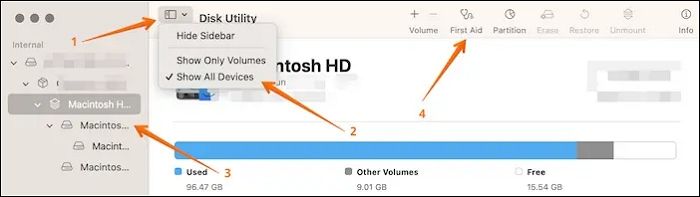
Step 6. Click "Run".
Step 7. Wait for the process to finish. Select "Done".
3. Formatting or resizing the disk if necessary
If needed, you can format or resize disks. Check out these steps –
Step 1. Select "View".
Step 2. Choose "Show All Devices".
Step 3. Select the disk you want to format.
Step 4. Select "Erase".
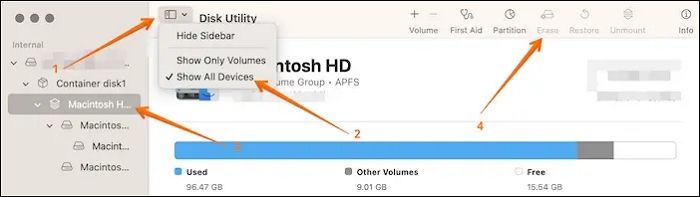
Step 5. Choose the Format pop-up menu.
Step 6. Select the file system format you want.
Step 7. Enter name.
Step 8. Select "Erase".
Step 9. Click "Done".
Method 2. Re-Download and Create a New macOS Installer
Another method is to re-download and create a new macOS installer. Read the section below to know more.
1. Steps to re-download the macOS installer
To re-download the macOS installer, here are the steps to follow –
Step 1. Go to the App Store.
Step 2. Click on your name at the bottom left-hand corner of the App Store. It will open the Purchased section.

Step 3. Here, you will see the macOS installer you want to re-download.

Create Monterey USB Installer on Mac
macOS Monterey was launched with several intriguing innovations, and you may wish to install macOS on your Mac. Read more >>
2. How to create a new bootable installer
Creating a bootable installer might seem complicated. You can check out these steps -
Step 1. Connect the USB flash drive.
Step 2. Go to Terminal on Mac.
Step 3. Type - sudo /Applications/Install\ macOS\ Ventura.app/Contents/Resources/createinstallmedia --volume /Volumes/MyVolume (here, you need to enter the name of the downloaded macOS.
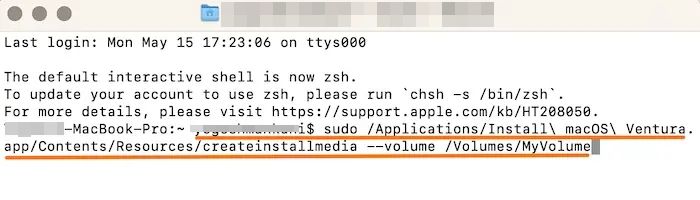
Step 4. Hit "Return".
Step 5. Type the admin password when asked.
Step 6. Type Y to erase the volume.
Step 7. Press "Return".
Step 8. When you see a pop-up asking permission to access files on the removable volume, click "OK".
Step 9. Quit the Terminal and disconnect the USB drive.
Method 3. Free Up Disk Space on the Target Drive
The simplest solution to resolve the "macOS Could Not Be Installed on Your Computer" error is to remove large files. Sufficient space on the disk is necessary for installation.
Identifying and removing large or unnecessary files
The process is straightforward. Follow these steps –
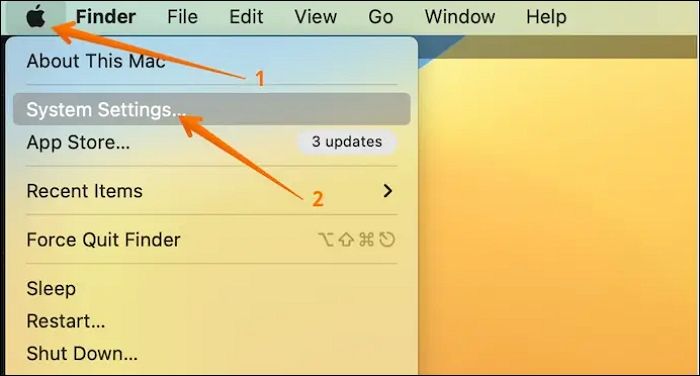
Step 1. Go to the Apple menu.
Step 2. Select System Settings.
Step 3. A new settings window will open, choose General option followed by Storage on the right-hand side.
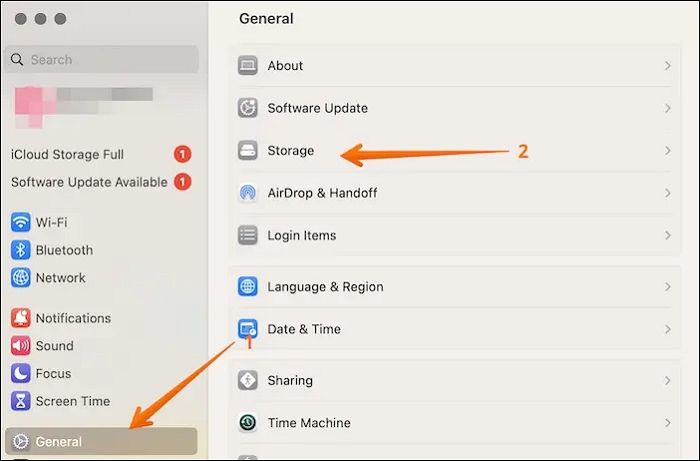
Step 4. Now, you can select the category you want and know more. Select what you want to delete.

Step 5. Click Delete.
Method 4. Check for Hardware and Software Compatibility
Checking the compatibility between the device and the operating system is necessary. Trying updates on a computer that cannot support it is futile.
1. Ensuring your Mac model supports the desired macOS version
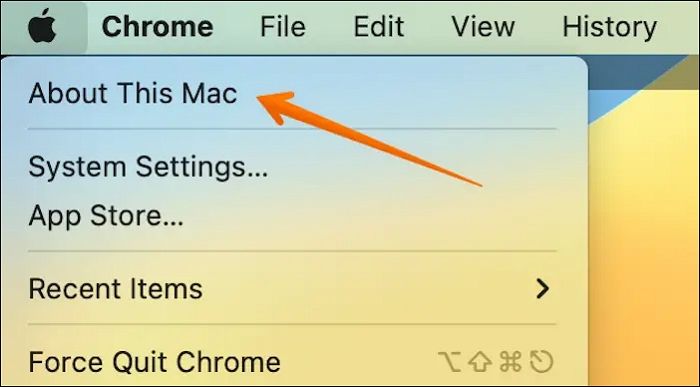
Go to the Apple menu to find out if your Mac model supports the desired macOS version. Select About This Mac. Here, you will see information about your device. Now, search online and get information about the updates that your model supports.
2. Updating or removing incompatible software before installation
Before installation, it is essential to either update or remove incompatible software. For updates, follow these steps –
Step 1. Go to the Apple menu.
Step 2. Select System Settings/System Preferences.

Step 3. Choose "Software Update".
Step 4. Here, you will find updates (if any)
To remove incompatible apps, check out these steps –
Step 1. Go to the Applications folder.
Step 2. Drag the software to Trash.
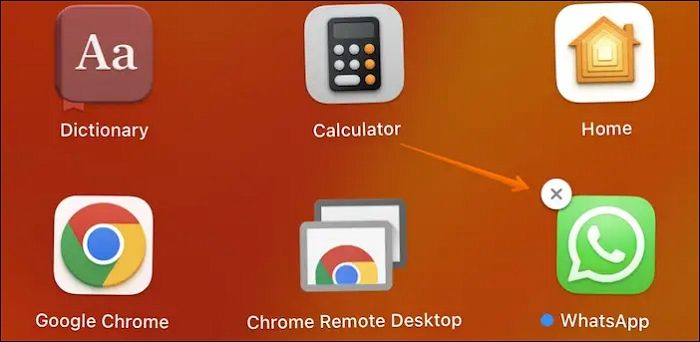
Step 3. You can also remove apps using Launchpad. Open "Launchpad".
Step 4. Select the software and hold it.
Step 5. Click on the X icon
| Here are the other 4 fixes |
| 5. Update Firmware and System Software |
| 6. Ensure the Correct Date and Time Settings |
| 7. Reset NVRAM/PRAM and SMC |
| 8. Perform a Clean Installation of macOS |
Method 5. Update Firmware and System Software
Checking firmware updates is an excellent solution to resolving the installation problem.
How to check for firmware updates
To check for firmware updates, you can follow these steps –
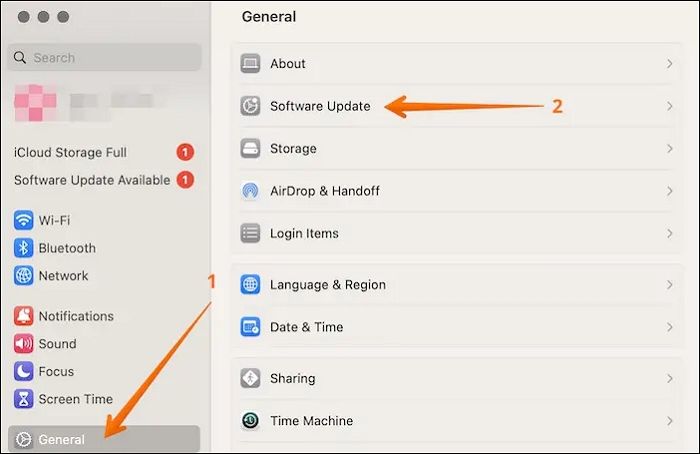
Step 1. Click on the "Apple menu".
Step 2. Choose "System Settings".
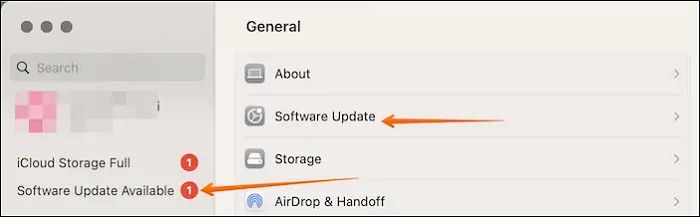
Step 3. Select "General".
Step 4. Go to "Software Update".
Method 6. Ensure the Correct Date and Time Settings
To check and modify the date and time in macOS Recovery mode, take a look at these steps –
Step 1. Enter the Recovery Mode.
Step 2. Go to Utilities.
Step 3. Open Terminal.
Step 4. Type the Date to check.
Step 5. If it is incorrect, type date {month}{day}{hour}{minute}{year}
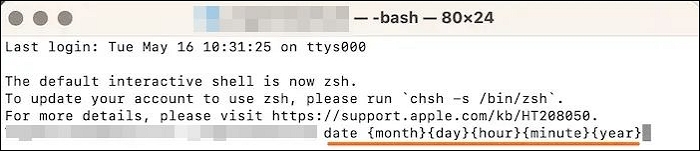
Step 6. Press Enter.
When an OS requests an update to the Apple servers for an update or the App Store does it, the client time is checked before the download starts. If the time stamp doesn't match, the installation fails.
Apart from this, there are checks for security certificates (incorrect time could mean the certificate is tampered with), synchronization, and compatibility issues.
Method 7. Reset NVRAM/PRAM and SMC
1. How to reset NVRAM/PRAM on Mac
To reset NVRAM/PRAM on Mac, follow these easy steps –
Step 1. Turn off the system.
Step 2. Press the power button.
Step 3. Press and hold Cmd, Option, P, and R keys simultaneously.
Step 4. Release the eyes when you hear the startup sound or the Apple logo appears and disappears for the second time.
2. How to reset SMC on different Mac models
To reset SMC on Macs with Apple T2 Security Chip, here are the steps –
Step 1. Turn off the system.
Step 2. Press the power button and hold it.
Step 3. Restart it.
Step 4. If it doesn't work, press the right Shift key, left Control key, and left Option key and hold them.
Step 5. At the same time, press and hold the Power button.
Step 6. Release the keys.
Step 7. Restart the system.

How to Reset NVRAM/PRAM on Your MacBook Pro/Air
Doing an NVRAM reset is one of the most effective Mac troubleshooting methods. when your MacBook has problems. Read more >>
Method 8. Perform a Clean Installation of macOS
There are various ways to conduct a clean installation of macOS. One of the methods is to do it via the Recovery Mode.
Step 1. Enter the Recovery Mode.
Step 2. Erase the Mac before reinstallation of macOS.
Step 3. Quit Disk Utility.
Step 4. Select Reinstall macOS from the utility window.
Causes of the "macOS Could Not Be Installed on Your Computer" Error
Multiple reasons explain the occurrence of the "macOS Could Not Be Installed on Your Computer" error. Let’s take a look -
-
💾Corrupted or incomplete macOS installer
Before the macOS installation, you need to download the installer. A damaged or corrupted installer can lead to this issue. An unstable internet connection can also be the cause of this error.
-
💽Insufficient disk space on the target drive
macOS updates need a massive amount of space. For that, you need to ensure sufficient space on the target drive. Lack of it can cause the error, stopping the installation in between.
-
⚙️Incompatible hardware or software
Compatibility of the system and operating system is of critical importance. If the hardware cannot support the update, users can get the "macOS Could Not Be Installed on Your Computer" error. For that, you can check the list of the models eligible for the update.
-
🗓️Incorrect date and time settings
You might be surprised but incorrect date and time can also cause this installation error. The ideal solution is to manually set the time and date and see if the issue is solved.
Recover Data from Corrupted macOS After Installing
"macOS Could Not Be Installed on Your Computer" is a common Mac error. And so is data loss. Surprised? You can indeed encounter data loss from a corrupted macOS after installation.
That is why it is critical to back up data before using any method to resolve the issue. However, if that is not something you have done, don't worry! There is another way to recover data. You can use professional data recovery software, EaseUS Data Recovery Wizard for Mac!
The EaseUS Data Recovery Wizard for Mac is a powerful data recovery software. Irrespective of the cause of the data loss, users can easily retrieve data. It boasts a user-friendly interface and is popular among both experts and beginners.
Highlights:
- Easy data recovery from Mac-based devices such as SSD, HDD, fusion drive, memory card, camera, etc.
- Recover lost photos on Mac, music files, videos, emails, documents, etc.
- Send retrieved data to various cloud storage services like Google Drive, Dropbox, etc.
- File filter feature to locate files you want to recover quickly.
Check out EaseUS Data Recovery Wizard for Mac today!
Conclusion
The "macOS Could Not Be Installed on Your Computer" error is frustrating. However, some reasons explain why this occurs. Incorrect date and time settings or an incomplete macOS installer could be the reasons—fortunately, several solutions aid in resolving the problem.
For starters, you can ensure there is enough space on the disk. You also need to make sure the time and data are correct. Other solutions include updating firmware, checking software and hardware compatibility, etc.
If data loss occurs, the best solution is to use a reliable data recovery tool. For that, you can check out EaseUS Data Recovery Wizard for Mac. It is user-friendly, powerful, and has a wide range of features. Recovering data is now simple and hassle-free!
macOS Could Not Be Installed on Your Computer FAQs
There are multiple methods you can adopt to resolve the installation error. To know more, read the questions and answers listed below -
1. How do you fix macOS that could not be installed on your computer?
There are various solutions to fix macOS that cannot be installed on your computer. For instance, you can restart the system and reinstall the macOS. You can free space on the target drive or reset the NVRAM and PRAM.
2. Why is my Mac saying macOS could not be installed?
Your Mac is saying macOS could not be installed due to multiple reasons. It could be due to lack of space on the drive, incorrect date and time, or corrupted macOS installer.
3. How do I force install macOS?
To force install macOS, follow these steps –
- Start the system in Recovery mode.
- Now, choose Reinstall for your macOS release.
- Select Continue and follow the instructions on the screen.
Was This Page Helpful?
Cedric Grantham is a senior editor and data recovery specialist of EaseUS. He mainly writes articles and how-to tips about data recovery on PC and Mac. He has handled 10,000+ data recovery cases and is good at data recovery of NTFS, FAT (FAT32 and ExFAT) file systems, and RAID structure reorganization.
Jaden is one of the editors of EaseUS who lives and works in Chengdu, China. She focuses on topics concerning PCs and Mac data recovery. Jaden is committed to enhancing professional IT knowledge and writing abilities. She is always keen on new and intelligent products.
Related Articles
-
How to Force Quit on Mac When Frozen [with 5 Proven Methods to Fix It]
![author icon]() Brithny/2024-01-11
Brithny/2024-01-11 -
Computer Powers On But Won't Boot - Causes & Fixes
![author icon]() Larissa/2024-03-15
Larissa/2024-03-15 -
How to Download and Install macOS 13 Ventura [Step by Step Navigation]
![author icon]() Dany/2024-01-11
Dany/2024-01-11 -
What Is Wake on LAN and How to Enable Wake on LAN in Windows 10
![author icon]() Daisy/2024-01-11
Daisy/2024-01-11

EaseUS Data Recovery Services
EaseUS data recovery experts have uneaqualed expertise to repair disks/systems and salvage data from all devices like RAID, HDD, SSD, USB, etc.