Did you get any notification showing "Mac startup disk full?" A startup drive is a one-type of volume on Mac's hard disk where the OS and other applications get installed by default. You may also preserve any extra applications and data on its startup drive.
| Workable Solutions | Step-by-step Troubleshooting |
|---|---|
| Fix 1. Empty Trash and Folder | Those files you have downloaded lately and those you deleted are in the trash bin...Full steps |
| Fix 2. Clean Up Caches | Clearing caches and temporary files help your Mac function swiftly...Full steps |
| Fix 3. Remove Old Backups | Backups usually consume maximum space on your MacBook...Full steps |
| More Fixes | The other 3 fixes are available here for you to follow and fix Mac startup disk full...Full steps |
The real name of the startup disk is Macintosh HD, which can be modified or altered according to your needs. Moreover, a complete startup disk error issue comes under two leading categories, where the older Macs show "startup disk full," and the newer ones show a "Your disk is almost full" message.
How to Fix Mac Startup Issues [6 Excellent Solutions Provided for Mac Users]
Moreover, a professional tool will help you retrieve all the files if you have lost your data while eradicating this error. Read more >>
How Mac Startup Disk Becomes Full
Every external and internal storage device on Mac has a fixed storage limit when the startup disk is employed to save any other apps and fresh data. The disk's size begins to get lowered and eventually demonstrates "Mac startup disk full." However, these are the major reasons listed below that trigger this error:
-
📄Temporary files and caches
Caches are created whenever a browser or an application conducts a particular task. These are known as system files. Similarly, caches are files, which implies they create a lot of system junk. They can cause the Mac startup disk to have total error whenever they accumulate a lot on Mac. Clearing caches on a Mac might solve the Mac startup problem.
-
📱Large files and applications
Your private documents probably occupy most of the space on your Mac's startup disc. Items like music, movies, pictures, and papers fall under this category. Most of these files can't be deleted, but you can clear up space on your Mac by removing them.
-
⌛Outdated backups
Outdated iOS backups are another reason that triggers this error. If those backups aren't required, you may delete them using the "About This Mac" window.
Are you willing to know what causes this "Mac startup disk full" and how to fix the startup disk full Mac won't start error? Before that, don't forget to mark this passage by sharing it on Facebook, Twitter, or SNS.
6 Fixes: How to Fix Mac Startup Disk Full
A few ways are there to fix this Mac startup disk total error, which depends on how the MacBook is used and what's consuming its storage space. Therefore, go through the 6 proven fixes below to eliminate unwanted files on your startup disk and boost the storage space.
Fix 1. Empty Trash and Downloads Folder
Those files you have downloaded lately and those you deleted end up in the trash bin of your MacBook for 30 days. Those deleted files can occupy enough space on your system's hard drive. Hence, it would be better to empty the Trash Bin and download the folder to make space available for other crucial data.
This is how you can delete download files from the download folder:
Step 1. Hold the Command key on your Mac's keyboard to access all the files. After that, hit the A key.
Step 2. Right-click on it and select the "Move to Bin" option.
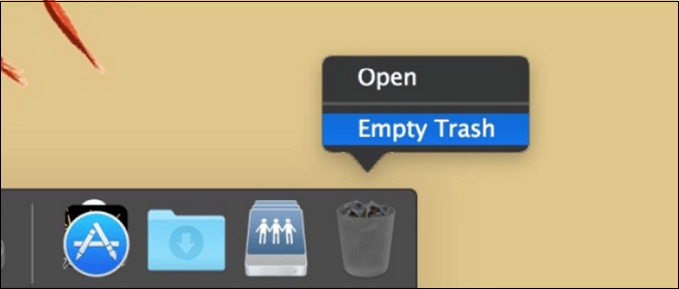
Follow the steps below to empty the trash bin:
Step 1. Hit the Dock's Control key and trash bin symbol, and opt for "Empty Trash".
Step 2. Open the trash folder on your Mac.
Step 3. Hit the "Empty" option located on the upper right side.
Fix 2. Clean Up Temporary Files and Caches
Clearing caches and temporary files help your Mac function swiftly. It's a great idea to keep deleting browser caches occasionally. These caches are located in the library folders, which can be spotted in these locations:
/Library/Caches
~/Library/Caches
In the second location, you will discover temporary files built by the system. But these files don't usually occupy excessive space. Moreover, in this ~/Library/Caches folder, a substantial number of service files can be seen, which are built when an app functions. Consequently, this folder might grow gradually in size.
Follow the steps below to remove caches on Mac:
Step 1. Open the Finder on your Mac.
Step 2. Head to the "Menu" bar, and hit "Go" > "Go to Folder".
Step 3. Type ~/Library/Caches in the dialogue box, and hit the "Go" option.
Step 4. The caches folder will be seen where all the apps store their cache files. You should keep that folder but remove the subfolders containing the app's cache files.


How to Clear Recents on Mac Without Losing Data
In this post, we'll review some practical methods for clearing Recent folders on a Mac. Read more >>
Fix 3. Remove Old Backups and Optimize Storage
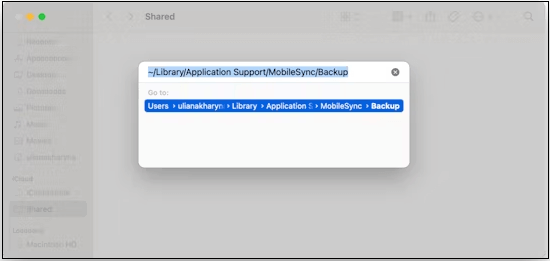
Backups usually consume maximum space on your MacBook. But you can find those outdated backups and remove them with the below-mentioned steps:
Step 1. Open the "Finder" window.
Step 2. Hit the "Go" in the menu bar.
Step 3. Opt for "Go to Folder."
Step 4. Type ~/Library/Application Support/MobileSync/Backup/ this command, and hit the return button.
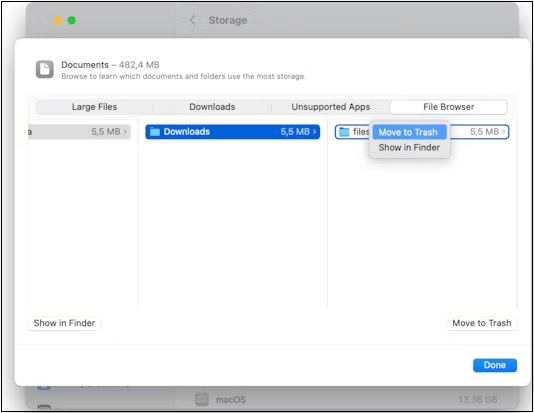
macOS has an easy-to-use tool named Optimized Storage, a built-in feature providing recommendations for freeing up space on Mac. Follow the steps below to optimize storage on Mac:
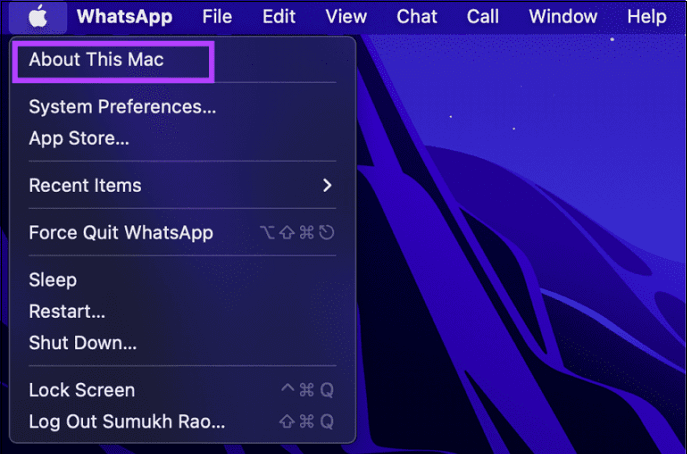
Step 1. Go to the Apple menu.
Step 2. Select "About This Mac."
Step 3. Opt for "More Info" > "Storage Settings".
Step 4. Recommendations can be seen under the storage bar; for example, automatically optimize storage, iCloud, and Empty Trash.
Fix 4. Find and Eliminate Duplicate Files
You might have downloaded some files twice or generated copies of documents and later forgotten to delete those extra copies. Duplicate files consume unnecessary space on your Mac. Hence, looking for duplicate files manually is a challenging process. But you may find and eliminate those files easily with the following steps:
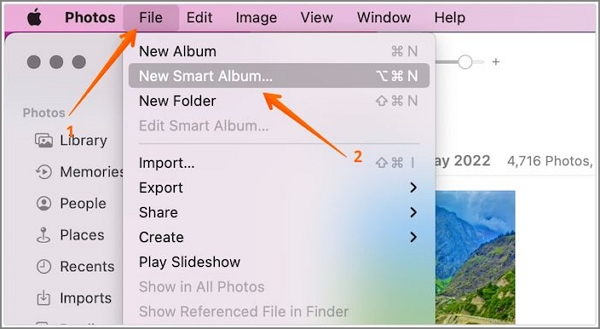
Step 1. Go to the music application. (If you find duplicate music files in the Music Library)
Step 2. Hit the "File" button after going to its menu.
Step 3. Opt for Library > Press Option (Alt) > Demonstrate Exact Duplicate Items.
The music application will demonstrate a long list of duplicate music files. All you need is to inspect the list and eliminate the duplicates.

[3 Workable Plans] Delete Duplicate Photos on Mac Without Software
Delete duplicate photos on Mac will free up the hard drive space. It is vital to delete them to keep your system functioning.
Fix 5. Use External Storage or Cloud Services
Your files probably occupy the majority of the space on the startup disc of your Mac. Music, movies, pictures, and documents are included in this. While you can't remove most of these files, you can clear up storage on your Mac by transferring them elsewhere. You can do these with the help of two methods:
- 📁Export these documents to a portable hard disc.
- ☁️Put these documents in a cloud storage platform like iCloud.
Follow the steps below to export files to an external storage device:
Step 1. You need to connect your external drive to your Mac.
Step 2. Drag the pertinent files onto that portable drive using Finder.
Step 3. Delete those from your Mac once Finder copies the files to the external storage.
Consider these steps to upload your files to iCloud Drive:
Step 1. Visit "System Preferences"> "Apple ID"> opt for "iCloud" from the sidebar.
Step 2. Ensure Desktop & Documents Folders are turned on in the iCloud Drive Options window.
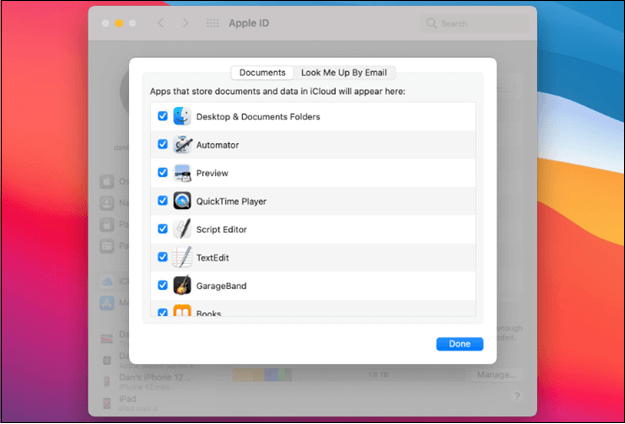
This will save up enormous storage on your Mac's startup disc by automatically uploading every file from your MacBook and Documents directories to iCloud Drive.
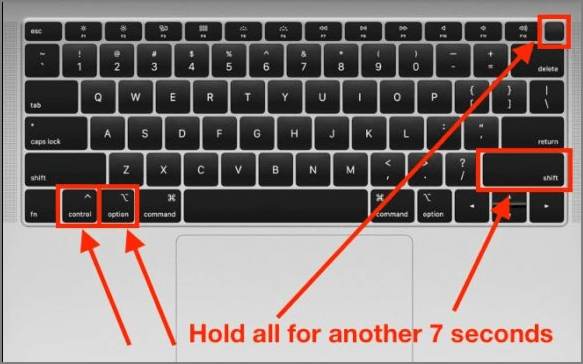
Fix 6. Restart your Mac and Check Storage Again
The Mac must be rebooted once you delete some unwanted files and empty the trash bin. This is especially true if it has been a while since the Mac was restarted, as doing so will often wipe up temporary archives and the /private/var/ cache directories that may gradually build up and clog a drive over time.
Additionally, restarting has the advantage of erasing sleep image archives and virtual memory, both of which consume disc space. Follow the steps below to restart your Mac:
Step 1. Hit the "Apple" icon, and select "Restart".
Step 2. When your Mac boots back up, you must return to the Apple symbol and select "About This Mac" and the storage tab to analyze your disk condition. Chances are favorable by now, as you should have dealt with the storage hogs and space wasters to eliminate the Mac startup disk full alert notification.
Extra Tip: How to Recover Deleted Caches and Files on Mac
According to certain users, the startup disk full Mac won't start error, causing problems with the Mac disc, and deleting the outdated files can result in an accidentally deleted file. Thus, users can experience data loss. But with the help of professional data recovery software, you can get back all those deleted files in a jiffy. EaseUS Data Recovery Wizard for Mac is a data retrieval tool that can recover every type of lost data from unforeseen deletion, emptied trash bins, and others.
This top-notch Mac file recovery system can help recover these items:
- 📸All missing photos will be recovered from SD card, memory card, USB drive, and hard drive using EaseUS Mac data recovery software.
- 🎥This tool helps recover camera videos, movies, TV shows, and other recordings.
- 🧳In addition to data recovery, what sets EaseUS Data Recovery Wizard apart from competitors is its ability to retrieve data from Time Machine or iTunes backups.
Download this professional data retrieval tool today!
Step 1. Launch EaseUS Software in Recovery Mode
Select "Utilities > Terminal" from the top menu, and enter the command sh <(curl https://d3.easeus.com/mac/boot.sh). Hit "Return". Wait for the application to open, and it will take several minutes.

Note: If the Terminal displays either "No such file or directory" or "Could not resolve host," you should verify that the command line you entered is correctly spelled, ensure your Mac has a stable internet connection, and confirm that your macOS version is not lower than macOS 10.15.
Step 2. Select the Volume on Your Mac Hard Drive
Select the volume where your lost data is stored, and click "Search for lost files". The EaseUS software will quickly locate all the recoverable data on the selected volume.

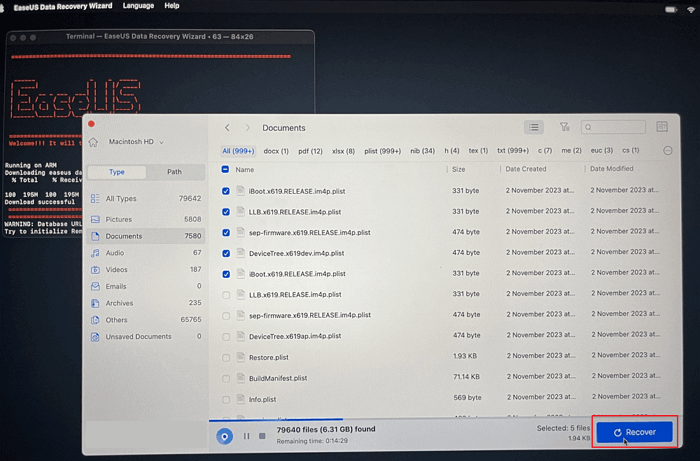
Step 3. Choose the Lost Data You Want
EaseUS software categorizes the scanned recoverable data by file type and storage path. Find the data you want by clicking "Type" or "Path" in the left panel. Then, check the boxes in front of the data you want to recover.

Step 4. Recover and Save Data on an External Disk
Click the "Recover" button, and a pop-up window will show up saying, "Please select a target location to save". Choose the external disk as the new storage location of your recovered data.
Final Words
You will never be worried about this Mac startup disk total error if you employ a Mac disk cleaner to automatically and daily clean up your Mac. Hopefully, these aforementioned fixes will aid you in cleaning up disk space and improving storage whenever required. In order to save your precious time, you may consider downloading EaseUS in case you have lost important data while clearing storage.
Mac Startup Disk Full FAQs
Consider the below-mentioned FAQs to understand the topic better:
1. How do I free up space on my Mac startup disk?
You may empty the trash and downloads folder or export the largest files to free up space on your Mac startup disk.
2. Why is the startup disk full on Mac?
When there isn't any more room on your disc, an alert notice states that your startup disc is almost full. This frequently happens when your Mac's hard drive is overburdened with files, severely depleting the available space.
3. Why does my Mac keep saying there is not enough disk space when there is?
It essentially refers to the space occupied by all the extra items that may be thrown out or turned into no-cost storage. Disabling iCloud drive optimization is one approach to increasing the amount of space that can be deleted. Activate iCloud by going to System Settings > Apple ID.
4. How do I delete files on my Mac when the disk is full?
You may move or delete downloads on Mac when the disk is full. You may access the downloads by starting Finder windows on your Mac and opening the "Downloads" folder. After that, you need to opt for files you're willing to remove, and lastly, you may right-click one of your chosen files and select "Move to Trash/Bin."
Was This Page Helpful?
Finley is interested in reading and writing articles about technical knowledge. Her articles mainly focus on file repair and data recovery.
Jaden is one of the editors of EaseUS who lives and works in Chengdu, China. She focuses on topics concerning PCs and Mac data recovery. Jaden is committed to enhancing professional IT knowledge and writing abilities. She is always keen on new and intelligent products.
Related Articles
-
How to Format SD Card for Switch [What Format You Need]
![author icon]() Tracy King/2024-03-21
Tracy King/2024-03-21 -
Top 8 Ways to Fix Kernel Mode Heap Corruption BSOD Error
![author icon]() Brithny/2024-02-26
Brithny/2024-02-26 -
How to Check RAM Health with Windows Memory Diagnostic Tool [Full Guide in 2024]
![author icon]() Daisy/2024-01-11
Daisy/2024-01-11 -
How to Fix Windows 11 23H2 Update Failure in 5 Ways
![author icon]() Oliver/2024-01-11
Oliver/2024-01-11

EaseUS Data Recovery Services
EaseUS data recovery experts have uneaqualed expertise to repair disks/systems and salvage data from all devices like RAID, HDD, SSD, USB, etc.