Imagine you have heard a lot about a particular web series and want to watch it, but it is unavailable for some location users. What will you do? By changing your DNS server. Changing your default DNS can allow you to get restricted content at your physical location. And think: If your Internet speed is so slow, you will feel like you are lagging behind the rest of the world.
Changing your DNS settings can significantly improve your Internet connection speed. In addition, there are various benefits to changing the DNS server of any device to get better functionality out of its features.
You need not be a developer or technician for the purpose. If you can use your device, you can do this as well. In this article, you will learn how to change the DNS on your device, whether you have a Windows, Mac, iPhone, or Android.
What Is DNS
DNS (commonly referred to as "DNS") is an internet phone book that connects web browsers to websites. Every Internet-connected device has its IP address. DNS allows you to load a website by typing a friendly domain name into their web browsers. It eliminates the need to remember the IP address for each website.
How Does DNS Work
DNS servers convert URLs and domain names into IP addresses that are easily understood by the machine that is your PC or any device connected to the Internet. Whenever you type anything into the browser's search bar, DNS servers convert it into machine language, which finds a dedicated web page.
How to Change DNS Settings
You can change DNS servers and use another server. Changing DNS is simple whether you use a Windows PC, Mac, iPhone, or Android. However, for every device, the method is slightly different for changing DNS. Here, we will discuss in detail "How to Change DNS" on various devices.
How to Change the DNS Settings in Windows 11
How to Change DNS Settings in Windows 10
How to Change DNS settings on Mac
How to Change the DNS on iPhone
How to Change DNS settings on Android
How to Change the DNS Settings in Windows 11
If you have Windows 11 on your device and want to change the DNS settings, here are some steps you should follow:
Step 1: Open "Settings" on your device.
Step 2: Click on "Network and Internet."
Step 3: Expand the Wi-Fi or Ethernet option with which you connect to the internet
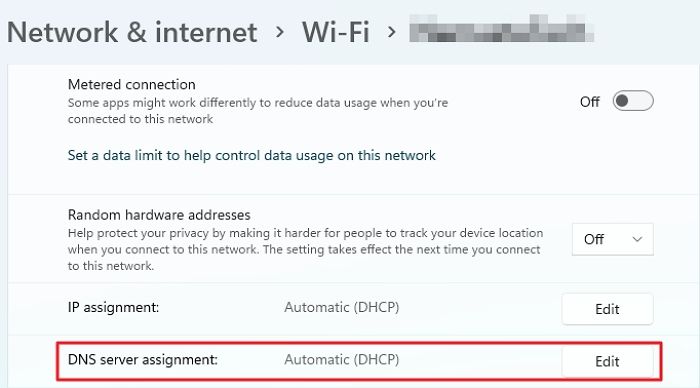
Step 4: Now click on the Edit button near "DNS Server Assignment" settings
Step 5: A drop-down menu appears; in it, select Manual
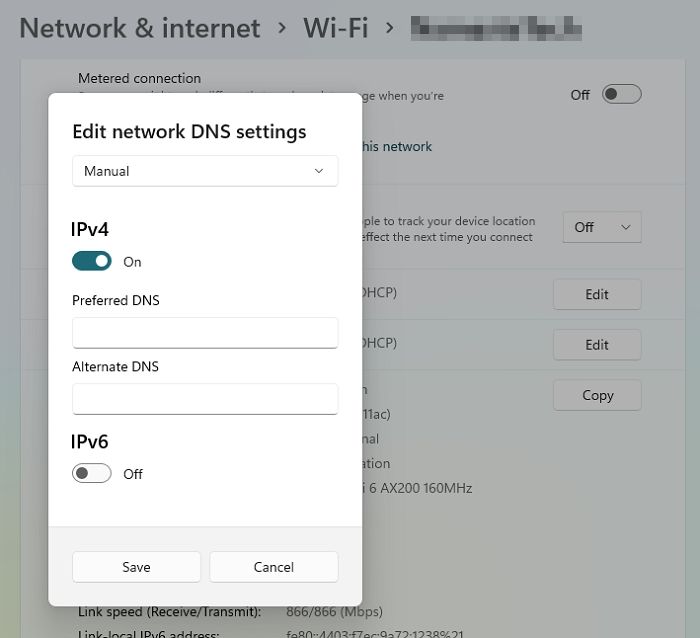
Step 6: Toggle on the IPv4 switch.
Step 7: In the Preferred DNS Settings, input any of the following DNS addresses
For example,
- Cloudflare: 1.1.1.1
- Google Public DNS: 8.8.8.8
- Open DN: 208.67.222.222
Step 8. Select any of the encryption options given below in the Preferred DNS encryption option
- Unencrypted only,
- Encrypted only (DNS over HTTPS),
- Encrypted preferred,
- Unencrypted allowed.
Step 9. Confirm the secondary DNS address in the "Alternate DNS" setting.
For example,
- Cloudflare: 1.0.0.1
- Google Public DNS: 8.8.4.4
- OpenDNS: 208.67.220.220
Step 10. You can also select an "Alternative DNS encryption" setting.
Step 11. Click on the 'Save' Button and restart your device.
If you have a Windows 10 OS, then the method is different.
How to Change DNS Settings in Windows 10
Most of the PCs come with Windows 10. If you have Windows 10 and want to know how to change DNS settings in Windows 10, here are some steps you must follow:
Step 1: Open Settings
Step 2: Go to Network and Internet.
Step 3: Click on Wi-Fi.
Here, you must select a connection that connects Windows 10 to theNetworkk.
Step 4: Press the Edit button below IP Settings.
Step 5: Now, a drop-down menu appears; select Edit IP Settings and then choose Manual
Step 6: Turn on the IP4 toggle.
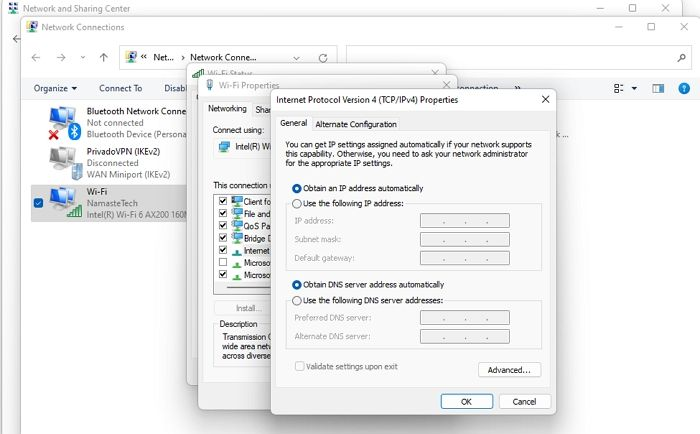
Step 7: Confirm the primary DNS address under the Preferred DNS server.
Step 8: Confirm the Secondary DNS Address below the Alternate DNS Server
Step 9: Click on the Save button and reboot your device
How to Change DNS settings on Mac
Changing DNS Settings on Mac is also easy-peasy.
Follow the steps given below to change DNS Settings on Mac.
Step 1: Head over to Apple Menu and select System Preferences
Step 2: Go to Network, click Advanced, and open the DNS tab.
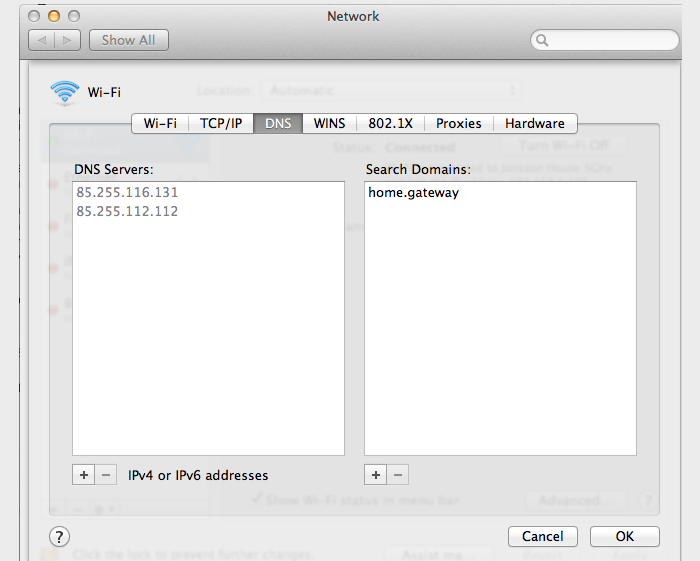
Step 3: Click on the + shaped icon to add a new DNS.
To use the Cloudflare DNS, use these DNS servers:
- 1.1.1.1
- 1.0.0.1
- 2602:4700:4700: :1111
- 2606:4700:4700: :1001
To use Google DNS, use these DNS servers:
- 8.8.8.8
- 8.8.4.4
- 2001:4860:4860: :8888
- 2001:4700:4700: :1001
Step 4: Now, click on the OK button and then select Apply to proceed with your action
Similarly, you can easily change DNS Settings on your iPhone if you have iPhone. For example, check out the following method below!
How to Change the DNS on iPhone
Changing DNS Settings on smartphones is relatively more straightforward than that on PCs.
Follow the steps given below to change DNS Settings on your iPhone:
Step 1: Go to 'Settings of the iPhone
Step 2: Open Wi-Fi and connect to a nearby wireless connection
Step 3: Tap on the connected Wi-Fi network
Step 4: Navigate to Configure DNS
Step 5: Select Static
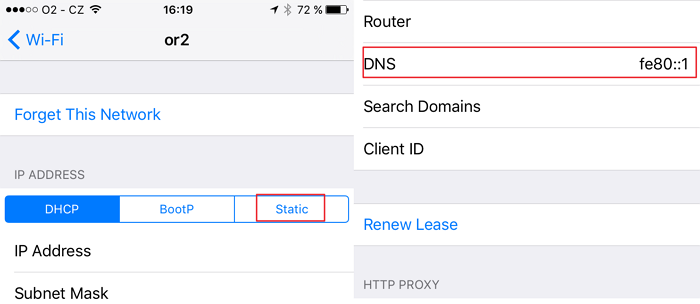
Now, you can delete the current DNS servers and input newer ones. You can use the following DNS servers to use Cloudflare DNS:
- 1.1.1.1
- 1.0.0.1
- 2606:4700:4700: : 1111
- 2606:4700:4700: : 1001
You can use the following DNS servers to use Google DNS.
- 8.8.8.8
- 8.8.4.4
- 2001:4860:4860: : 8888
- 2001:4860:4860: : 8844
- Afterward, tap on Save.
Now, the changes will be saved. You can even reboot your system for it to reflect the changes.
How to Change DNS settings on Android
When you are a smartphone user, there is a higher probability that you own an Android due to its comprehensive range of features. But it often happens that your default DNS would not work well. In such a scenario, changing DNS Settings will help you out!
Follow the steps given below to change DNS on Android 9 or later versions:
Step 1: Open your phone's Settings.
Step 2: Head overNetworkwork and internet
Step 3: Choose Private DNS and select the private DNS provider hostname.
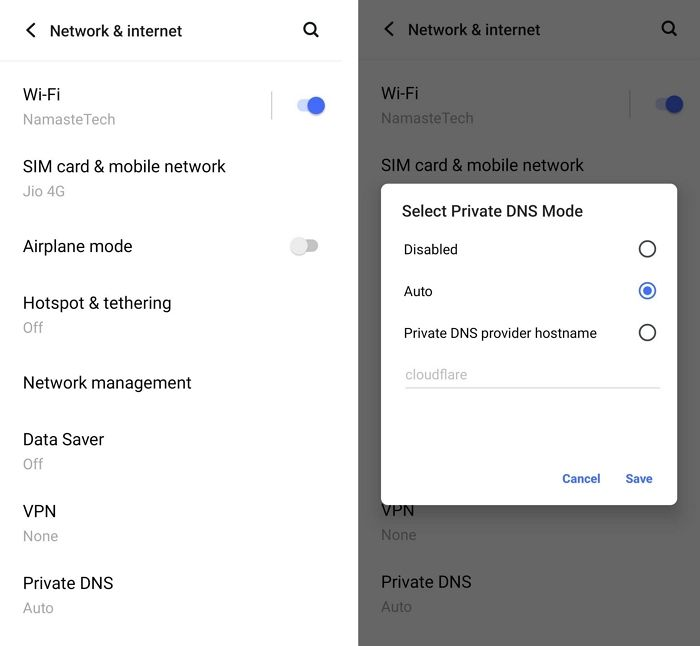
Step 4: Tap on Save to save all your settings.
Now, you have successfully changed your DNS and then the Settings.
Conclusion
Searching online without a DNS is a nightmare. DNS is a must to get results online. If it's not working, the system can be useless. The discussion provided instructions for configuring DNS on various devices.
You can select any method relevant to your system. Now we hope Networktwork will not disturb you while you do your work, and you can access any restricted website on your device with the new DNS server in the system. Happy Browsing!
Was This Page Helpful?
Daisy is the Senior editor of the writing team for EaseUS. She has been working at EaseUS for over ten years, starting as a technical writer and moving on to being a team leader of the content group. As a professional author for over ten years, she writes a lot to help people overcome their tech troubles.
Related Articles
-
How to Fix Windows 11 Updates Are Underway Stuck | 8 Ways
![author icon]() Jerry/2024-01-23
Jerry/2024-01-23 -
[8 Fixes] How to Fix Windows 10 File Sharing Not Working After Update 1803/1809/1903
![author icon]() Cedric/2024-01-11
Cedric/2024-01-11 -
[Solved!] How to Fix Windows 10 Activation Key Not Working
![author icon]() Jerry/2024-02-21
Jerry/2024-02-21 -
The Finals Save File Location - Everything You Need to Know
![author icon]() Larissa/2024-03-15
Larissa/2024-03-15

EaseUS Data Recovery Services
EaseUS data recovery experts have uneaqualed expertise to repair disks/systems and salvage data from all devices like RAID, HDD, SSD, USB, etc.