Featured Articles
- 01 How to Partition Hard Drive in Windows
- 02 How to Extend C Drive or Disk Partition in Windows 10
- 03 How to Merge/Combine Disk Partitions in Windows 10/8/7
- 04 How to Resize Partition Windows 11/10
- 05 How to Recover Deleted or Lost Disk Partition in Windows 10
- 06 How to Delete All Partitions on Windows 11/10/8/7
- 07 How to Hide a Partition or Show Hidden Disk Partitions
- 08 How to Merge Partitions in Windows 7
- 09 Best Hard Disk Partition Software/Tool
- 10 7 Top Best Free Disk Partition Software For Windows
| Workable Solutions | Step-by-step Troubleshooting |
|---|---|
| Show Hidden Partition in Windows 10 |
#1. EaseUS Free Partition Manager Software...Full steps #2. Disk Management...Full steps |
| Hide Partition in Windows 10/8/7 |
#1. EaseUS Free Partition Manager Software...Full steps #2. Disk Management...Full steps |
Are you looking for a tutorial on how to show hidden partition in Windows 10? Have you forgotten how to unhide a hidden partition when you need to use the stored data on it?
When you can't view a partition in File Explorer but can find it in Disk Management, the first thing you should check is that whether the disk partition is hidden or not. In Windows 10, 8, or 7. 3 causes can result in a hidden partition:
- Windows users set a partition as hidden which would be invisible to most ordinary users so to protect important data or files from being deleted, formatted, or lost due to unknown reasons.
- Partitions are hidden by a third-party program.
- Partitions are hidden by the manufacturer for system protection, such as Recovery Partition and OEM Partition.
If you want to unhide partitions on Windows 10/8/7, two simple and free methods are demonstrated here. Follow the guides to view hidden partition easily. Meanwhile, you can also learn how to hide partitions in vice versa.
Part 1. How to Show Hidden Partition in Windows 10 in 2 Ways
You can unhide and access hidden hard drive partitions by using a free partition manager or Disk Management.
1. How to Show Hidden Partitions in Windows 10 with Free Partition Manager Software
To find a hidden partition or partition your hard drive with a disk management program, EaseUS Partition Master Free will be a great choice. It helps you create, resize, clone, move, merge, and format partitions without any data loss.
To show hidden partition in Windows 10, download and run EaseUS Partition Master Free, then unhide partitions within seconds.
Option 1 - Hide Partition
- Right-click the partition, and choose "Advanced". Select "Hide" from the drop-down menu.
- Then you will see a window showing the notification. Read the instructions and click "Yes" to continue.
- Click the "Execute 1 Task(s)" button in the top-left corner. Then, click "Apply" to hide your partition.
Option 2 - Unhide Partition
- Right-click the partition you want to view and access. choose "Advanced" and select "Unhide" from the drop-down menu.
- Read the instructions and click "Yes" to continue.
- Click the "Execute 1 Task(s)" button in the top-left corner. Check the pending operations, then click "Apply" to unhide the partition on Windows 11/10/8/7.
In addition to unhiding partitions, EaseUS Partition Master provides other one-stop partition and disk management solutions for your Windows computer, for instances:
- Resize/move partitions (the Pro version allows to move space from D drive to C drive without deleting or formatting), create, format, delete, and merge partitions
- Copy and clone an entire disk to another even the target partition is smaller than the source
- Convert a logical partition to primary or primary partition to logical, FAT32 to NTFS partition, MBR disk to GPT, or GPT disk to MBR
- Completely wipe out all the data on the hard disk to prevent information from being leaked or recovered
This tool is multifunctional, isn't it? Don't hesitate to share this tool with your friends. To do so, click the buttons below to try.
2. How to Unhide Partitions with Disk Management
This method is quite simple, but you need to very careful while hiding the partition. Or false operation may get your partition deleted by mistake.
Step 1. Right-click on This PC/My Computer and click on "Manage".
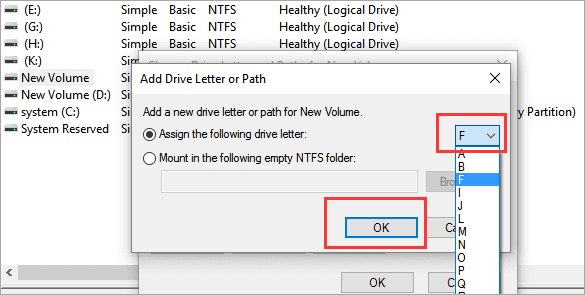
Step 2. Select the volume without a drive letter, the partition which you've hidden previously. Right-click it, select "Change Drive Letter and Paths...".
Step 3. Click "Add" to assign the drive letter for the partition to unhide it.
Step 4. Assign the drive letter for the hidden partition, such as F, and hit "OK". Then your hidden partition will show up in PC and work as a normal partition to store data for you again.
Part 2. How to Hide Partition in Windows 10/8/7
The opposite of unhiding partitions is hiding partitions. As mentioned before, sometimes you want to hide disk partitions for some purposes, but how? Here you'll have two methods to hide partitions in Windows 10, 8, or 7 computers: hide partition with EaseUS free partition manager software or hide partition with Disk Management.
1. How to Hide Partition with EaseUS Free Partition Manager Software
You can also apply EaseUS Partition Master Free to hide partition with easy clicks by following the steps below.
Option 1 - Hide Partition
- Right-click the partition, and choose "Advanced". Select "Hide" from the drop-down menu.
- Then you will see a window showing the notification. Read the instructions and click "Yes" to continue.
- Click the "Execute 1 Task(s)" button in the top-left corner. Then, click "Apply" to hide your partition.
Option 2 - Unhide Partition
- Right-click the partition you want to view and access. choose "Advanced" and select "Unhide" from the drop-down menu.
- Read the instructions and click "Yes" to continue.
- Click the "Execute 1 Task(s)" button in the top-left corner. Check the pending operations, then click "Apply" to unhide the partition on Windows 11/10/8/7.
2. How to Create Hidden Partition with Disk Management
Step 1. Right-click This PC/My Computer, select "Manage", and click "Disk Management".
Step 2. Select and right-click the partition that you want to hide and choose "Change Drive Letter and Path...".
Step 3. Click "Remove" and click "OK".
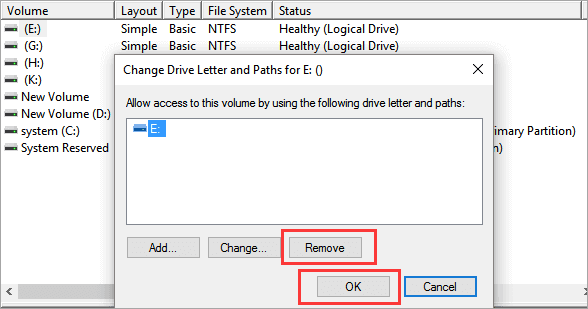
There, your partition will show as New Volume in Disk Management without a drive letter and will not show up in the File Explorer anymore.
Conclusion
Follow these simple guides; you can easily and effectively find hidden partition or hide disk partition on Windows 10. As a popular and user-friendly partition management tool, EaseUS Partition Master provides many useful functions to help you organize your disk, like resize/move/delete/format partition, disk copy, partition copy, repair MBR, create WinPE bootable disk (Pro version), and so on.
Download and try this disk management program to optimize your hard drive and improve computer performance.
FAQs About Hidden Partition Windows 10
The following are the top four highly relevant questions on how to show hidden partition in Windows 10. If you also have any of these problems, you can find the methods here.
How do I find a hidden partition on my hard drive?
You can find a hidden partition on your hard drive in two ways: using EaseUS Partition Master or applying Disk Management. Both solutions are quite simple.
How do I hide a partition in Windows 10?
Two methods are available for you to hide a partition in Windows 10, Windows 8, or Windows 7. Hide partition with Disk Management or EaseUS Partition Master. The operation is very simple and similar.
The difference is that this software gives you more comprehensive and more advanced disk management capabilities. For example, move free space from other partitions to target partition without deleting, clone bigger HDD to smaller SSD, convert logic partition to primary partition, or in the vice versa, etc.
How do I unhide a hidden drive?
You can access a hidden drive with the help of Disk Management:
Step 1. Right-click on This PC/My Computer and click on "Manage".
Step 2. Select the partition that you've hidden previously. Right-click it, select "Change Drive Letter and Paths...".
Step 3. Click "Add" to assign the drive letter for the partition to unhide it.
Step 4. Assign the drive letter for the hidden partition, and hit "OK".
How do I find hidden partitions in Windows 10?
To find hidden partitions on Windows 10, you can resort to EaseUS Partition Master is for help:
Step 1. Open EaseUS Partition Master, right-click the partition you want to unhide, and choose "Unhide" from the drop-down menu.
Step 2. Then you will see a window showing the notification. Check it and click "OK" to continue.
Step 3. Click the "Execute Operation" button in the top-right corner, check the changes, then click "Apply" to show your partition.
Was This Page Helpful?
Roxanne is one of the main contributors to EaseUS and has created over 200 posts that help users solve multiple issues and failures on digital devices like PCs, Mobile phones, tablets, and Macs. She loves to share ideas with people of the same interests.
Written by Tracy King
Tracy became a member of the EaseUS content team in 2013. Being a technical writer for over 10 years, she is enthusiastic about sharing tips to assist readers in resolving complex issues in disk management, file transfer, PC & Mac performance optimization, etc., like an expert.
Related Articles
-
Can't Extend C Drive in Windows 11? Here Is Why and How-to Fix
![author icon]() Tracy King/Apr 09, 2024
Tracy King/Apr 09, 2024 -
Can I Delete Dynamic Volume on GPT or MBR Disk? Your Guide Here [2024 Tutorial]
![author icon]() Tracy King/Apr 09, 2024
Tracy King/Apr 09, 2024 -
How to Format C Drive in Windows 11/10? [4 Efficient Ways]
![author icon]() Jean/Apr 09, 2024
Jean/Apr 09, 2024 -
Fix Genshin Impact Insufficient Storage Space | Best Ways 🏆
![author icon]() Roxanne/Apr 09, 2024
Roxanne/Apr 09, 2024