- Video Recovery
- SD Card Recovery
- Recycle Bin Recovery
- Recover Data from USB
- Recover Deleted Emails
- Hard Drive Not Showing Up in Windows
- Recover Unsaved Word Documents
- Recover Deleted Files in Windows 10
- Recover Files from Virus Infected Hard Drive
- Best Free Photo Recovery Software
- Recover Files from Formatted Hard Drive
Are you trying to revert or downgrade your new macOS or Mac OS X to the previous version on the Mac computer? If yes, stay here. Just follow the provided guidance below to bring your previous macOS or Mac OS X back without losing any data:
| Workable Solutions | Step-by-step Troubleshooting |
|---|---|
| Method 1. Use Time Machine | Start Mac and hold Command + R keys > Enter Recovery Mode > Insert Time Machine drive...Full steps |
| Method 2. Use USB Bootable Drive | Back up data first > Plug in USB and launch Disk Utility > Erase USB > Rename it as "My Volume"...Full steps |
| Bonus Tip. Recover Data | After reverting macOS or Mac OS X, run EaseUS Mac file recovery software > Scan and recover lost data ...Full steps |
Methods on this page can be applied to all Mac systems including the latest Big Sur, Catalina, Mojave, High Sierra, Sierra, and old Mac OS El Capitan, etc.
Tip: Backup Mac data before downgrading macOS or Mac OS X
It's highly recommended for you to back up all important Mac data first before you start downgrading Mac OS to an older system.
You can either choose third-party Mac backup software to back up Mac data to an external hard drive at once or choose Time Machine to back up all wanted data with ease.

Considering data security, it's also highly recommended for you to backup all important data into an external hard drive.
If you prefer to use Time Machine, here are the details:
- Click "Finder" > "Preference" > Check "Hard disks box" under Show these items on the desktop.
- Open the backup disk and create a file folder and name it, for example, "My Backup".
- Open the Mac disk and click "Users" file folder > Select all files and data that you want to back up and drag to the My Backup file folder.
Wait for the process to finish. After backing up all data, then you can start to revert macOS with ease. Here, you'll find two methods for you to downgrade macOS without losing data and you can choose either one as a guide.
Method 1. Downgrade macOS or Mac OS X with Time Machine
- Notice:
- This method applies to downgrade macOS: Big Sur to Catalina, Catalina to Mojave, Mojave to High Sierra, High Sierra to Sierra and downgrade Mac OS X: Yosemite to El Capitan, etc.
- This method is designed for those users who have used Time Machine to back up their Mac data including the Mac OS when it was running the previous old system.
So if you have created backups for your Mac data and macOS, follow the below steps for a guide. If you haven't created such a backup, please jump to Method 2 to downgrade Mac OS.
- 1. Start or restart your Mac and hold command + R keys to enter the Recovery Mode, or hold the Option/Alt and then choose the Recovery option.
- 2. Insert the hard drive used for Time Machine and choose to Restore from Time Machine Backup under OS X Utility, choose the inserted hard drive.
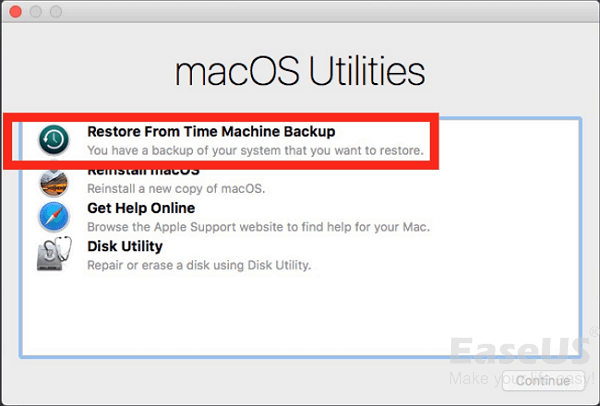
- 3. Choose the most recent data and time when the Mac was still running the current macOS.
- 4. Select the main disk drive where the backup was stored and it is usually named Macintosh HD. Click Restore.
Then all you need is to wait for the computer to restore and gain Yosemite again. It will usually take a few hours or all day long, depending on how much data need to be restored.
Method 2. Create USB Boot Drive and Revert Back to Old macOS or Mac OS X
This method is set for users who have no Time Machine backups. And if you have no backups of your current macOS or Mac OS, use Time Machine to back up your important data first and the system first.
Then follow the below steps to downgrade Mac OS now: (The ways to download new macOS and old Mac OS X are different. Make sure that you've followed the right guide for downgrading the Mac system.)
Downgrade macOS (e.g: Downgrade macOS Mojave to High Sierra)
- 1. Plug an external USB drive (with 16GB min), launch Disk Utility, and select the USB drive, click Erase.
- 2. Rename the USB drive as "MyVolume" and choose APFS or Mac OS Extended as the format, click Erase. Quit Disk Utility when the process is done.
3. To to Finder and launch Terminal, type: -sudo /Applications/Install\ macOS\ High\ Sierra.app/Contents/Resources/createinstallmedia --volume /Volumes/MyVolume --applicationpath /Applications/Install\ macOS\ High\ Sierra.app and hit Return.
- 4. Enter your Admin Password as required, wait until the process is done.
- 5. Restart the Mac, hold the Option key.
- 6. When the option to select a boot disk appears, choose the installer disk (the external USB drive) you created.
- 7. High Sierra will start the installing process. When it's finished, restart your Mac and the Startup Assistant will appear. Then go through the steps to set up your Mac.
If your Mac is shipped with Mojave, you can directly downgrade Catalina to Mojave with the below tips:
- 1. Restart Mac, hold Command + Option + Shift + R keys to boot into Recovery Mode. You can also press Command + R to enter the Recovery Mode.
- 2. Click on "Disk Utility", select the disk with Mojave installed, and click "Erase".
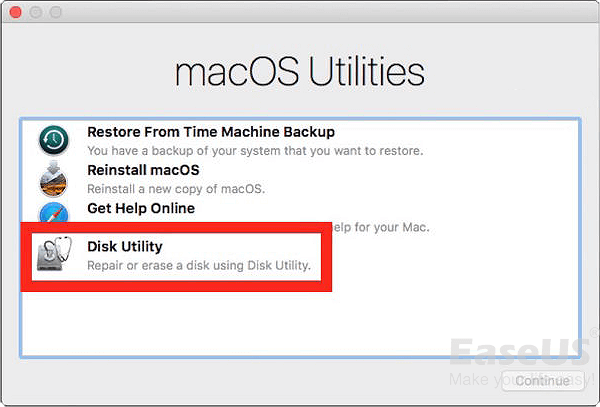
- 3. Rename the disk, select Mac OS Extended or APFS as the file format, click "Erase". Quick Disk Utility by then.
- 4. Re-enter the Recovery Mode, and select "Reinstall macOS" and press "Continue".
By doing so, the old High Sierra will be installed on your Mac automatically.
Downgrade Mac OS X (e.g: Downgrade Mac OS X Yosemite to El Capitan)
- 1. Download the OS X Yosemite installer from Mac App Store.
- 2. Download the Diskmaker X app to create a bootable USB drive for El Capitan's downgrade.
- 3. Insert a USB drive into Mac, launch Diskmaker X, and choose OS X Yosemite 10.10. Then the Diskmaker X will do the rest jobs for you.
- 4. Keep the USB drive inserted into the PC, restart Mac. Hole Option/Alt and chose USB drive in the menu while rebooting Mac.
- 5. Go to Utilities and select Disk Utility at the Install OS X menu.
- 6. Select Macintosh HD and choose Erase. Be sure that selected under the Format field is Mac OS Extended (Journaled).
- 7. Return to Install OS X menu and select Continue to begin the installation of OS X Yosemite.
- 8. After all these, all you need is to be patient in installing Yosemite on your Mac.
Bonus Tip: Restore Lost Data after Downgrading macOS/Mac OS X(without backups)
This method is for users who have forgotten to back up important data before downgrading Mac OS. And if you lost data after Mac OS reinstallation or downgrading, here is the solution - to restore lost data after Mac OS X downgrading or reinstallation with powerful Mac data recovery software.
EaseUS Mac data recovery software supports to restore whatever you lost in Mac and it's fully compatible with all Mac OS above 10.8
And if you happen to lost important data after Mac OS downgrading, let EaseUS Data Recovery Wizard for Mac help you out. Three steps will do all jobs.
Step 1. Search for lost files
Select the disk location to search for lost files (it can be an internal HDD/SSD or an external hard drive) where you lost data and files. Click the "Search for lost files" button.
Note: Before data recovery, you'd better click "Disk Backup" from the left sidebar to create a backup of your HDD/SSD to avoid further data loss. After backing up, the software can recover data from your disk backup, and you can use the HDD or SSD again.

Step 2. Go through the scanning results
This software will immediately scan your selected disk volume and display pictures, documents, audio, videos, and emails on the left pane.

Step 3. Select the file(s) and recover
Click the data to preview, and click the "Recover" button to have them back.

Was This Page Helpful?
Cedric Grantham is a senior editor and data recovery specialist of EaseUS. He mainly writes articles and how-to tips about data recovery on PC and Mac. He has handled 10,000+ data recovery cases and is good at data recovery of NTFS, FAT (FAT32 and ExFAT) file systems, and RAID structure reorganization.
Written by Tracy King
Tracy became a member of the EaseUS content team in 2013. Being a technical writer for over 10 years, she is enthusiastic about sharing tips to assist readers in resolving complex issues in disk management, file transfer, PC & Mac performance optimization, etc., like an expert.
-
EaseUS Data Recovery Wizard is a powerful system recovery software, designed to enable you to recover files you’ve deleted accidentally, potentially lost to malware or an entire hard drive partition.
Read More -
EaseUS Data Recovery Wizard is the best we have seen. It's far from perfect, partly because today's advanced disk technology makes data-recovery more difficult than it was with the simpler technology of the past.
Read More -
EaseUS Data Recovery Wizard Pro has a reputation as one of the best data recovery software programs on the market. It comes with a selection of advanced features, including partition recovery, formatted drive restoration, and corrupted file repair.
Read More
Related Articles
-
Fix Slow External Hard Drive on Mac
![author icon]() Jean/Feb 23, 2024
Jean/Feb 23, 2024 -
Photoshop Autosave Location on Mac: Where to Find Autosave Photoshop Files
![author icon]() Brithny/Feb 23, 2024
Brithny/Feb 23, 2024 -
WD Hard Drive Not Showing Up on Mac? Fix It with 7 Effective Ways
![author icon]() Brithny/Feb 23, 2024
Brithny/Feb 23, 2024 -
USB Data Recovery Mac [Restore USB Flash Drive]
![author icon]() Daisy/Feb 23, 2024
Daisy/Feb 23, 2024